In this guide, you’ll learn how to control the ESP32 board’s GPIOs using PWM (Pulse Width Modulation) with ESP-IDF (Espressif IoT Development Framework).
The ESP32 is a microcontroller that offers several General Purpose Input/Output (GPIO) pins. Most ESP32 GPIOs can be configured with the LEDC (LED Control) peripheral which allows to generate PWM signals to control an LED’s brightness or any other output devices that require a signal with duty cycle and frequency control.

Prerequisites
Before following this guide, you need to install the ESP-IDF extension on VS Code IDE (Microsoft Visual Studio Code). Follow the next guide to install it, if you haven’t already:
You will also need an ESP32 development board model of your choice.
ESP32 LEDC (LED Control)
In ESP-IDF, to generate PWM signals with the ESP32 GPIOs, you need to use the LEDC (LED Control) peripheral. The ESP32 offers up to 8 channels that can be configured with different duty cycles, frequencies and resolutions.
In a high level overview, in order to use LEDC it is necessary to configure the timer first by using ledc_timer_config(), and then configure the channels with ledc_channel_config(). This procedure ensures the PWM frequency is at the desired value. This process will be explained in more detail in the examples (you can also learn more in the official documentation).
The ESP32 has an LED PWM controller with 6 to 16 independent channels (depending on the ESP32 model) that can be configured to generate PWM signals with different properties. All pins that can act as outputs can be used as PWM pins (GPIOs 34 to 39 can’t generate PWM).
Learn more about the ESP32 GPIOs: ESP32 GPIO Reference Guide.
Creating an ESP-IDF Template App Project for the ESP32
The ESP-IDF extension provides an easy way to create a project from scratch with all the required files and configurations generated automatically.
To create a new ESP-IDF project on VS Code, follow these steps:
- Open the ESP-IDF Espressif extension
- Expand the “Advanced” menu
- Click the “New Project Wizard” option
- Choose the “Use ESP-IDF v5.4.1” to select the framework version

A new window opens, you need to fill in these fields:
- Project Name: type the desired project name;
- Enter Project Directory: click the folder icon and select the target folder to save all your project files. You can use any directory. Note: do NOT use a Google Drive / One Drive / Dropbox folder, because it will write/create many files during the building process—if it’s on a cloud folder, this process might be extremely slow;
- ESP-IDF Target: select the target device chip, I’m using an ESP32 with the esp32s3 chip;
- ESP-IDF Board: for the esp32s3 chip, I also need to select the configuration: ESP32-S chip (via builtin USB-JTAG);
- Serial Port: while having your ESP32 board connected to your computer, select the correct COM port number that refers to your ESP32;
- Choose Template: click the blue button to create a new project using a template.

In the menu, select the “ESP-IDF Templates” sample project and press the “Create project using template sample project” button.

Opening the ESP-IDF Project on VS Code
After a few seconds, a notification will appear on a new window on VS Code. You can click “Open Project” to open the newly created ESP-IDF sample project template.

IMPORTANT: if you didn’t see the notification that allows you to automatically open the ESP-IDF project on VS Code, you can easily do it by following these instructions:
Go to File > Open Folder…

Browse on your computer for the esp-idf-project folder (your project folder name that you’ve previously defined) and “Select Folder“.

That’s it! Your new ESP-IDF project template has been successfully created and opened.
ESP-IDF generates many files, folders, and subfolders for your project. For this guide, I recommend keeping all the default files unchanged; we will only modify the main.c file.
The example codes will be written in the main.c file. To open it, follow these instructions:
- Open the project explorer by clicking the first icon on the left sidebar.
- Select your project folder name, in my case it’s “ESP-IDF-PROJECT“.
- Expand the “main” folder.
- Click the “main.c” file.
- The default main.c template file loads in the code window.

Example #1: Control ESP32 LED’s Brightness with ESP-IDF LEDC (LED Control)
Here’s the full main.c code that controls the LED brightness using the ledc peripheral:
/*
  Rui Santos & Sara Santos - Random Nerd Tutorials
  https://RandomNerdTutorials.com/esp-idf-esp32-gpio-pwm-ledc/
*/
#include <stdio.h>
#include <freertos/FreeRTOS.h>
#include <freertos/task.h>
#include <driver/ledc.h>
#include "sdkconfig.h"

#define LED_PIN 5           // LED connected to GPIO 5
#define LEDC_CHANNEL LEDC_CHANNEL_0
#define LEDC_TIMER LEDC_TIMER_0
#define LEDC_MODE LEDC_LOW_SPEED_MODE
#define LEDC_DUTY_RES LEDC_TIMER_10_BIT // 10-bit resolution (0-1023)
#define LEDC_FREQUENCY 1000             // 1 kHz PWM frequency

void app_main(void)
{
    // Configure LEDC timer
    ledc_timer_config_t ledc_timer = {
        .speed_mode = LEDC_MODE,
        .duty_resolution = LEDC_DUTY_RES,
        .timer_num = LEDC_TIMER,
        .freq_hz = LEDC_FREQUENCY
    };
    ledc_timer_config(&ledc_timer);

    // Configure LEDC channel
    ledc_channel_config_t ledc_channel = {
        .gpio_num = LED_PIN,
        .speed_mode = LEDC_MODE,
        .channel = LEDC_CHANNEL,
        .timer_sel = LEDC_TIMER,
        .duty = 0
    };
    ledc_channel_config(&ledc_channel);

    // Fading loop
    while (1) {
        // Fade in
        for (int duty = 0; duty <= 1023; duty += 10) {
            ledc_set_duty(LEDC_MODE, LEDC_CHANNEL, duty);
            ledc_update_duty(LEDC_MODE, LEDC_CHANNEL);
            vTaskDelay(20 / portTICK_PERIOD_MS);
            printf("LED duty cycle: %d\n", duty);
        }
        // Fade out
        for (int duty = 1023; duty >= 0; duty -= 10) {
            ledc_set_duty(LEDC_MODE, LEDC_CHANNEL, duty);
            ledc_update_duty(LEDC_MODE, LEDC_CHANNEL);
            vTaskDelay(20 / portTICK_PERIOD_MS);
            printf("LED duty cycle: %d\n", duty);
        }
    }
}
How the Code Works
In this section, we’ll take a look at the code to see how it works.
Libraries
We start by including the required libraries:
- stdio.h – the standard C library will be used for the printf function that prints the debugging information in the serial monitor;
- FreeRTOS.h – provides the core FreeRTOS types and functions;
- task.h – allows to use of the non-blocking delay function vTaskDelay;
- driver/ledc.h – includes the functions required to configure timers and channels to generate PWM signals;
- sdkconfig.h – includes the project’s configuration file.
#include <stdio.h>
#include <freertos/FreeRTOS.h>
#include <freertos/task.h>
#include <driver/ledc.h>
#include "sdkconfig.h"
Pin Assignment
This line assigns the LED to GPIO 5; you can change it to a different number to match your board pinout or to control a different GPIO.
#define LED_PIN 5LEDC Configurations
Define the configurations for your LEDC channel, LEDC timer, mode, duty cycle resolution and frequency.
#define LEDC_CHANNEL LEDC_CHANNEL_0
#define LEDC_TIMER LEDC_TIMER_0
#define LEDC_MODE LEDC_LOW_SPEED_MODE
#define LEDC_DUTY_RES LEDC_TIMER_10_BIT  // 10-bit resolution (0-1023)
#define LEDC_FREQUENCY 1000                           // 1 kHz PWM frequency
app_main(void)
When creating an ESP-IDF project, this function will always be called to run. This function is where you need to write your code for any ESP-IDF applications; it is the equivalent of the setup() in Arduino programming. When the ESP32 boots, the ESP-IDF framework calls app_main.
void app_main(void)
{
    // your code goes here
}
In the app_main(void) function, you start by creating the ledc_timer with the mode, resolution, timer and frequency:
- speed_mode: use LEDC_LOW_SPEED_MODE (some ESP32 also support LEDC_HIGH_SPEED_MODE)
- duty_resolution: set the PWM resolution (for example: 10-bit gives a 0 to 1023 range)
- timer_num: select one of the available timers
- freq_hz: sets the PWM frequency (1 kHz can be used for LEDs)
// Configure LEDC timer
ledc_timer_config_t ledc_timer = {
    .speed_mode = LEDC_MODE,
    .duty_resolution = LEDC_DUTY_RES,
    .timer_num = LEDC_TIMER,
    .freq_hz = LEDC_FREQUENCY
};
ledc_timer_config(&ledc_timer);
Then, call the ledc_channel_config(&ledc_channel) function to configure the LEDC channels with the GPIO number, mode, channel, timer and duty cycle.
- gpio_num: assign the GPIO pin connected to the LED
- speed_mode: use LEDC_LOW_SPEED_MODE (some ESP32 also support LEDC_HIGH_SPEED_MODE)
- channel: assign an available channel (example: LEDC_CHANNEL_0)
- timer_sel: assign the channel to the configured timer
- duty: set the initial duty cycle (example: 0 = off and 1023 = full brightness for 10-bit range)
// Configure LEDC channel
ledc_channel_config_t ledc_channel = {
    .gpio_num = LED_PIN,
    .speed_mode = LEDC_MODE,
    .channel = LEDC_CHANNEL,
    .timer_sel = LEDC_TIMER,
    .duty = 0
};
ledc_channel_config(&ledc_channel);
The while(1) runs an infinite loop that keeps the LED fading in and fading out creating a dimming LED effect.
while (1) {
    // Fade in
    for (int duty = 0; duty <= 1023; duty += 10) {
        ledc_set_duty(LEDC_MODE, LEDC_CHANNEL, duty);
        ledc_update_duty(LEDC_MODE, LEDC_CHANNEL);
        vTaskDelay(20 / portTICK_PERIOD_MS);
        printf("LED duty cycle: %d\n", duty);
    }
    // Fade out
    for (int duty = 1023; duty >= 0; duty -= 10) {
        ledc_set_duty(LEDC_MODE, LEDC_CHANNEL, duty);
        ledc_update_duty(LEDC_MODE, LEDC_CHANNEL);
        vTaskDelay(20 / portTICK_PERIOD_MS);
        printf("LED duty cycle: %d\n", duty);
    }
}
Set the LEDC_CHANNEL duty cycle to the value stored in duty and apply it to your LED (example: 0 = off and 1023 = full brightness for 10-bit range).
ledc_set_duty(LEDC_MODE, LEDC_CHANNEL, duty);
ledc_update_duty(LEDC_MODE, LEDC_CHANNEL);
Then, add a delay of 20 milliseconds, so the LED is brightness is incremented to create a fading in effect.
vTaskDelay(20 / portTICK_PERIOD_MS);Inside the infinite loop, you print a message saying “LED duty cycle:” in the Serial Monitor/Terminal tab to see the current duty cycle that was applied.
printf("LED duty cycle: %d\n", duty);A similar process is repeated to fade out the LED.
Build and Flash Code to the ESP32 Board
To build and flash ESP-IDF code to the ESP32, you always need to follow this procedure. You need to select the flash method (UART), the COM port number, the target device (ESP32), build the code, and finally, flash it to the board. All these commands are available in the bottom menu bar of VS Code.
Make sure all your options are correct (they may already be properly configured if you used the project wizard).

However, if your setup is not correct, follow the next instructions to ensure everything is set up correctly. First, click the “Star” icon and select the flash method as UART.

While the ESP32 board is connected to your computer, click the COM Port (plug icon) and select the correct port number that refers to your ESP32.

You also need to select the target device. Click on the chip icon at the bottom bar. In my case, I have an ESP32 with the esp32s3 chip.

For this board, I also need to select the configuration: ESP32-S chip (via builtin USB-JTAG).

Finally, your command bar on the bottom of VS Code should have similar options selected.
Now, you can build the project by clicking the wrench icon (Build Project) as shown in the image below.

The first time you build a project, it usually takes a bit more time. Once completed, it should print a similar message in the Terminal menu and show a “Build Successfully” message.

This is the final step. You can now flash the ESP-IDF project to the ESP32 by clicking the “Flash Device” button (thunder icon).

Depending on your board, you might need to hold down the on-board BOOT button on your ESP32 to put into flashing mode. Once the process is completed, it will pop-up a info message saying “Flash Done“.

Demonstration
If you followed all the steps, the code example should be running successfully on your board. Open your Terminal window — click the “Monitor Device” tool that is illustrated with a screen icon.

The terminal should be printing a message saying “LED duty cycle: 1023” and it will increment/decrement from 0 to 1023. This process is repeated indefinitely.

You should have an LED that increases and decreases its brightness.

Example #2: Control Multiple LEDs’ Brightness with ESP-IDF LEDC
Here’s the full main.c code that controls the brightness of 2 LEDs at different speeds:
/*
  Rui Santos & Sara Santos - Random Nerd Tutorials
  https://RandomNerdTutorials.com/esp-idf-esp32-gpio-pwm-ledc/
*/
#include <stdio.h>
#include <freertos/FreeRTOS.h>
#include <freertos/task.h>
#include <driver/ledc.h>
#include "sdkconfig.h"

#define LED_PIN_1 4
#define LED_PIN_2 5
#define LEDC_CHANNEL_0 LEDC_CHANNEL_0
#define LEDC_CHANNEL_1 LEDC_CHANNEL_1
#define LEDC_TIMER_0 LEDC_TIMER_0
#define LEDC_MODE LEDC_LOW_SPEED_MODE
#define LEDC_DUTY_RES LEDC_TIMER_10_BIT  // 10-bit resolution (0-1023)
#define LEDC_FREQUENCY 1000              // 1 kHz for smooth fading

void app_main(void)
{
    // Configure LEDC timer (one timer for all channels)
    ledc_timer_config_t ledc_timer = {
        .speed_mode = LEDC_MODE,
        .duty_resolution = LEDC_DUTY_RES,
        .timer_num = LEDC_TIMER_0,
        .freq_hz = LEDC_FREQUENCY,
    };
    ledc_timer_config(&ledc_timer);

    // Configure LEDC channels
    ledc_channel_config_t ledc_channel_0 = {
        .gpio_num = LED_PIN_1,
        .speed_mode = LEDC_MODE,
        .channel = LEDC_CHANNEL_0,
        .timer_sel = LEDC_TIMER_0,
        .duty = 0
    };
    ledc_channel_config(&ledc_channel_0);

    ledc_channel_config_t ledc_channel_1 = {
        .gpio_num = LED_PIN_2,
        .speed_mode = LEDC_MODE,
        .channel = LEDC_CHANNEL_1,
        .timer_sel = LEDC_TIMER_0,
        .duty = 0
    };
    ledc_channel_config(&ledc_channel_1);

    // Fading loop
    int duty1 = 0, duty2 = 0;
    int step1 = 10, step2 = 20;
    while (1) {
        // LED 1: slow fade
        duty1 += step1;
        if (duty1 > 1023) {
            duty1 = 1023;
            step1 = -step1;
        } else if (duty1 < 0) {
            duty1 = 0;
            step1 = -step1;
        }
        ledc_set_duty(LEDC_MODE, LEDC_CHANNEL_0, duty1);
        ledc_update_duty(LEDC_MODE, LEDC_CHANNEL_0);

        // LED 2: fast fade
        duty2 += step2;
        if (duty2 > 1023) {
            duty2 = 1023;
            step2 = -step2;
        } else if (duty2 < 0) {
            duty2 = 0;
            step2 = -step2;
        }
        ledc_set_duty(LEDC_MODE, LEDC_CHANNEL_1, duty2);
        ledc_update_duty(LEDC_MODE, LEDC_CHANNEL_1);

        printf("LED #1 duty cycle: %d, LED #2 duty cycle: %d\n", duty1, duty2);
        vTaskDelay(20 / portTICK_PERIOD_MS);
    }
}
How the Code Works
Libraries
We start by including the required libraries as shown in the previous example:
#include <stdio.h>
#include <freertos/FreeRTOS.h>
#include <freertos/task.h>
#include <driver/ledc.h>
#include "sdkconfig.h"
Pin Assignment
This line assigns the 2 LED pins to GPIO 4 and GPIO 5.
#define LED_PIN_1 4
#define LED_PIN_2 5
LEDC Configurations
Then, define the configurations for your LEDC channel, LEDC timer, mode, duty cycle resolution and frequency.
#define LEDC_CHANNEL_0 LEDC_CHANNEL_0
#define LEDC_CHANNEL_1 LEDC_CHANNEL_1
#define LEDC_TIMER_0 LEDC_TIMER_0
#define LEDC_MODE LEDC_LOW_SPEED_MODE
#define LEDC_DUTY_RES LEDC_TIMER_10_BIT  // 10-bit resolution (0-1023)
#define LEDC_FREQUENCY 1000              // 1 kHz for smooth fading
app_main(void)
In the app_main(void) function, you need to create only one ledc_timer that will be used by the two channels to set the mode, resolution, timer and frequency:
- speed_mode: use LEDC_LOW_SPEED_MODE (some ESP32 also support LEDC_HIGH_SPEED_MODE)
- duty_resolution: set the PWM resolution (for example: 10-bit gives a 0 to 1023 range)
- timer_num: select one of the available timers
- freq_hz: sets the PWM frequency (1 kHz can be used for LEDs)
// Configure LEDC timer
ledc_timer_config_t ledc_timer = {
    .speed_mode = LEDC_MODE,
    .duty_resolution = LEDC_DUTY_RES,
    .timer_num = LEDC_TIMER,
    .freq_hz = LEDC_FREQUENCY
};
ledc_timer_config(&ledc_timer);
Then, call the ledc_channel_config(&ledc_channel_0) and ledc_channel_config(&ledc_channel_1) functions to configure the LEDC channels with the GPIO number, mode, channel, timer and duty cycle.
- gpio_num: assign the GPIO pin connected to the LED
- speed_mode: use LEDC_LOW_SPEED_MODE (some ESP32 also support LEDC_HIGH_SPEED_MODE)
- channel: assign an available channel (example: LEDC_CHANNEL_0)
- timer_sel: assign the channel to the configured timer
- duty: set the initial duty cycle (example: 0 = off and 1023 = full brightness for 10-bit range)
ledc_channel_config_t ledc_channel_0 = {
    .gpio_num = LED_PIN_1,
    .speed_mode = LEDC_MODE,
    .channel = LEDC_CHANNEL_0,
    .timer_sel = LEDC_TIMER_0,
    .duty = 0
};
ledc_channel_config(&ledc_channel_0);

ledc_channel_config_t ledc_channel_1 = {
    .gpio_num = LED_PIN_2,
    .speed_mode = LEDC_MODE,
    .channel = LEDC_CHANNEL_1,
    .timer_sel = LEDC_TIMER_0,
    .duty = 0
};
ledc_channel_config(&ledc_channel_1);
The while(1) runs an infinite loop that keeps the 2 LEDs fading in and fading out creating a dimming LED effect at different speeds.
// Fading loop
int duty1 = 0, duty2 = 0;
int step1 = 10, step2 = 20;
while (1) {
    // LED 1: slow fade
    duty1 += step1;
    if (duty1 > 1023) {
        duty1 = 1023;
        step1 = -step1;
    } else if (duty1 < 0) {
        duty1 = 0;
        step1 = -step1;
    }
    ledc_set_duty(LEDC_MODE, LEDC_CHANNEL_0, duty1);
    ledc_update_duty(LEDC_MODE, LEDC_CHANNEL_0);

    // LED 2: fast fade
    duty2 += step2;
    if (duty2 > 1023) {
        duty2 = 1023;
        step2 = -step2;
    } else if (duty2 < 0) {
        duty2 = 0;
        step2 = -step2;
    }
    ledc_set_duty(LEDC_MODE, LEDC_CHANNEL_1, duty2);
    ledc_update_duty(LEDC_MODE, LEDC_CHANNEL_1);

    printf("LED #1 duty cycle: %d, LED #2 duty cycle: %d\n", duty1, duty2);
    vTaskDelay(20 / portTICK_PERIOD_MS);
}
Schematic Diagram
Here’s a list of the parts you need to build the circuit:
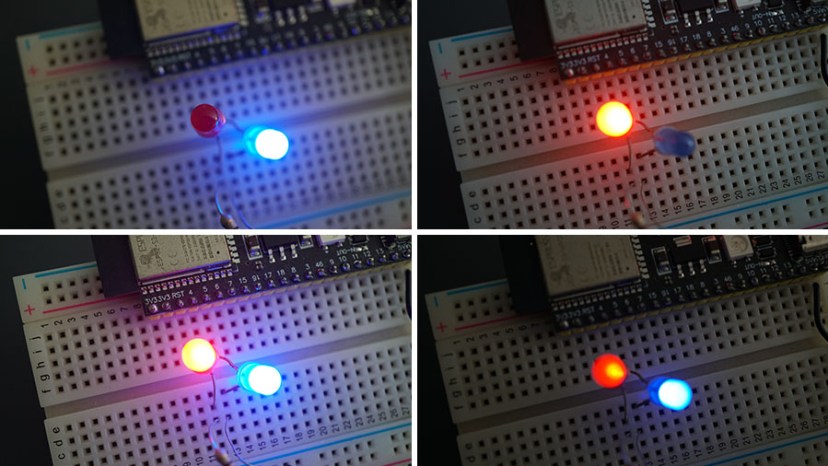
Connect 2 LEDs to GPIO 4, and GPIO 5 as shown in the schematic diagram below.

The terminal should be printing a message saying “LED #1 duty cycle: 1023, LED #2 duty cycle: 700” and it will increment/decrement from 0 to 1023. This process is repeated indefinitely.

You can build and flash the code into your ESP32. This code fades in and out the 2 connected LEDs continuously at different speeds.
Wrapping Up
In this tutorial, you learned how to program the ESP32 with the ESP-IDF framework using VS Code to generate PWM signals to control the ESP32 GPIOs.
Other ESP-IDF guides:
- Programming ESP32 with ESP-IDF using VS Code – Getting Started Guide
- ESP-IDF: ESP32 Blink LED Example (VS Code)
- ESP-IDF: ESP32 GPIO – Control Digital Outputs
- ESP-IDF: ESP32 GPIO – Read Digital Inputs
- ESP-IDF: ESP32 GPIO – Read Analog Input (ADC – Analog to Digital Converter)
Meanwhile, you can check our ESP32 resources (with Arduino IDE) to learn more about the ESP32 board:
Thanks for reading.


I always enjoy reading your tutorials, and I always learn something from them.
Thank You
Nice work Rui and Sara!
These tutorials in ESP-IDF and FreeRTOS in Arduino IDE are amazing!
Thank you!
Thanks for your feedback.
Regards,
Sara