In this tutorial, you’ll learn how to build an ESP32 web server to serve files from a microSD card using a microSD card module that communicates using SPI protocol. You’ll learn how to serve your HTML, CSS, JavaScript files, images, and other assets saved on the microSD card. This can be especially useful if your files are too big to fit on the filesystem (SPIFFS), or it can also be more convenient depending on your project. To build the web server, we’ll use the ESPAsyncWebServer library.

If you want to build a web server with files from SPIFFS, follow the next tutorial instead:
Project Overview
To show you how to build a web server with files from a microSD card, we’ll build a simple HTML page that displays some text formatted with CSS. We’ll also serve a favicon. The following image shows the web page we’ll serve:

- The web server is built using the ESPAsyncWebServer library;
- The HTML, CSS, and favicon files are saved on the microSD card;
- The microSD card communicates with the ESP32 via SPI communication protocol;
- When the client makes a request to the ESP32, it serves the files saved on the microSD card;
- You can apply what you’ll learn here to any web server project that you are working on.

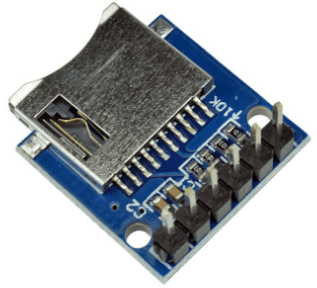
MicroSD Card Module
There are different microSD card modules compatible with the ESP32. We’re using the microSD card module sown in the following figure – it communicates using SPI communication protocol. You can use any other microSD card module with an SPI interface.

Where to Buy?
You can click the link below to check different stores where you can get the microSD card module:
MicroSD Card Module Pinout
The microSD card module communicates using SPI communication protocol. We’ll use the default ESP32 SPI pins as shown in the following table:
| microSD card module | ESP32 |
| 3V3 | 3.3V |
| CS | GPIO 5 |
| MOSI | GPIO 23 |
| CLK | GPIO 18 |
| MISO | GPIO 19 |
| GND | GND |
Recommended reading: ESP32 Pinout Reference: Which GPIO pins should you use?
Preparing the MicroSD Card
Before proceeding with the tutorial, make sure you format your microSD card as FAT32. Follow the next instructions to format your microSD card or use a software tool like SD Card Formater (compatible with Windows and Mac OS).
1. Insert the microSD card in your computer. Go to My Computer and right click on the SD card. Select Format as shown in figure below.

2. A new window pops up. Select FAT32, press Start to initialize the formatting process and follow the onscreen instructions.

After formatting the microSD card, you can paste the files used to build the web server there. We’ll move the index.html, style.css, and favicon.png files into there. Follow the next section to get your files.
HTML File
Create a file called index.html with the following content:
<!DOCTYPE HTML><html>
<head>
  <meta name="viewport" content="width=device-width, initial-scale=1">
  <link rel="stylesheet" type="text/css" href="style.css">
  <link rel="icon"  type="image/png" href="favicon.png">
  <title>ESP Web Server</title>
</head>
<body>
  <h1>Hello World!</h1>
  <p>This page was built with files from a microSD card.</p>
</body>
</html>
CSS File
Create a file called style.css with the following content:
html {
    font-family: Arial;
    text-align: center;
}
body {
    max-width: 400px;
    margin:0px auto;
}Favicon
We’ll also serve a favicon. It is a png image with 15×15 pixels. You can use the same favicon as ours, or your own icon, or none favicon at all.

You can click on the following link to download the favicon:
Copy Files to MicroSD Card
After having all files prepared, open the microSD card directory and paste the files.

Parts Required

For this tutorial you need the following parts:
You can use the preceding links or go directly to MakerAdvisor.com/tools to find all the parts for your projects at the best price!

Schematic Diagram
Wire the microSD card module to the ESP32 as shown in the following schematic diagram. We’re using the default ESP32 SPI pins.

Code
Copy the following code to your Arduino IDE.
/*
  Rui Santos
  Complete project details at https://RandomNerdTutorials.com/esp32-web-server-microsd-card/

  Permission is hereby granted, free of charge, to any person obtaining a copy
  of this software and associated documentation files.

  The above copyright notice and this permission notice shall be included in all
  copies or substantial portions of the Software.
*/

#include <Arduino.h>
#include <WiFi.h>
#include <AsyncTCP.h>
#include <ESPAsyncWebServer.h>
#include "FS.h"
#include "SD.h"
#include "SPI.h"

// Replace with your network credentials
const char* ssid = "REPLACE_WITH_YOUR_SSID";
const char* password = "REPLACE_WITH_YOUR_PASSWORD";

// Create AsyncWebServer object on port 80
AsyncWebServer server(80);

void initSDCard(){
  if(!SD.begin()){
    Serial.println("Card Mount Failed");
    return;
  }
  uint8_t cardType = SD.cardType();

  if(cardType == CARD_NONE){
    Serial.println("No SD card attached");
    return;
  }

  Serial.print("SD Card Type: ");
  if(cardType == CARD_MMC){
    Serial.println("MMC");
  } else if(cardType == CARD_SD){
    Serial.println("SDSC");
  } else if(cardType == CARD_SDHC){
    Serial.println("SDHC");
  } else {
    Serial.println("UNKNOWN");
  }
  uint64_t cardSize = SD.cardSize() / (1024 * 1024);
  Serial.printf("SD Card Size: %lluMB\n", cardSize);
}

void initWiFi() {
  WiFi.mode(WIFI_STA);
  WiFi.begin(ssid, password);
  Serial.print("Connecting to WiFi ..");
  while (WiFi.status() != WL_CONNECTED) {
    Serial.print('.');
    delay(1000);
  }
  Serial.println(WiFi.localIP());
}

void setup() {
  Serial.begin(115200);
  initWiFi();
  initSDCard();

  server.on("/", HTTP_GET, [](AsyncWebServerRequest *request){
    request->send(SD, "/index.html", "text/html");
  });

  server.serveStatic("/", SD, "/");

  server.begin();
}

void loop() {

}
Insert your network credentials in the following variables and the code should work straight away:
// Replace with your network credentials
const char* ssid = "REPLACE_WITH_YOUR_SSID";
const char* password = "REPLACE_WITH_YOUR_PASSWORD";
How the Code Works
We’ve covered how to build a web server with the ESP32 in previous tutorials. So, we’ll just take a look at the relevant parts for this tutorial.
Libraries
First, make sure you include the FS.h, SD.h and SPI.h libraries to be able to communicate with the microSD card and handle files.
#include "FS.h"
#include "SD.h"
#include "SPI.h"
Initialize MicroSD Card
The initSDCard() function initializes the microSD card on the default SPI pins.
void initSDCard(){
  if(!SD.begin()){
    Serial.println("Card Mount Failed");
    return;
  }
  uint8_t cardType = SD.cardType();

  if(cardType == CARD_NONE){
    Serial.println("No SD card attached");
    return;
  }
  Serial.print("SD Card Type: ");
  if(cardType == CARD_MMC){
    Serial.println("MMC");
  } else if(cardType == CARD_SD){
    Serial.println("SDSC");
  } else if(cardType == CARD_SDHC){
    Serial.println("SDHC");
  } else {
    Serial.println("UNKNOWN");
  }
  uint64_t cardSize = SD.cardSize() / (1024 * 1024);
  Serial.printf("SD Card Size: %lluMB\n", cardSize);
}
Then, you need to call this function in the setup():
initSDCard();Serve Files From microSD Card
When you access the ESP32 IP address on the root (/) URL, send the HTML file saved on the microSD card.
server.on("/", HTTP_GET, [](AsyncWebServerRequest *request){
  request->send(SD, "/index.html", "text/html");
});
The first argument of the send() function is the filesystem where the files are saved. In this case, it is saved in the SD card (SD). The second argument is the path where the file is located /index.html). The third argument refers to the content type (text/html).
When the HTML file loads on your browser, it will request the CSS and the favicon files. These are static files saved on the same directory (SD). We can add the following line to serve static files in a directory when requested by the root URL. It serves the CSS and favicon files automatically.
server.serveStatic("/", SD, "/");If your web server needs to handle more routes, you can add them to the setup(). Don’t forget to set SD as the first argument to the send() function. This way, it will look for the files in the microSD card.
It’s as simple as this. This can be applied to any other web server project.
Demonstration
After uploading the code, open the Serial Monitor at a baud rate of 115200. Press the on-board RST button.
You should get something similar on the Serial Monitor: the ESP32 IP address and information about the microSD card.

Open a browser on your local network and paste the ESP32 IP address. It will load the following web page with the files saved on the microSD card. Notice the favicon on the web browser title bar.

Wrapping Up
In this tutorial, you’ve learned how to build a web server with the ESP32 with files saved on the microSD card. Instead of writing the HTML, CSS, and JavaScript text directly on the Arduino sketch, you can save them on separate files on a microSD card. This can also be useful to store other data that you might want to display on your web server.
If you don’t have a microSD card module, you can save the files on the ESP32 filesystem (SPIFFS) if they fit. You might also like:
We hope you’ve found this tutorial useful.
Learn more about the ESP32 with our resources:


Have you thought about demonstrating the adding of files, and replacing existing files with updated files on the microSD card, Over The Air (OTA)?
Good point Ron, that would be a very nice project using OTA.
Bob D
Hi.
We’ll publish a similar tutorial soon, but with files in the filesystem (SPIFFS).
Regards,
Sara
Thanks for the suggestion.
That would be a useful feature.
Regards,
Sara
Will the SD card be readable after it has been removed and reinserted without removing power or reset of the system?
I’m searching the same, you find something?
It is “always” best to remove the power supply from a card reader when removing a memory card. The sd card may break and / or must be reformatted.
Hi, when I’m testing my webserver from sdcard. I remove and insert many times with no problems.Only need to refresh page on the client side.
very interesting project !
Is there any similar project applicable to the esp8266 please ? ( nedemcu )
Thanks
Bye
Hi.
This is compatible with the ESP8266.
You just need to include the ESP8266WiFi library and connect to the ESP8266 SPI pins.
We’ll create a similar tutorial for the ESP8266 soon.
Regards,
Sara
Hello.
While trying to adapt this program for ESP8266 I’ve encountered some problem with the function: request->send(SD, “/index.html”, “text/html”);
When I change “SD” to “LittleFS” it works correctly. Do you have any suggestion how to solve the problem?
Hi.
The pins to use the SD card with the ESP8266 are different.
However, I’ve tried to use this approach with the ESP8266 without success until now :/
So, at the moment I don’t have a solution for the ESP8266.
I’m sorry that I can’t help much.
Regards,
Sara
Thanks for your response.
The hardware and its configuration are OK – I can write or read from SD card using another methods.
I’ve figured out that it should be “SDFS” instead of “SD” for ESP8266. But now I have another problem – for “request->send(SDFS, “/index.htm”, “text/html”, processor);” the web site doesn’t appear in the browser but there is only a prompt to downloading the file to disk. I think that I should add somewhere response 200 (OK from server) but I don’t know how. Never ending story… 🙂
Hi.
I remember that I also tried an approach that had the same result—instead of showing the page, it downloaded the file.
At the moment, I’m not sure how to make it work with the ESP8266.
Let us know if you find anything.
Regards,
Sara
.. about the problem tha do it page download when invoke the template processor function.. on “request->send” method, there is one parameter that disable this behavior.
see the function scope:
void AsyncWebServerRequest::send(AsyncWebServerRequest::FS &fs, const String &path, const String &contentType = String(), bool download = false, AwsTemplateProcessor callback = nullptr)
.. note that one of the arguments these function called “bool download = false”. Then, when you invoke this method pass “false” before processor and the page will load correctly on the brower, instead that donwload to disk
I have the same problem
with
“request->send(SD, “/index.htm”, “text/html”, processor);”
on the ESP32 C3
download the index.html file
Any Idea
Hi.
I’m not sure why that happens.
Did you try without the processor function, just to check if it produces a different result?
Regards,
Sara
Hi, thanks for your attentions. Yes, I try without the processor argument, and the webserver works fine, without download the file. I made some changes:
server.on(“/”, HTTP_GET, [](AsyncWebServerRequest *request){
request->send(SD,”/index.html”, “text/html”);
});
server.serveStatic(“/”, SD, “/”).setTemplateProcessor(processor);
server.begin();
But in the processor function receive only garbage.
processr function:
String processor(const String& var)
{
Serial.println(“—processor—-“);
Serial.println(var);
.
.
.}
processor output:
—processor—-
1��(/��+.��*0��’1��)3��+3��x{���
On the client side display the page with %Variable% because garbage in the processor function.
Maybe son configuration for the SD.h or something.
Thanks
Best Regards,
Hi, update about this. Following the declaration of request->send i change the code to this:
server.on(“/”, HTTP_GET, [](AsyncWebServerRequest *request){
request->send(SD, “/index.html”, “text/html”, false, processor);
});
server.serveStatic(“/”, SD, “/”);
server.begin();
This this the output of the processor at the monitor:
—processor—-
20Logo.jpg” alt=”BamexLogo”
—processor—-
–
<p style=”text-align
—processor—-
<p style=”text-align:
On the client side show only a blank page.
Please advice.
Best Regards,
Hi, I resolve the problem.
If there’s any % on the html file, the processor keeps waiting for the sencond one.
So, in my html a filename was “Bamex Logo.png” with space, In the html a space is like “%20”.
I change the fle name to “BamexLogo.png” and workls like a charme.
I hope the information is useful.
Thanks
Hi.
Thanks for sharing that information.
Regards,
Sara
100% requirement on the OTA file read/write to the SD card.
What about using an ESP32-cam which already has the SD card on board?
It is the same, you just need to assign the right pinout for the microSD card.
You can learn more about the ESP32-CAM pinout here: https://randomnerdtutorials.com/esp32-cam-ai-thinker-pinout/
Regards,
Sara
Are you limited to the same 4gb restriction with the above set up, as you would be with the included Esp32-Cam board micro SD reader?
Hi.
I’m not sure.
I have not tested that.
Regards,
Sara
Hi! Thanks for the great tutorial!
Can I use other pins to connect MicroSD card to my ESP32?
For example my board has built-in Card Module (CS – IO13, MOSI – IO15, SCK – IO14, MISO – IO2). How can I assign the right pinout and make my program work ?
Hi.
Yes, you can do that.
Check this guide: https://randomnerdtutorials.com/esp32-microsd-card-arduino/#sdcardcustompins
Regards,
Sara
Just change the included library from SD.h to SD_MMC.h (and replace all the calls to the SD library to SD_MMC one)
That worked for me right away, no issues.
Would this work with an ESP8266?
Note to self: read the comments before asking…
Why are you using SPIFFS rather than LittleFS?
I’d read that SPIFFS is depreciated, or is that only for the ESP8266?
It’s only for ESP8266.
Regards,
Sara
I think they have made progress on that front: https://github.com/lorol/LITTLEFS
Thanks for sharing.
Regards,
Sara
Cāk por cĕkh tạwxỳāng k̄ĥāng bn p̄hm mī khảt̄hām thī̀ xyāk ca t̄hām kạb khuṇ ẁā mạn rxngrạb kār tậng chụ̄̀x fịl̒ bæb yāw læa rxngrạb fịl̒ thī̀ mī nāms̄kul yāw mākkẁā 3 tạw xạks̄ʹr h̄rụ̄x mị̀ læa s̄ảh̄rạb krṇī k̄hxng ESP8266(p̄hm chı̂ Wemos D1 mini with SD card shield) p̄hm thdlxng d̂wy tạw xeng xỳāng ng̀āy«mị̀ nān mā nī̂ p̄hm phb ẁā welā chı̂ wĕb be rā sexr̒ chī̂ pị yạng tạw server(esp8266) bāng khrậng h̄rụ̄x xāc ca b̀xy«mạn dūh̄emụ̄xn ca mī xākār kĥāng læa meụ̄̀x peid h̄n̂āt̀āng serial monitor p̄hm k̆ phb kạb kār cæ̂ng xxk mā nı lạks̄ʹṇa keid khwām p̄hid phlād pramāṇ”exception” xarị thảnxng nận cnt̄hụng welā nī̂ p̄hm k̆ yạng mị̀kh̀xy ca k̄hêācı mạn nạk læa pherāa p̄hm mị̀kh̀xy ca mī welā cụng pl̀xy mạn xeā wị̂ k̀xn læa klạb mā reīyn rū̂ s̄ìng thī̀ mī xyū̀ nı ebook thī̀ p̄hm sụ̄̂x mā cāk khuṇ t̀x pị k̄hxxp̣hạy p̄hm mị̀kh̀xy kèng p̣hās̄ʹā xạngkvs̄ʹ p̄hm xeng k̆ phyāyām ca s̄ụ̄̀xs̄ār kạb khuṇ d̂wy p̣hās̄ʹā k̄hxng p̄hm læ̂w h̄ı̂ google pæl mạn h̄ı̂ pĕn p̣hās̄ʹā xạngkvs̄ʹ k̄hxbkhuṇ s̄ảh̄rạb khwām rū̂ dī«
แสดงเพิ่ม
753 / 5000
ผลลัพธ์การแปล
From the example project above
I have a question that I want to ask you.
Does it support long file names and does it support files with extensions more than 3 characters?
And for the case of ESP8266 (I use Wemos D1 mini with SD card shield) I have easily tried it myself recently. I found that when I use my web browser to point to the server (esp8266).
Sometimes or maybe often It appears to have freezes. And when I opened the serial monitor window, I got an error like “exception” and something like that. Until now, I have not fully understood it. And because I don’t have much time, I just leave it and go back and learn what is included in the ebook I bought from you.
Sorry, I am not good at English.
I also try to communicate with you in my language.
And let google translate it to english
Thank you for your kind knowledge
Hi.
I haven’t tried it with long filenames.
It supports PNG extension (3 characters). I never tried it with an extension with more than 4 characters, but I don’t see why it would be a problem.
If you’re trying to load a huge file using the ESP8266, it may not have enough processing power to do that. In that case, your project would benefit if you use an ESP32. However, it really depends on the file size.
Regards,
Sara
Excellent project. Thanks for sharing. One question, I have saved 4 audio files in the SD card. How to access these from my PC? I can access to webpage through local network’s private IP address but can’t access to the audio files. Please help!
Very good presentation of the project.
Thanks!
Hi Sara,
Thanks for all your excellent tutorials, unlike many I have found online, where the software will not even compile, or libraries will not load..
I purchased a micro SD card from Banggood from your link. I noticed that this card seems to require 4.5 – 5.5 Volts to operate. However even after connecting Vcc to Vin on the ESP32, I was still greeted by a message telling me ‘Card Mount Failed’.
I do not give up easily, & a little research found the solution. Connect a 10K resistor between GND & CS.
Success!!
It works fine now.
Keep up the good work, & stay safe.
Alan
Thank you Alan Knight for this comment.
Actually, some SDCard readers need 4.5 – 5.5 Volts to operate.
Many thanks to Sara and Rui for these wonderful tutos, you’re great !
Hallo Sar en Rui.
This would be a great option as a Portal version. I don’t have the knowledge to program this myself. Do you have any plans for this? That would be nice. Greetings old man Bert
I found that the Micro Card Reader VCC should be connected to VIN on the ESP32. If connected to 3.3V, result is Card Mount failed. Also, the Webpage I have also uses PHP files. The CSS and JS files work, i.e., uploaded and main page looks okay. But if I try a clicking on a label which calls a PHP list function this is the result:
192.168.1.64 is currently unable to handle this request.
HTTP ERROR 500
Is there a method to include PHP files when calling the initial html file.
Appreciate your help. Thank You.
Regards,
Robert
I think that would require to have a PHP enabled WebServer and I dont think these little boards are capable of serving PHP.
Is it fast enough to serve .mp4 streaming to one client?
The simple answer is no, as far as I can tell. I’ve just tried it with a 193MB video file and I had time to read several RNT articles before it eventually loaded. It did get there in the end, though, so if you have got 10 minutes to spare, it may be OK.
I don’t know what is the limiting factor – the SD card to ESP32 transfer or the ESP32 to the web client. I suspect the latter.
Does anyone else have any experience of this?
Hello,
This is a great example that you have made! I am having some errors during the compilation process. I have updated libraries with the latest ones for ESP32 and install the libraries that you have used in this example. I fixed some of them but there are two which I could not find any solution to them by searching on Google and decided to ask you.
I use an ESP32 and the libraries I included as listed below.
#include “WiFi.h”
#include <AsyncTCP.h>
#include “ESPAsyncWebServer.h”
I have followed the steps you applied for the example but after compilation, I am having those errors:
error: ‘class WiFiServer’ has no member named ‘on’.
error: ‘class WiFiServer’ has no member named ‘serveStatic’.
Do you have any idea how can I solve them?
Thank you.
Hi.
Are you sure you installed the libraries?
Do you have more than one Arduino IDE installed on your computer?
Sometimes, multiple installations may conflict with the libraries.
Regards,
Sara
Mucho gusto, implemente el proyecto https://randomnerdtutorials.com/esp32-web-server-microsd-card/ , con base al paso a paso. La SD esta con los pines:
#define CS 5
#define MOSI 23
#define SCK 18
#define MISO 19
Connecting to WiFi …..192.168.0.14
Card Mount Failed
Solución forum.arduino.cc/index.php?topic=645886.0
“he3117 Re: ESP32s no puede detectar / montar la tarjeta microSD # 3
11 de mayo de 2020 13:54
Para cualquier otra persona que tenga el mismo problema con el módulo micro SD, debe conectar el pin VCC del módulo de la tarjeta micro SD al pin Vin de ESP32, no a la salida de 3.3 V.”
Hi.
Thanks for sharing.
But, take into account that it will depend on the microSD card module you’re using.
If you’re using one exactly like ours, you should only feed 3.3V.
Regards,
Sara
Hi, great article. I have a question.
How do I serve a 404-notfound page with a 404 status from the SDcard?
Thanks!
Hi.
This is the code provided by the library.
server.onNotFound([](AsyncWebServerRequest *request){
request->send(404);
});
Instead of sending 404, I think you can use the “regular” commands to send a customized page.
Regards,
Sara
Hi Sara,
Yes, I know the library calls, but it seems like there is no library overload of send() that takes a statuscode and a filename as input.
I can send a 404 statuscode like:
request->send(404);
or
request->send(404, “text/html”, “”);
Likewise, I can send a page stored on SDcard like:
request->send(SD, “”, “text/html”);
but this always send status code 200 (OK) to the client.
I am looking for something like:
request->send(404, SD, “”, “text/html”);
to send a 404 (NOTFOUND) status with a page_on_SD as content.
Thanks for thinking with me!
Regards,
Marcel
(strings were deleted from my post because I embedded them within less-than and greater-than. Let’s try again)
Hi Sara,
Yes, I know the library calls, but it seems like there is no library overload of send() that takes a statuscode and a filename as input.
I can send a 404 statuscode like:
request->send(404);
or
request->send(404, “text/html”, “HTMLsourceAsString”);
Likewise, I can send a page stored on SDcard like:
request->send(SD, “FileNameAsString”, “text/html”);
but this always send status code 200 (OK) to the client.
I am looking for something like:
request->send(404, SD, “FileNameAsString”, “text/html”);
to send a 404 (NOTFOUND) status with a page_on_SD as content.
Thanks for thinking with me!
Regards,
Marcel
Good afternoon, I’m trying to find a way to download a csv file from the SD, through the browser, do you have an idea of how to do it? I tried that way, but it doesn’t.
request->send(SD, “/datalog.csv”, “text/text”);
Hi.
Try it like this:
request->send(SD, “/datalog.csv”, “text/text”, true);
Does it work?
Regards,
Sara
… thanks… THANKS!
I want to ask, why when i tried to upload the source code its always say “Error compiling for board ESP32 Dev Module” is there any error on my Arduino IDE?
Hi.
First, check that you have the right board selected in Tools > Boards.
Then, when it throws that errors, it highlights the line that is giving problems. What’s the line that you have highlighted?
Regards,
Sara
Thank you, its solve now, but my web server wont connect, and said this site can’t be reached
Hi. Make sure that you’ve saved all the needed files to build the web server on the micro SD card.
Additionally, make sure you’ve inserted your network credentials in the ssid and password variables.
Regards,
Sara
Need 5V on most SD card readers on the VCC connection not 3.3 as they will fail to mount.
Hi.
Our microSD card module works well with 3.3V.
Other microSD card modules might need a different voltage.
Regards,
Sara
Hi, Rui and Sara. Great tutorial. I tried to combine what I learn from several of your tutorial with a bit of success. I written a code to read a float sensors which is place at different water level and show the result/msg (water level) on the web page. I was able to do it. But my problem is I had to refresh the web page for it to update the current water level. I couldn’t figure out what line of code is missing for it to do so. My code doesn’t have any output to control. Thank You
Hi.
Check Server-Sents Events: https://randomnerdtutorials.com/esp32-web-server-sent-events-sse/
It sends new readings to the web page every predetermined number of seconds. Then, the web page updates automatically without the need to refresh.
I hope this helps.
Regards,
Sara
Hi there. Great tutorial!
I’ve got my project happily serving files from my SD card, but I’d like to take advantage of the ESPAsyncWebServer’s templating capabilities. On the GitHub site for the library (https://github.com/me-no-dev/ESPAsyncWebServer) the author shows how to do this with a SPIFFS file system, but I can’t seem to make it work with the SD card FS.
https://github.com/me-no-dev/ESPAsyncWebServer#respond-with-content-coming-from-a-file-containing-templates
Here’s their example: String processor(const String& var)
{
if(var == “HELLO_FROM_TEMPLATE”)
return F(“Hello world!”);
return String();
}
// …
//Send index.htm with template processor function
request->send(SPIFFS, “/index.htm”, String(), false, processor);
Any insights would be greatly appreciated.
Thanks, again.
Hi.
Did you try using the following?
request->send(SD, “/index.htm”, String(), false, processor);
Hi, Sara.
Thanks for the reply!
It turned out to be “pilot error” on my part!
“/index.htm” != “index.html”
🙂
Great!
Hello!
I learned lots from your tutorials and have combined bits and pieces for my project. Like many others here, I am having problems being able to serve a file from an SD card using an ESP8266MOD. In the example code above:
request->send(SD, "/index.html", "text/html");
just won’t compile, regardless of whatever libraries are included or not.
no matching function for call to ‘AsyncWebServerRequest::send(SDClass&, const char [12], const char [10])’
Could you post a sketch that works for an ESP8266?
Hi.
At the time, I was not able to make this approach work with the ESP8266. That’s why we don’t have a similar tutorial for the ESP8266.
Regards,
Sara
Thank you for your reply! At least I know now that I was not just a noob with no clue what I was doing! I’ll swap out my ESP8266MOD with an Espressif ESP32-WROOM-32 and start over.
OK, I switched to an Espressif ESP32-WROOM-32 made by Inland. I also have a Sainsmart TFT w/SD and a BME280. The SD card is connected:
SCLK > GPIO18
MISO > GPIO19
MOSI > GPIO0 (labeled IO23)
CS > GPIO15
I copied the sketch verbatim from above. I’m using board definition,
ESP32 DEV MOD. I tried a few others as well.
/home/johnz/Arduino/libraries/ESPAsyncWebServer/src/WebAuthentication.cpp:73: undefined reference to `mbedtls_md5_starts’
collect2: error: ld returned 1 exit status
exit status 1
Error compiling for board ESP32 Dev Module.
Apparently, it is the:
server.serveStatic(“/”, SD, “/”);
statement that is causing the problem.
Hi.
Try updating your ESP32 boards’ installation.
Regards,
Sara
Hmm, when I go to the Boards Manager, I select the Updatable filter and nothing appears. Earlier when I switched over from the ESP8266 to the ESP32, I had removed and then added the ESP32 boards. Oh well, I need to go back to the ESP32 Async web server example to properly understand event handling.
BTW, even though I check the email notification, I never get any.
Got it working on a ESP8266 with this repository:
https://github.com/boblemaire/ESPAsyncSDWebServer/blob/master/ESPAsyncSDWebServer.ino
Just include LittleFS.h, const char* ssid and password, replace AsyncWiFiManager wifiManager(&server, &dns);
wifiManager.autoConnect(); with WiFi.mode(WIFI_STA); and WiFi.begin(ssid, password); .
and of course dont`t forget to change const int pin_CS_SDcard = 15; to the corresponding pin of your board.
Interesting. In my app, I’m mixing SPIFFS and the SD card. The SPIFFS are for the UI and I can update using the nifty Elegant OTA library. The SD, I’m using for logging data.
Here’s a snippet:
server.on(“/”, HTTP_GET, [](AsyncWebServerRequest *request){
request->send(SPIFFS, “/index.html”, String(), false, processor);
});
server.on(“/eventlog”, HTTP_GET, [](AsyncWebServerRequest *request){
request->send(SD, “/eventlog.txt”, “text/plain”,true);
});
Works pretty well.
What is the html code that starts the send( eventlog.txt)? My app logs BME280 data as well as serving a web page with the current values. I’m trying to add a button that when clicked, prompts me to download the log file.
Hi John,
Here’s the HTML:
Download Log File
(It’s just a link styled in CSS to look like a button.)
CSS:
.button {
font: 14px Arial;
text-decoration: none;
background-color: #EEEEEE;
color: #333333;
padding: 4px 6px 4px 6px;
border-top: 1px solid #CCCCCC;
border-right: 1px solid #333333;
border-bottom: 1px solid #333333;
border-left: 1px solid #CCCCCC;
}
Funny! The link in my message became a link on the page. Let’s try this:
” <“atag” href=’/eventlog’ class=”button”>Download Log File</”atag”>”
Replace “atag” with “a”.
Thank you! Finally got my app working!
Excellent!
Wonderful tutorial! Thank you a lot !
I will use it to test my website.
Is it possible to embed videos, php or SQL files?
Hi this is great! Thank you for the tutorial! I’ve managed to host a home page on the esp32 SD card. I’m struggling with understanding how I can then use a link to go deeper into the SD card to access files within folders.
Lets say I have a folder on the sd called data. I wanted to make a button to access that folder to view it’s contents but I can’t seem to get it working. I have tried to create button with a path to ,y local IP /data, eg. 196.168.0.14/data…. but that doesn’t work unfortunately. Any guidance would be appreciated. Thank you
I want to save the sensor data to the sd card and transfer it to the web server from the sdcard. How can I do this? Should the data saved on the sd card be in html format?
I had login form in webserver. I want to save data what i type in login form and return a data in a file in microSD. How can i do this? Thanks!!!
I can’t find the esp8266 version. Is it there?
Greetings old man Bert
Hi.
We don’t have a version for the ESP8266.
At the time, I couldn’t make it compatible with both boards.
I haven’t tried it recently.
Regards,
Sara
Thank you.
If I put a python algorithm in SD Card, will it process that?
Python script or any simple python code*
I have a doubt regarding the text file can we paginate the text files in webpage if yes please help.
Hi.
What do you mean by “paginate”?
Regards,
Sara
Hi, Sara
Some web servers allow you to split large data replies into ‘pages’ so the user is not overwhelmed with too long a page on the return from a query.
You see this all the time when a web page has something like:
<< < 1 2 3 4 5 6 … > >>
at the bottom with links to the next page. @Standley David, is this what you are asking about?
Ahh, ok…
Yes, I think it is possible to do, but we don’t have any examples of that.
Great tutorial!
I’m trying to do the same but I put my files in this path: /env/sys/WSF/.
But anything shows on the link.
server.on(“/”, HTTP_GET, [](AsyncWebServerRequest *request){
request->send(SD, “/env/sys/WSF/index.html”, “text/html”);
server.serveStatic("/env/sys/WSF/", SD, "/env/sys/WSF/");server.begin();
Very great tutorial. Now I want to access a file from the MicroSD Card to read the ssid and password.
Using this code:
File fAcceso;
fAcceso = SD.open(“/acceso.txt”, FILE_READ, false);
But at run time send the message:
Guru Meditation Error: Core 0 panic’ed (Store access fault). Exception was unhandled.
And the status of all registers on the CPU.
Maybe because “ESPAsyncWebServer” is using the MicroSD Card and conflicts with SD.open.
Theres any method to access files when Hosting Files from MicroSD Card.
Please advice
Alternatively, you may want to save the password files on the esp32 filesystem: SPIFFS or LittleFS.
Is LittleFS working on the ESP32 now?
It wasn’t available last time I looked.
That’s a good idea, but I resolve the problem. By error I declare an array of 3 bytes size instead of 30 bytes.
🙂
Thanks
Hello, I love your projects. And many thanks for your sharing for free. I wonder that this project available for ESP8266? Thanks.
It’s working, I want to display a image on oled display module from sd card,I have tried conveting file to .bin and hex code but nothing works! can you tell me how to do it?
Recently tried this project but my chrome browser in Window 10 laptop, can not run web page. Got message
“This site can’t be reached”
Hi, I read the article and will build this. I was wondering if I wrote a ASPX web page that used some DLL files would the Index page serve the ASPX pages correctly to a browser?
i ran into an odd issue, i copied the code provided, and after loading it to the esp32 it half works, and im not sure why.
i can navigate the SD card and its files through the browser but the browser will not load the index.html page. i can navigate to 192.etc/image.jpg and that loads. i can navigate to 192…/test.txt and that will load. but 192…/index.html just gives a 404 error page unreachable.
i have tried allot. to much to list actually and am rather stumped. any ideas?
Hi.
Did you follow the “Preparing the MicroSD Card” section?
Please make sure that you load the index.html, style.css and favicon.png files to the micro sd card, see the section “Copy Files to MicroSD Card”.
Regards,
Sara
Yeah i did all that correctly. I can load all the files via the web browser off the sd card including additional files i have loaded (mp3, text file etc) but it wont display the html as a webpage
Please make tutorial on multi protocol relay control
Hi.
Can you be a little bit more specific?
Regards,
Sara
Cool project. My project rendered very slowly. The web page was blank for at least 90 seconds, when I grabbed the screen and moved it over to my second monitor. Then the HTML was shown but without style. It took another almost three minutes before it refreshed with the style applied.
Is that normal?
Hi.
No.
Are you using the files in our example?
Can you check the size of your files? They should load almost instantly.
Regards,
Sara