Learn how to make a BLE (Bluetooth Low Energy) connection between two ESP32 boards. One ESP32 is going to be the server, and the other ESP32 will be the client. The BLE server advertises characteristics that contain sensor readings that the client can read. The ESP32 BLE client reads the values of those characteristics (temperature and humidity) and displays them on an OLED display.

Recommended Reading: Getting Started with ESP32 Bluetooth Low Energy (BLE)
What is Bluetooth Low Energy?
Before going straight to the project, it is important to take a quick look at some essential BLE concepts so that you’re able to better understand the project later on. If you’re already familiar with BLE, you can skip to the Project Overview section.
Bluetooth Low Energy, BLE for short, is a power-conserving variant of Bluetooth. BLE’s primary application is short-distance transmission of small amounts of data (low bandwidth). Unlike Bluetooth that is always on, BLE remains in sleep mode constantly except for when a connection is initiated.
This makes it consume very low power. BLE consumes approximately 100x less power than Bluetooth (depending on the use case). You can check the main differences between Bluetooth and Bluetooth Low Energy here.
BLE Server and Client
With Bluetooth Low Energy, there are two types of devices: the server and the client. The ESP32 can act either as a client or as a server.
The server advertises its existence, so it can be found by other devices and contains data that the client can read. The client scans the nearby devices, and when it finds the server it is looking for, it establishes a connection and listens for incoming data. This is called point-to-point communication.

There are other possible communication modes like broadcast mode and mesh network (not covered in this tutorial).
GATT
GATT stands for Generic Attributes and it defines a hierarchical data structure that is exposed to connected BLE devices. This means that GATT defines the way that two BLE devices send and receive standard messages. Understanding this hierarchy is important because it will make it easier to understand how to use BLE with the ESP32.

- Profile: standard collection of services for a specific use case;
- Service: collection of related information, like sensor readings, battery level, heart rate, etc. ;
- Characteristic: it is where the actual data is saved on the hierarchy (value);
- Descriptor: metadata about the data;
- Properties: describe how the characteristic value can be interacted with. For example: read, write, notify, broadcast, indicate, etc.
In our example, we’ll create a service with two characteristics. One for the temperature and another for the humidity. The actual temperature and humidity readings are saved on the value under their characteristics. Each characteristic has the notify property, so that it notifies the client whenever the values change.
UUID
Each service, characteristic, and descriptor have a UUID (Universally Unique Identifier). A UUID is a unique 128-bit (16 bytes) number. For example:
55072829-bc9e-4c53-938a-74a6d4c78776
There are shortened UUIDs for all types, services, and profiles specified in the SIG (Bluetooth Special Interest Group).
But if your application needs its own UUID, you can generate it using this UUID generator website.
In summary, the UUID is used for uniquely identifying information. For example, it can identify a particular service provided by a Bluetooth device.
For a more detailed introduction about BLE, read our getting started guide:
Project Overview
In this tutorial, you’re going to learn how to make a BLE connection between two ESP32 boards. One ESP32 is going to be the BLE server, and the other ESP32 will be the BLE client.

The ESP32 BLE server is connected to a BME280 sensor and it updates its temperature and humidity characteristic values every 30 seconds.
The ESP32 client connects to the BLE server and it is notified of its temperature and humidity characteristic values. This ESP32 is connected to an OLED display and it prints the latest readings.
This project is divided into two parts:
Parts Required
Here’s a list of the parts required to follow this project:
ESP32 BLE Server:
- ESP32 DOIT DEVKIT V1 Board (read Best ESP32 development boards)
- BME280 Sensor
- Jumper wires
- Breadboard
- Smartphone with Bluetooth (optional)
ESP32 BLE Client:
You can use the preceding links or go directly to MakerAdvisor.com/tools to find all the parts for your projects at the best price!

1) ESP32 BLE Server
In this part, we’ll set up the BLE Server that advertises a service that contains two characteristics: one for temperature and another for humidity. Those characteristics have the Notify property to notify new values to the client.

Schematic Diagram
The ESP32 BLE server will advertise characteristics with temperature and humidity from a BME280 sensor. You can use any other sensor as long as you add the required lines in the code.
We’re going to use I2C communication with the BME280 sensor module. For that, wire the sensor to the default ESP32 SCL (GPIO 22) and SDA (GPIO 21) pins, as shown in the following schematic diagram.

Recommended reading: ESP32 Pinout Reference: Which GPIO pins should you use?
Installing BME280 Libraries
As mentioned previously, we’ll advertise sensor readings from a BME280 sensor. So, you need to install the libraries to interface with the BME280 sensor.
You can install the libraries using the Arduino Library Manager. Go to Sketch > Include Library > Manage Libraries and search for the library name.
Installing Libraries (VS Code + PlatformIO)
If you’re using VS Code with the PlatformIO extension, copy the following to the platformio.ini file to include the libraries.
lib_deps = adafruit/Adafruit Unified Sensor @ ^1.1.4
            adafruit/Adafruit BME280 Library @ ^2.1.2
ESP32 BLE Server – Code
With the circuit ready and the required libraries installed, copy the following code to the Arduino IDE, or to the main.cpp file if you’re using VS Code.
/*********
  Rui Santos
  Complete instructions at https://RandomNerdTutorials.com/esp32-ble-server-client/
  Permission is hereby granted, free of charge, to any person obtaining a copy of this software and associated documentation files.
  The above copyright notice and this permission notice shall be included in all copies or substantial portions of the Software.
*********/

#include <BLEDevice.h>
#include <BLEServer.h>
#include <BLEUtils.h>
#include <BLE2902.h>
#include <Wire.h>
#include <Adafruit_Sensor.h>
#include <Adafruit_BME280.h>

//Default Temperature is in Celsius
//Comment the next line for Temperature in Fahrenheit
#define temperatureCelsius

//BLE server name
#define bleServerName "BME280_ESP32"

Adafruit_BME280 bme; // I2C

float temp;
float tempF;
float hum;

// Timer variables
unsigned long lastTime = 0;
unsigned long timerDelay = 30000;

bool deviceConnected = false;

// See the following for generating UUIDs:
// https://www.uuidgenerator.net/
#define SERVICE_UUID "91bad492-b950-4226-aa2b-4ede9fa42f59"

// Temperature Characteristic and Descriptor
#ifdef temperatureCelsius
  BLECharacteristic bmeTemperatureCelsiusCharacteristics("cba1d466-344c-4be3-ab3f-189f80dd7518", BLECharacteristic::PROPERTY_NOTIFY);
  BLEDescriptor bmeTemperatureCelsiusDescriptor(BLEUUID((uint16_t)0x2902));
#else
  BLECharacteristic bmeTemperatureFahrenheitCharacteristics("f78ebbff-c8b7-4107-93de-889a6a06d408", BLECharacteristic::PROPERTY_NOTIFY);
  BLEDescriptor bmeTemperatureFahrenheitDescriptor(BLEUUID((uint16_t)0x2902));
#endif

// Humidity Characteristic and Descriptor
BLECharacteristic bmeHumidityCharacteristics("ca73b3ba-39f6-4ab3-91ae-186dc9577d99", BLECharacteristic::PROPERTY_NOTIFY);
BLEDescriptor bmeHumidityDescriptor(BLEUUID((uint16_t)0x2903));

//Setup callbacks onConnect and onDisconnect
class MyServerCallbacks: public BLEServerCallbacks {
  void onConnect(BLEServer* pServer) {
    deviceConnected = true;
  };
  void onDisconnect(BLEServer* pServer) {
    deviceConnected = false;
  }
};

void initBME(){
  if (!bme.begin(0x76)) {
    Serial.println("Could not find a valid BME280 sensor, check wiring!");
    while (1);
  }
}

void setup() {
  // Start serial communication
  Serial.begin(115200);

  // Init BME Sensor
  initBME();

  // Create the BLE Device
  BLEDevice::init(bleServerName);

  // Create the BLE Server
  BLEServer *pServer = BLEDevice::createServer();
  pServer->setCallbacks(new MyServerCallbacks());

  // Create the BLE Service
  BLEService *bmeService = pServer->createService(SERVICE_UUID);

  // Create BLE Characteristics and Create a BLE Descriptor
  // Temperature
  #ifdef temperatureCelsius
    bmeService->addCharacteristic(&bmeTemperatureCelsiusCharacteristics);
    bmeTemperatureCelsiusDescriptor.setValue("BME temperature Celsius");
    bmeTemperatureCelsiusCharacteristics.addDescriptor(&bmeTemperatureCelsiusDescriptor);
  #else
    bmeService->addCharacteristic(&bmeTemperatureFahrenheitCharacteristics);
    bmeTemperatureFahrenheitDescriptor.setValue("BME temperature Fahrenheit");
    bmeTemperatureFahrenheitCharacteristics.addDescriptor(&bmeTemperatureFahrenheitDescriptor);
  #endif

  // Humidity
  bmeService->addCharacteristic(&bmeHumidityCharacteristics);
  bmeHumidityDescriptor.setValue("BME humidity");
  bmeHumidityCharacteristics.addDescriptor(new BLE2902());

  // Start the service
  bmeService->start();

  // Start advertising
  BLEAdvertising *pAdvertising = BLEDevice::getAdvertising();
  pAdvertising->addServiceUUID(SERVICE_UUID);
  pServer->getAdvertising()->start();
  Serial.println("Waiting a client connection to notify...");
}

void loop() {
  if (deviceConnected) {
    if ((millis() - lastTime) > timerDelay) {
      // Read temperature as Celsius (the default)
      temp = bme.readTemperature();
      // Fahrenheit
      tempF = 1.8*temp +32;
      // Read humidity
      hum = bme.readHumidity();

      //Notify temperature reading from BME sensor
      #ifdef temperatureCelsius
        static char temperatureCTemp[6];
        dtostrf(temp, 6, 2, temperatureCTemp);
        //Set temperature Characteristic value and notify connected client
        bmeTemperatureCelsiusCharacteristics.setValue(temperatureCTemp);
        bmeTemperatureCelsiusCharacteristics.notify();
        Serial.print("Temperature Celsius: ");
        Serial.print(temp);
        Serial.print(" ºC");
      #else
        static char temperatureFTemp[6];
        dtostrf(tempF, 6, 2, temperatureFTemp);
        //Set temperature Characteristic value and notify connected client
        bmeTemperatureFahrenheitCharacteristics.setValue(temperatureFTemp);
        bmeTemperatureFahrenheitCharacteristics.notify();
        Serial.print("Temperature Fahrenheit: ");
        Serial.print(tempF);
        Serial.print(" ºF");
      #endif

      //Notify humidity reading from BME
      static char humidityTemp[6];
      dtostrf(hum, 6, 2, humidityTemp);
      //Set humidity Characteristic value and notify connected client
      bmeHumidityCharacteristics.setValue(humidityTemp);
      bmeHumidityCharacteristics.notify();
      Serial.print(" - Humidity: ");
      Serial.print(hum);
      Serial.println(" %");

      lastTime = millis();
    }
  }
}
You can upload the code, and it will work straight away advertising its service with the temperature and humidity characteristics. Continue reading to learn how the code works, or skip to the Client section.
There are several examples showing how to use BLE with the ESP32 in the Examples section. In your Arduino IDE, go to File > Examples > ESP32 BLE Arduino. This server sketch is based on the Notify example.
Importing Libraries
The code starts by importing the required libraries.
#include <BLEDevice.h>
#include <BLEServer.h>
#include <BLEUtils.h>
#include <BLE2902.h>
#include <Wire.h>
#include <Adafruit_Sensor.h>
#include <Adafruit_BME280.h>
Choosing Temperature Unit
By default, the ESP sends the temperature in Celsius degrees. You can comment the following line or delete it to send the temperature in Fahrenheit degrees.
//Comment the next line for Temperature in Fahrenheit
#define temperatureCelsius
BLE Server Name
The following line defines a name for our BLE server. Leave the default BLE server name. Otherwise, the server name in the client code also needs to be changed (because they have to match).
//BLE server name
#define bleServerName "BME280_ESP32"
BME280 Sensor
Create an Adafruit_BME280 object called bme on the default ESP32 I2C pins.
Adafruit_BME280 bme; // I2CThe temp, tempF and hum variables will hold the temperature in Celsius degrees, the temperature in Fahrenheit degrees, and the humidity read from the BME280 sensor.
float temp;
float tempF;
float hum;
Other Variables
The following timer variables define how frequently we want to write to the temperature and humidity characteristic. We set the timerDelay variable to 30000 milliseconds (30 seconds), but you can change it.
// Timer variables
unsigned long lastTime = 0;
unsigned long timerDelay = 30000;
The deviceConnected boolean variable allows us to keep track if a client is connected to the server.
bool deviceConnected = false;BLE UUIDs
In the next lines, we define UUIDs for the service, for the temperature characteristic in celsius, for the temperature characteristic in Fahrenheit, and for the humidity.
// https://www.uuidgenerator.net/
#define SERVICE_UUID "91bad492-b950-4226-aa2b-4ede9fa42f59"

// Temperature Characteristic and Descriptor
#ifdef temperatureCelsius
  BLECharacteristic bmeTemperatureCelsiusCharacteristics("cba1d466-344c-4be3-ab3f-189f80dd7518", BLECharacteristic::PROPERTY_NOTIFY);
  BLEDescriptor bmeTemperatureCelsiusDescriptor(BLEUUID((uint16_t)0x2902));
#else
  BLECharacteristic bmeTemperatureFahrenheitCharacteristics("f78ebbff-c8b7-4107-93de-889a6a06d408", BLECharacteristic::PROPERTY_NOTIFY);
  BLEDescriptor bmeTemperatureFahrenheitDescriptor(BLEUUID((uint16_t)0x2901));
#endif

// Humidity Characteristic and Descriptor
BLECharacteristic bmeHumidityCharacteristics("ca73b3ba-39f6-4ab3-91ae-186dc9577d99", BLECharacteristic::PROPERTY_NOTIFY);
BLEDescriptor bmeHumidityDescriptor(BLEUUID((uint16_t)0x2903));
I recommend leaving all the default UUIDs. Otherwise, you also need to change the code on the client side—so the client can find the service and retrieve the characteristic values.
setup()
In the setup(), initialize the Serial Monitor and the BME280 sensor.
// Start serial communication
Serial.begin(115200);

// Init BME Sensor
initBME();
Create a new BLE device with the BLE server name you’ve defined earlier:
// Create the BLE Device
BLEDevice::init(bleServerName);
Set the BLE device as a server and assign a callback function.
// Create the BLE Server
BLEServer *pServer = BLEDevice::createServer();
pServer->setCallbacks(new MyServerCallbacks());
The callback function MyServerCallbacks() changes the boolean variable deviceConnected to true or false according to the current state of the BLE device. This means that if a client is connected to the server, the state is true. If the client disconnects, the boolean variable changes to false. Here’s the part of the code that defines the MyServerCallbacks() function.
//Setup callbacks onConnect and onDisconnect
class MyServerCallbacks: public BLEServerCallbacks {
  void onConnect(BLEServer* pServer) {
    deviceConnected = true;
  };
  void onDisconnect(BLEServer* pServer) {
    deviceConnected = false;
  }
};
Start a BLE service with the service UUID defined earlier.
BLEService *bmeService = pServer->createService(SERVICE_UUID);Then, create the temperature BLE characteristic. If you’re using Celsius degrees it sets the following characteristic and descriptor:
#ifdef temperatureCelsius
  bmeService->addCharacteristic(&bmeTemperatureCelsiusCharacteristics);
  bmeTemperatureCelsiusDescriptor.setValue("BME temperature Celsius");
  bmeTemperatureCelsiusCharacteristics.addDescriptor(new BLE2902());
Otherwise, it sets the Fahrenheit characteristic:
#else
  bmeService->addCharacteristic(&dhtTemperatureFahrenheitCharacteristics);
  bmeTemperatureFahrenheitDescriptor.setValue("BME temperature Fahrenheit");
  bmeTemperatureFahrenheitCharacteristics.addDescriptor(new BLE2902());
#endif
After that, it sets the humidity characteristic:
// Humidity
bmeService->addCharacteristic(&bmeHumidityCharacteristics);
bmeHumidityDescriptor.setValue("BME humidity");
bmeHumidityCharacteristics.addDescriptor(new BLE2902());
Finally, you start the service, and the server starts the advertising so other devices can find it.
// Start the service
bmeService->start();

// Start advertising
BLEAdvertising *pAdvertising = BLEDevice::getAdvertising();
pAdvertising->addServiceUUID(SERVICE_UUID);
pServer->getAdvertising()->start();
Serial.println("Waiting a client connection to notify...");
loop()
The loop() function is fairly straightforward. You constantly check if the device is connected to a client or not. If it’s connected, and the timerDelay has passed, it reads the current temperature and humidity.
if (deviceConnected) {
  if ((millis() - lastTime) > timerDelay) {
    // Read temperature as Celsius (the default)
    temp = bme.readTemperature();
    // Fahrenheit
    tempF = temp*1.8 +32;
    // Read humidity
    hum = bme.readHumidity();
If you’re using temperature in Celsius it runs the following code section. First, it converts the temperature to a char variable (temperatureCTemp variable). We must convert the temperature to a char variable type to use it in the setValue() function.
static char temperatureCTemp[6];
dtostrf(temp, 6, 2, temperatureCTemp);
Then, it sets the bmeTemperatureCelsiusCharacteristic value to the new temperature value (temperatureCTemp) using the setValue() function. After settings the new value, we can notify the connected client using the notify() function.
//Set temperature Characteristic value and notify connected client
bmeTemperatureCelsiusCharacteristics.setValue(temperatureCTemp);
bmeTemperatureCelsiusCharacteristics.notify();
We follow a similar procedure for the Temperature in Fahrenheit.
#else
    static char temperatureFTemp[6];
    dtostrf(f, 6, 2, temperatureFTemp);
    //Set temperature Characteristic value and notify connected client
    bmeTemperatureFahrenheitCharacteristics.setValue(tempF);
    bmeTemperatureFahrenheitCharacteristics.notify();
    Serial.print("Temperature Fahrenheit: ");
    Serial.print(tempF);
    Serial.print(" *F");
#endif
Sending the humidity also uses the same process.
//Notify humidity reading from DHT
static char humidityTemp[6];
dtostrf(hum, 6, 2, humidityTemp);
//Set humidity Characteristic value and notify connected client
bmeHumidityCharacteristics.setValue(humidityTemp);
bmeHumidityCharacteristics.notify();
Serial.print(" - Humidity: ");
Serial.print(hum);
Serial.println(" %");
Testing the ESP32 BLE Server
Upload the code to your board and then, open the Serial Monitor. It will display a message as shown below.

Then, you can test if the BLE server is working as expected by using a BLE scan application on your smartphone like nRF Connect. This application is available for Android and iOS.
After installing the application, enable Bluetooth on your smartphone. Open the nRF Connect app and click on the Scan button. It will find all Bluetooth nearby devices, including your BME280_ESP32 device (it is the BLE server name you defined on the code).

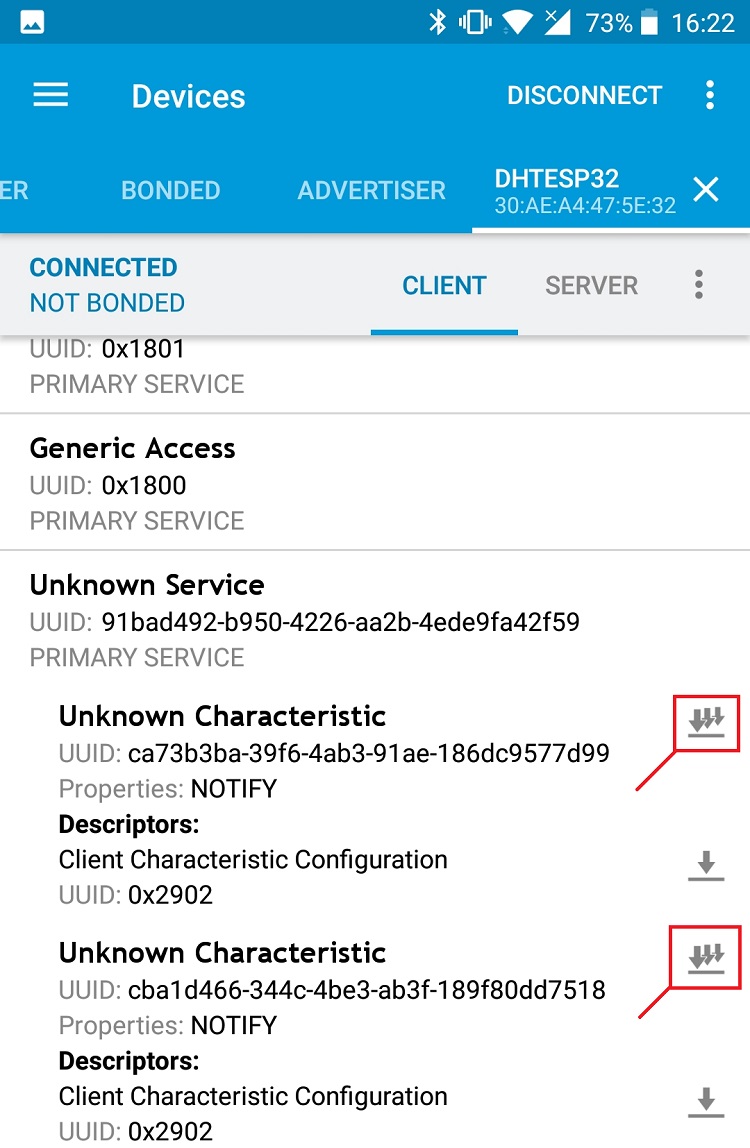
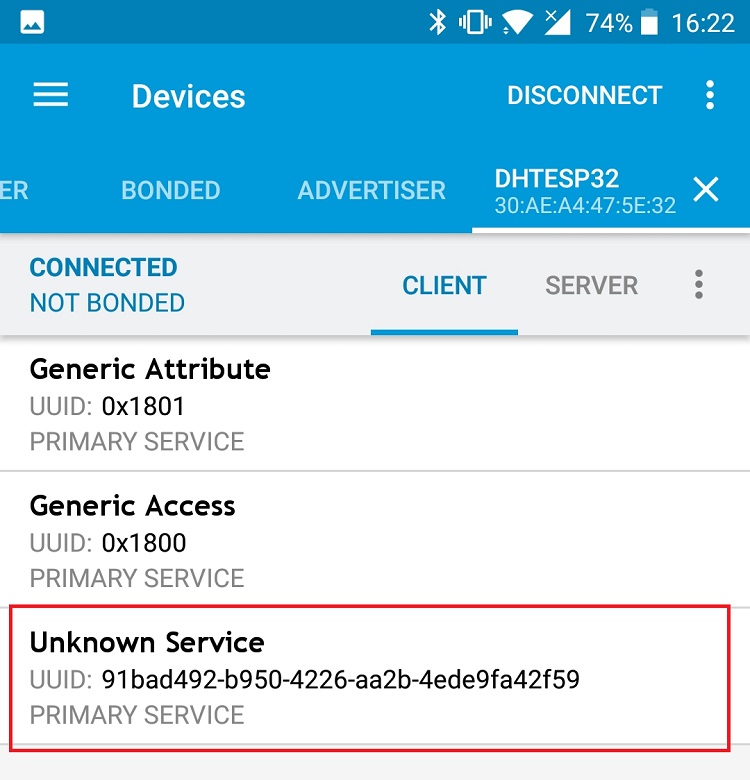
Connect to your BME280_ESP32 device and then, select the client tab (the interface might be slightly different). You can check that it advertises the service with the UUID we defined in the code, as well as the temperature and humidity characteristics. Notice that those characteristics have the Notify property.

Your ESP32 BLE Server is ready!
Go to the next section to create an ESP32 client that connects to the server to get access to the temperature and humidity characteristics and get the readings to display them on an OLED display.
2) ESP32 BLE Client
In this section, we’ll create the ESP32 BLE client that will establish a connection with the ESP32 BLE server, and display the readings on an OLED display.
Schematic
The ESP32 BLE client is connected to an OLED display. The display shows the readings received via Bluetooth.
Wire your OLED display to the ESP32 by following the next schematic diagram. The SCL pin connects to GPIO 22 and the SDA pin to GPIO 21.

Installing the SSD1306, GFX and BusIO Libraries
You need to install the following libraries to interface with the OLED display:
To install the libraries, go Sketch> Include Library > Manage Libraries, and search for the libraries’ names.
Installing Libraries (VS Code + PlatformIO)
If you’re using VS Code with the PlatformIO extension, copy the following to the platformio.ini file to include the libraries.
lib_deps =
	adafruit/Adafruit GFX Library@^1.10.12
	adafruit/Adafruit SSD1306@^2.4.6
ESP32 BLE Client – Code
Copy the BLE client Sketch to your Arduino IDE or to the main.cpp file if you’re using VS Code with PlatformIO.
/*********
  Rui Santos
  Complete instructions at https://RandomNerdTutorials.com/esp32-ble-server-client/
  Permission is hereby granted, free of charge, to any person obtaining a copy of this software and associated documentation files.
  The above copyright notice and this permission notice shall be included in all copies or substantial portions of the Software.
*********/

#include "BLEDevice.h"
#include <Wire.h>
#include <Adafruit_SSD1306.h>
#include <Adafruit_GFX.h>

//Default Temperature is in Celsius
//Comment the next line for Temperature in Fahrenheit
#define temperatureCelsius

//BLE Server name (the other ESP32 name running the server sketch)
#define bleServerName "BME280_ESP32"

/* UUID's of the service, characteristic that we want to read*/
// BLE Service
static BLEUUID bmeServiceUUID("91bad492-b950-4226-aa2b-4ede9fa42f59");

// BLE Characteristics
#ifdef temperatureCelsius
  //Temperature Celsius Characteristic
  static BLEUUID temperatureCharacteristicUUID("cba1d466-344c-4be3-ab3f-189f80dd7518");
#else
  //Temperature Fahrenheit Characteristic
  static BLEUUID temperatureCharacteristicUUID("f78ebbff-c8b7-4107-93de-889a6a06d408");
#endif

// Humidity Characteristic
static BLEUUID humidityCharacteristicUUID("ca73b3ba-39f6-4ab3-91ae-186dc9577d99");

//Flags stating if should begin connecting and if the connection is up
static boolean doConnect = false;
static boolean connected = false;

//Address of the peripheral device. Address will be found during scanning...
static BLEAddress *pServerAddress;

//Characteristicd that we want to read
static BLERemoteCharacteristic* temperatureCharacteristic;
static BLERemoteCharacteristic* humidityCharacteristic;

//Activate notify
const uint8_t notificationOn[] = {0x1, 0x0};
const uint8_t notificationOff[] = {0x0, 0x0};

#define SCREEN_WIDTH 128 // OLED display width, in pixels
#define SCREEN_HEIGHT 64 // OLED display height, in pixels

//Declaration for an SSD1306 display connected to I2C (SDA, SCL pins)
Adafruit_SSD1306 display(SCREEN_WIDTH, SCREEN_HEIGHT, &Wire, -1);

//Variables to store temperature and humidity
char* temperatureChar;
char* humidityChar;

//Flags to check whether new temperature and humidity readings are available
boolean newTemperature = false;
boolean newHumidity = false;

//Connect to the BLE Server that has the name, Service, and Characteristics
bool connectToServer(BLEAddress pAddress) {
   BLEClient* pClient = BLEDevice::createClient();

  // Connect to the remove BLE Server.
  pClient->connect(pAddress);
  Serial.println(" - Connected to server");

  // Obtain a reference to the service we are after in the remote BLE server.
  BLERemoteService* pRemoteService = pClient->getService(bmeServiceUUID);
  if (pRemoteService == nullptr) {
    Serial.print("Failed to find our service UUID: ");
    Serial.println(bmeServiceUUID.toString().c_str());
    return (false);
  }

  // Obtain a reference to the characteristics in the service of the remote BLE server.
  temperatureCharacteristic = pRemoteService->getCharacteristic(temperatureCharacteristicUUID);
  humidityCharacteristic = pRemoteService->getCharacteristic(humidityCharacteristicUUID);

  if (temperatureCharacteristic == nullptr || humidityCharacteristic == nullptr) {
    Serial.print("Failed to find our characteristic UUID");
    return false;
  }
  Serial.println(" - Found our characteristics");

  //Assign callback functions for the Characteristics
  temperatureCharacteristic->registerForNotify(temperatureNotifyCallback);
  humidityCharacteristic->registerForNotify(humidityNotifyCallback);
  return true;
}

//Callback function that gets called, when another device's advertisement has been received
class MyAdvertisedDeviceCallbacks: public BLEAdvertisedDeviceCallbacks {
  void onResult(BLEAdvertisedDevice advertisedDevice) {
    if (advertisedDevice.getName() == bleServerName) { //Check if the name of the advertiser matches
      advertisedDevice.getScan()->stop(); //Scan can be stopped, we found what we are looking for
      pServerAddress = new BLEAddress(advertisedDevice.getAddress()); //Address of advertiser is the one we need
      doConnect = true; //Set indicator, stating that we are ready to connect
      Serial.println("Device found. Connecting!");
    }
  }
};

//When the BLE Server sends a new temperature reading with the notify property
static void temperatureNotifyCallback(BLERemoteCharacteristic* pBLERemoteCharacteristic,
                                        uint8_t* pData, size_t length, bool isNotify) {
  //store temperature value
  temperatureChar = (char*)pData;
  newTemperature = true;
}

//When the BLE Server sends a new humidity reading with the notify property
static void humidityNotifyCallback(BLERemoteCharacteristic* pBLERemoteCharacteristic,
                                    uint8_t* pData, size_t length, bool isNotify) {
  //store humidity value
  humidityChar = (char*)pData;
  newHumidity = true;
  Serial.print(newHumidity);
}

//function that prints the latest sensor readings in the OLED display
void printReadings(){

  display.clearDisplay();
  // display temperature
  display.setTextSize(1);
  display.setCursor(0,0);
  display.print("Temperature: ");
  display.setTextSize(2);
  display.setCursor(0,10);
  display.print(temperatureChar);
  display.setTextSize(1);
  display.cp437(true);
  display.write(167);
  display.setTextSize(2);
  Serial.print("Temperature:");
  Serial.print(temperatureChar);
  #ifdef temperatureCelsius
    //Temperature Celsius
    display.print("C");
    Serial.print("C");
  #else
    //Temperature Fahrenheit
    display.print("F");
    Serial.print("F");
  #endif

  //display humidity
  display.setTextSize(1);
  display.setCursor(0, 35);
  display.print("Humidity: ");
  display.setTextSize(2);
  display.setCursor(0, 45);
  display.print(humidityChar);
  display.print("%");
  display.display();
  Serial.print(" Humidity:");
  Serial.print(humidityChar);
  Serial.println("%");
}

void setup() {
  //OLED display setup
  // SSD1306_SWITCHCAPVCC = generate display voltage from 3.3V internally
  if(!display.begin(SSD1306_SWITCHCAPVCC, 0x3C)) { // Address 0x3C for 128x32
    Serial.println(F("SSD1306 allocation failed"));
    for(;;); // Don't proceed, loop forever
  }
  display.clearDisplay();
  display.setTextSize(2);
  display.setTextColor(WHITE,0);
  display.setCursor(0,25);
  display.print("BLE Client");
  display.display();

  //Start serial communication
  Serial.begin(115200);
  Serial.println("Starting Arduino BLE Client application...");

  //Init BLE device
  BLEDevice::init("");

  // Retrieve a Scanner and set the callback we want to use to be informed when we
  // have detected a new device.  Specify that we want active scanning and start the
  // scan to run for 30 seconds.
  BLEScan* pBLEScan = BLEDevice::getScan();
  pBLEScan->setAdvertisedDeviceCallbacks(new MyAdvertisedDeviceCallbacks());
  pBLEScan->setActiveScan(true);
  pBLEScan->start(30);
}

void loop() {
  // If the flag "doConnect" is true then we have scanned for and found the desired
  // BLE Server with which we wish to connect.  Now we connect to it.  Once we are
  // connected we set the connected flag to be true.
  if (doConnect == true) {
    if (connectToServer(*pServerAddress)) {
      Serial.println("We are now connected to the BLE Server.");
      //Activate the Notify property of each Characteristic
      temperatureCharacteristic->getDescriptor(BLEUUID((uint16_t)0x2902))->writeValue((uint8_t*)notificationOn, 2, true);
      humidityCharacteristic->getDescriptor(BLEUUID((uint16_t)0x2902))->writeValue((uint8_t*)notificationOn, 2, true);
      connected = true;
    } else {
      Serial.println("We have failed to connect to the server; Restart your device to scan for nearby BLE server again.");
    }
    doConnect = false;
  }
  //if new temperature readings are available, print in the OLED
  if (newTemperature && newHumidity){
    newTemperature = false;
    newHumidity = false;
    printReadings();
  }
  delay(1000); // Delay a second between loops.
}
Continue reading to learn how the code works or skip to the Demonstration section.
Importing libraries
You start by importing the required libraries:
#include "BLEDevice.h"
#include <Wire.h>
#include <Adafruit_SSD1306.h>
#include <Adafruit_GFX.h>
Choosing temperature unit
By default the client will receive the temperature in Celsius degrees, if you comment the following line or delete it, it will start receiving the temperature in Fahrenheit degrees.
//Default Temperature is in Celsius
//Comment the next line for Temperature in Fahrenheit
#define temperatureCelsius
BLE Server Name and UUIDs
Then, define the BLE server name that we want to connect to and the service and characteristic UUIDs that we want to read. Leave the default BLE server name and UUIDs to match the ones defined in the server sketch.
//BLE Server name (the other ESP32 name running the server sketch)
#define bleServerName "BME280_ESP32"

/* UUID's of the service, characteristic that we want to read*/
// BLE Service
static BLEUUID bmeServiceUUID("91bad492-b950-4226-aa2b-4ede9fa42f59");

// BLE Characteristics
#ifdef temperatureCelsius
  //Temperature Celsius Characteristic
  static BLEUUID temperatureCharacteristicUUID("cba1d466-344c-4be3-ab3f-189f80dd7518");
#else
  //Temperature Fahrenheit Characteristic
  static BLEUUID temperatureCharacteristicUUID("f78ebbff-c8b7-4107-93de-889a6a06d408");
#endif

// Humidity Characteristic
static BLEUUID humidityCharacteristicUUID("ca73b3ba-39f6-4ab3-91ae-186dc9577d99");
Declaring variables
Then, you need to declare some variables that will be used later with Bluetooth to check whether we’re connected to the server or not.
//Flags stating if should begin connecting and if the connection is up
static boolean doConnect = false;
static boolean connected = false;
Create a variable of type BLEAddress that refers to the address of the server we want to connect. This address will be found during scanning.
//Address of the peripheral device. Address will be found during scanning...
static BLEAddress *pServerAddress;
Set the characteristics we want to read (temperature and humidity).
//Characteristicd that we want to read
static BLERemoteCharacteristic* temperatureCharacteristic;
static BLERemoteCharacteristic* humidityCharacteristic;
OLED Display
You also need to declare some variables to work with the OLED. Define the OLED width and height:
#define SCREEN_WIDTH 128 // OLED display width, in pixels
#define SCREEN_HEIGHT 64 // OLED display height, in pixels
Instantiate the OLED display with the width and height defined earlier.
Adafruit_SSD1306 display(SCREEN_WIDTH, SCREEN_HEIGHT, &Wire);Temperature and Humidity Variables
Define char variables to hold the temperature and humidity values received by the server.
//Variables to store temperature and humidity
char* temperatureChar;
char* humidityChar;
The following variables are used to check whether new temperature and humidity readings are available and if it is time to update the OLED display.
//Flags to check whether new temperature and humidity readings are available
boolean newTemperature = false;
boolean newHumidity = false;
printReadings()
We created a function called printReadings() that displays the temperature and humidity readings on the OLED display.
void printReadings(){

  display.clearDisplay();
  // display temperature
  display.setTextSize(1);
  display.setCursor(0,0);
  display.print("Temperature: ");
  display.setTextSize(2);
  display.setCursor(0,10);
  display.print(temperatureChar);
  display.print(" ");
  display.setTextSize(1);
  display.cp437(true);
  display.write(167);
  display.setTextSize(2);
  Serial.print("Temperature:");
  Serial.print(temperatureChar);
  #ifdef temperatureCelsius
    //Temperature Celsius
    display.print("C");
    Serial.print("C");
  #else
    //Temperature Fahrenheit
    display.print("F");
    Serial.print("F");
  #endif

  //display humidity
  display.setTextSize(1);
  display.setCursor(0, 35);
  display.print("Humidity: ");
  display.setTextSize(2);
  display.setCursor(0, 45);
  display.print(humidityChar);
  display.print("%");
  display.display();
  Serial.print(" Humidity:");
  Serial.print(humidityChar);
  Serial.println("%");
}
Recommended reading: ESP32 OLED Display with Arduino IDE
setup()
In the setup(), start the OLED display.
//OLED display setup
// SSD1306_SWITCHCAPVCC = generate display voltage from 3.3V internally
if(!display.begin(SSD1306_SWITCHCAPVCC, 0x3C)) { // Address 0x3C for 128x32
  Serial.println(F("SSD1306 allocation failed"));
  for(;;); // Don't proceed, loop forever
}
Then, print a message in the first line saying “BME SENSOR”.
display.clearDisplay();
display.setTextSize(2);
display.setTextColor(WHITE,0);
display.setCursor(0,25);
display.print("BLE Client");
display.display();
Start the serial communication at a baud rate of 115200.
Serial.begin(115200);And initialize the BLE device.
//Init BLE device
BLEDevice::init("");
Scan nearby devices
The following methods scan for nearby devices.
// Retrieve a Scanner and set the callback we want to use to be informed when we
// have detected a new device.  Specify that we want active scanning and start the
// scan to run for 30 seconds.
BLEScan* pBLEScan = BLEDevice::getScan();
pBLEScan->setAdvertisedDeviceCallbacks(new MyAdvertisedDeviceCallbacks());
pBLEScan->setActiveScan(true);
pBLEScan->start(30);
MyAdvertisedDeviceCallbacks() function
Note that the MyAdvertisedDeviceCallbacks() function, upon finding a BLE device, checks if the device found has the right BLE server name. If it has, it stops the scan and changes the doConnect boolean variable to true. This way we know that we found the server we’re looking for, and we can start establishing a connection.
//Callback function that gets called, when another device's advertisement has been received
class MyAdvertisedDeviceCallbacks: public BLEAdvertisedDeviceCallbacks {
  void onResult(BLEAdvertisedDevice advertisedDevice) {
    if (advertisedDevice.getName() == bleServerName) { //Check if the name of the advertiser matches
      advertisedDevice.getScan()->stop(); //Scan can be stopped, we found what we are looking for
      pServerAddress = new BLEAddress(advertisedDevice.getAddress()); //Address of advertiser is the one we need
      doConnect = true; //Set indicator, stating that we are ready to connect
      Serial.println("Device found. Connecting!");
    }
  }
};
Connect to the server
If the doConnect variable is true, it tries to connect to the BLE server. The connectToServer() function handles the connection between the client and the server.
//Connect to the BLE Server that has the name, Service, and Characteristics
bool connectToServer(BLEAddress pAddress) {
   BLEClient* pClient = BLEDevice::createClient();

  // Connect to the remove BLE Server.
  pClient->connect(pAddress);
  Serial.println(" - Connected to server");

  // Obtain a reference to the service we are after in the remote BLE server.
  BLERemoteService* pRemoteService = pClient->getService(bmeServiceUUID);
  if (pRemoteService == nullptr) {
    Serial.print("Failed to find our service UUID: ");
    Serial.println(bmeServiceUUID.toString().c_str());
    return (false);
  }

  // Obtain a reference to the characteristics in the service of the remote BLE server.
  temperatureCharacteristic = pRemoteService->getCharacteristic(temperatureCharacteristicUUID);
  humidityCharacteristic = pRemoteService->getCharacteristic(humidityCharacteristicUUID);

  if (temperatureCharacteristic == nullptr || humidityCharacteristic == nullptr) {
    Serial.print("Failed to find our characteristic UUID");
    return false;
  }
  Serial.println(" - Found our characteristics");

  //Assign callback functions for the Characteristics
  temperatureCharacteristic->registerForNotify(temperatureNotifyCallback);
  humidityCharacteristic->registerForNotify(humidityNotifyCallback);
  return true;
}
It also assigns a callback function responsible to handle what happens when a new value is received.
//Assign callback functions for the Characteristics
temperatureCharacteristic->registerForNotify(temperatureNotifyCallback);
humidityCharacteristic->registerForNotify(humidityNotifyCallback);
After the BLE client is connected to the server, you need to active the notify property for each characteristic. For that, use the writeValue() method on the descriptor.
if (connectToServer(*pServerAddress)) {
  Serial.println("We are now connected to the BLE Server.");
  //Activate the Notify property of each Characteristic
  temperatureCharacteristic->getDescriptor(BLEUUID((uint16_t)0x2902))->writeValue((uint8_t*)notificationOn, 2, true);
  humidityCharacteristic->getDescriptor(BLEUUID((uint16_t)0x2902))->writeValue((uint8_t*)notificationOn, 2, true);
Notify new values
When the client receives a new notify value, it will call these two functions: temperatureNotifyCallback() and humidityNotifyCallback() that are responsible for retrieving the new value, update the OLED with the new readings and print them on the Serial Monitor.
//When the BLE Server sends a new temperature reading with the notify property
static void temperatureNotifyCallback(BLERemoteCharacteristic* pBLERemoteCharacteristic,
                                        uint8_t* pData, size_t length, bool isNotify) {
  //store temperature value
  temperatureChar = (char*)pData;
  newTemperature = true;
}
//When the BLE Server sends a new humidity reading with the notify property
static void humidityNotifyCallback(BLERemoteCharacteristic* pBLERemoteCharacteristic,
uint8_t* pData, size_t length, bool isNotify) {
//store humidity value
humidityChar = (char*)pData;
newHumidity = true;
Serial.print(newHumidity);
}These two previous functions are executed every time the BLE server notifies the client with a new value, which happens every 30 seconds. These functions save the values received on the temperatureChar and humidityChar variables. These also change the newTemperature and newHumidity variables to true, so that we know we’ve received new readings.
Display new temperature and humidity readings
In the loop(), there is an if statement that checks if new readings are available. If there are new readings, we se the newTemperature and newHumidity variables to false, so that we are able to receive new readings later on. Then, we call the printReadings() function to display the readings on the OLED.
//if new temperature readings are available, print in the OLED
if (newTemperature && newHumidity){
  newTemperature = false;
  newHumidity = false;
  printReadings();
}
Testing the Project
That’s it for the code. You can upload it to your ESP32 board.
Once the code is uploaded. Power the ESP32 BLE server, then power the ESP32 with the client sketch. The client starts scanning nearby devices, and when it finds the other ESP32, it establishes a Bluetooth connection. Every 30 seconds, it updates the display with the latest readings.
Important: don’t forget to disconnect your smartphone from the BLE server. Otherwise, the ESP32 BLE Client won’t be able to connect to the server.

Wrapping Up
In this tutorial, you learned how to create a BLE Server and a BLE Client with the ESP32. You learned how to set new temperature and humidity values on the BLE server characteristics. Then, other BLE devices (clients) can connect to that server and read those characteristic values to get the latest temperature and humidity values. Those characteristics have the notify property, so that the client is notified whenever there’s a new value.
Using BLE is another communication protocol you can use with the ESP32 boards besides Wi-Fi. We hope you found this tutorial useful. We have tutorials for other communication protocols that you may find useful.
- ESP32 Bluetooth Classic with Arduino IDE – Getting Started
- ESP32 Useful Wi-Fi Library Functions (Arduino IDE)
- ESP-MESH with ESP32 and ESP8266: Getting Started (painlessMesh library)
- Getting Started with ESP-NOW (ESP32 with Arduino IDE)
Learn more about the ESP32 with our resources:


Excelente Tutorial! Parabéns.
Obrigada 🙂
Should the line in the server:
dtostrf(f, 6, 2, temperatureFTemp);
actually be:
dtostrf(tempF, 6, 2, temperatureFTemp);
Hi.
Yes. You are right.
I’ll fix the code.
Thanks for pointing that out.
Regards,
Sara
I’m afraid I noticed a couple of other typos in the server sketch. You apparently switched from dht to bme sensors but missed one reference in line 93:
bmeService->addCharacteristic(&dhtTemperatureFahrenheitCharacteristics);
You also created new descriptors when, I’m sure, you intended to point to the ones created earlier. Lines 95 and 101:
bmeTemperatureFahrenheitCharacteristics.addDescriptor(new BLE2902());
bmeHumidityCharacteristics.addDescriptor(new BLE2902());
should be:
bmeTemperatureCharacteristics.addDescriptor(&bmeTemperatureDescriptor);
bmeHumidityCharacteristics.addDescriptor(&bmeHumidityDescriptor);
Thanks for all the work you do. You are always the first source I go to when I have a problem with ESP microcontrollers.
Hi.
You’re right. Thanks for pointing that out.
I’ll fix it soon.
I guess I need a vacation. I should have seen that.
Regards,
Sara
Don’t feel too bad. When I looked for more documentation, every example I found created a new Descriptor. None explained how to modify that Descriptor after it was created. I applaud you for putting together such a good sketch when documentation is apparently so hard to find. That is why I always go to RNT first.
Thanks.
It is fixed now.
Regards,
Sara
Hello Sara and Allen (R Mulvey) too,
When I correct here in the server code this line adding the humidity descriptor as suggested, my client will crash at receiving data from the server.
Here the lines:
// Humidity
bmeService->addCharacteristic(&bmeHumidityCharacteristics);
bmeHumidityDescriptor.setValue(“BME humidity”);
//bmeHumidityCharacteristics.addDescriptor(new BLE2902()); // error?
// zie: https://randomnerdtutorials.com/esp32-ble-server-client/#comment-698103
bmeHumidityCharacteristics.addDescriptor(&bmeHumidityDescriptor); // now the client will crash!
So I came on the idea to change the definition of the humidity descriptor more in the beginning of this server sketch:
// Humidity Characteristic and Descriptor
BLECharacteristic bmeHumidityCharacteristics(“ca73b3ba-39f6-4ab3-91ae-186dc9577d99”, BLECharacteristic::PROPERTY_NOTIFY);
//BLEDescriptor bmeHumidityDescriptor(BLEUUID((uint16_t)0x2903)); // crashes when used in corrected code below
BLEDescriptor bmeHumidityDescriptor(BLEUUID((uint16_t)0x2902)); // does NOT crash when used in corrected code below
I don’t know why but that helps! No crashes at at the client.
But still I have a small but nasty problem at my client side. Once in a while the value for temperature is incorrect and is, in such a case, always exact the same value as the transferred value for the humidity. So I see equal values on the printed line (serial monitor).
Here you can see this probleem in a screenshot:
https://share.cleanshot.com/4blHZ2VJ
At right the data as sent by the server – at left what is printed by the client. Maybe the bug is at client side.
I hoped to solve this problem with your good suggestion, Allen.
I hope you can help me, Sara.
For the rest I’m very happy with your excellent examples BLE-coding, as I’m a novice in this area.
Kind regards,
Jop
Hey Sara,
Could you tell me how to stop hexdump.
If you look in the value field of a characteristic in the nrf connect app, it shows you the hexdump of the actual data followed by the actual data.
How to stop that?
I am reading data from rfid tag and sending over ble to nrf connect app but due to the hexdump only half of the data is being shown.
superb
and if you add sleeping to the server it will be even more battery friendly 😉
Thank you 🙂
It’s a pleasure to read yet another of your and Sara’s well explained tutorials.
Thank you.
Hey.
Can you explain this rule to me in more detail?
BLECharacteristic bmeTemperatureCelsiusCharacteristics(“cba1d466-344c-4be3-ab3f-189f80dd7518”, BLECharacteristic::PROPERTY_NOTIFY);
I almost understand how everything works but where does that long number come from or what does it do.
Greetings old man Bert
Hi.
Basically, you need to set UUIDs for your characteristics to identify them. You can create UUIDs (use the UUID generator website: https://www.uuidgenerator.net/) or use predefined UUIDs (https://www.bluetooth.com/specifications/assigned-numbers/).
The UUIDs are used to identify the characteristics. There are predefined UUIDs for the most common characteristics used by BLE devices, for example the Battery Level has a default UUID. This is useful because other devices that connect, know exactly what to search for to get the information they want.
We also define that we want the property of that characteristic to be notify. The property defines how the client can interact with those characteristics, it can be read, write, notify, and others.
I hope this is clear.
Regards,
Sara
Hey.
Very clear and understandable.
Sometimes there is a translation problem because I can’t write english.
Certain concepts are then not clear.
You explain everything you do very well and it is very instructive.
I thank you for that.
I’m going to work on it.
Greetings Old man Bert
That’s great!
Thank you.
Regards,
Sara
You once had a wish list.
If you still have it I’d love to
Esp32 Web server Hosting files from MicroSd Card.
Turns into an Esp32 captive portal Hosting Files from MicroSd Card.
But I have no idea if that’s possible.
I do have a version here that does that without SDcart, but that is very inconvenient if you want to change the html.
Hi.
I also don’t know. I haven’t investigated that.
But, I’ll add it to my list.
Regards,
Sara
Please tell us the power consume from server and client if you can.
And thankyou for this blog
Hi.
Unfortunately, I don’t have data about power consumption for this scenario.
Regards,
Sara
I found a way to make the client much more stable if the connection is broken and reconnected.
Make pClient global by moving the following statement to the top area outside all loops and functions:
BLEClient* pClient = BLEDevice::createClient();
Then add this to the top of the main loop:
bool status = pClient->isConnected(); // check BLE connection
if (!status) {
doConnect = true;
temperatureChar[0] = 0; humidityChar[0] = 0; // purge stale data
Serial.println(“Reconnecting BLE…”);
printReadings(); // redraw display so it does not display stale data
}
It will then connect and reconnect as necessary.
Thanks. I’ll try it out and update the code.
Regards,
Sara
Hi Sara,
Did you try already this suggestion of Allen?
As your code for client is not changed. (Doesn’t this maybe a good solution?)
Thnx,
Jop
Thanks RNT crew,
… for doing the BLE thing for esp32… and everything else.!
I am trying to incorporate [AsyncElegantOTA]
and am confused as to the order of the [#includes].
— I am only guessing that there is a correct “pecking order” ! ?
Is there a location where this issue is documented?
Currently I have:
#include <BLEDevice.h>
#include <BLEServer.h>
#include <BLEUtils.h>
#include <BLE2902.h>
#include <Wire.h>
#include <Arduino.h>
#include “WiFi.h”
#include “AsyncTCP.h”
#include “ESPAsyncWebServer.h”
#include “AsyncElegantOTA.h”
#include <Adafruit_Sensor.h>
#include <Adafruit_BME280.h>
But haven’t even tested that yet.
…before I proceed only to find headaches that I can’t identify the cause of.
I would appreciate someone with more experience would mind checking that and advise whether OK. If not, please re-order.
Any other pitfalls of trying to do OTA with BLE.
My server is going outside to a hard-to-reach spot.
TIA
Hi.
Everything looks fine.
Just put the following at the beginning:
#include <Arduino.h>
Regards,
Sara
Maybe this will be useful for someone.
Use NimBLEDevice.h instead BLEDevice.h for ESP32BLE !!!.
The BLEDevice.h eating too much memory, and if you will use wifi & BLE – the free memory will be dramatically low.
Found NimBLEDevice.h library,
Its use up to 44% less memory, compared to BLEDevice.h !!!
thank you for your information dude, have a nice day
Hello Sara!
I’m using your client example to get info from a pressure sensor. I don’t why I can really connect to my sensor that act like a server (tested via the LightBlue application in Android)
My console output look like this:
Starting Arduino BLE Client application…
Device found. Connecting!
Setup done
[E][BLEClient.cpp:238] gattClientEventHandler(): Failed to connect, status=Unknown ESP_ERR error
– Connected to server
Any idea why?
Thanks if you have any idea 🙂
If you want i can read your code and look that
I’m having the exact same error. Did you find a solution?
Can i use multiple servers with single client. Is that possible
Dear Sara,
Only the temperature and humidity value updates shown on the serial monitor. No any other details related to communication between both ESP32 modules shown on the serial monitor(Both server and client are same).
What can be the reason?
Thanks,
Indika
If you want i can read your code and look that , did you pay attention to the specific address of the sensor in its datasheet?
ESP BLE client
Est il possible que le client se déconnecte du serveur après avoir reçu ses informations, pour laisser la place à un autre client
Merci pour votre réponse
Cordialement
Serge
Hi Sara, Rui,
I am wondering if I could persuade you wonderful folk to have a look into [NimBLE-Arduino] by h2zero.
The advantages of NimBLE-Arduino over the Standard model BLE are huge in terms of RAM usage.
— This is even acknowledged on on the http://www.arduino.cc site.
For my tired old brain, it’s too much to get my head around and my project is now stretching the limits such that I am now using esp32-WROVER-IE.
some links:
– https://www.arduino.cc/reference/en/libraries/nimble-arduino/
– https://github.com/h2zero/NimBLE-Arduino
– https://h2zero.github.io/esp-nimble-cpp/md__migration_guide.html#autotoc_md46
If anyone else reading this is already into NimBLE and have a solid grasp of how to migrate, please drop a not in the RNT Labs. I could really use some help.
In BLE, I find it difficult to determine which are the library “keywords” and which are User defined.
— The third of the above links, I’ve only just found and that is helping a lot.
I feel sure you will be impressed by this library…
AND widely applauded for a tutorial and/or book on this subject. I would be first in line to buy. 🙂
TIA,
Chris
Hi.
Thank you so much for sharing that.
Other readers have also said great things about that library.
I haven’t tried it yet. But, that’s on my endless to-do list.
Thanks for your comment.
Regards,
Sara
Hello i want use value temperature in my client to make a condition but i can’t because it’s a pointer do you have a solution or idea for make a condition with data receive ?
Hi.
Check this that might help: https://stackoverflow.com/questions/13145777/c-char-to-int-conversion
Regards,
Sara
Is it possible to connect more than one client to the same server?
Hi.
Not at the same time.
Regards,
Sara
Hello Sara
I want to use multipel Client to one Server ESP32, what should i do in your code? may be few suggestions to start with ?
thanks Johnny
Guys can you tell is there a method where i can broadcast some text and sensor data using esp32 BLE
Which part do i need to change and add if i want to use 2 type of sensors which is Soil Moisture sensor and DS18B20 Temperature sensor to display the soil moisture values, temperature and status if the soil is too wet or too dry on the client’s OLED
Dear Sara,
Excelent Tutorial!
I need to identify the device I am connected to.
Is there a way of reading the MAC address or the Manufactorer ID of the device that is connected to my ESP32 BLE?
Thank you and regards
Hi.
I think this discussion might help: https://rntlab.com/question/ble-profile/
Regards,
Sara
Thank you Sara.
I will take a look.
Obrigado e cumprimentos
José Miguel Santos
Great tutorial! Thanks.
I have experienced an issue that after a successful connect, disconnect I could not connect to the device again. I had to restart advertising after disconnect like so:
//Setup callbacks onConnect and onDisconnect
class MyServerCallbacks: public BLEServerCallbacks {
void onConnect(BLEServer* pServer) {
deviceConnected = true;
};
void onDisconnect(BLEServer* pServer) {
deviceConnected = false;
pServer->startAdvertising(); // restart advertising after disconnecting
}
};
Now it works like charm.
Link to where I have found this solution: https://github.com/espressif/arduino-esp32/issues/6016
Hi I hope you can help me i get a
error: ‘temperatureNotifyCallback’ was not declared in this scope
message when compiling ESP32 BLE Client – Code
Hi.
Move the following function in the code so that it comes before the connectToServer() function.
//When the BLE Server sends a new temperature reading with the notify property
static void temperatureNotifyCallback(BLERemoteCharacteristic* pBLERemoteCharacteristic,
uint8_t* pData, size_t length, bool isNotify) {
//store temperature value
temperatureChar = (char*)pData;
newTemperature = true;
}
Thanks Love your Work
Hi, amazing tutorial. I have a question though, perhaps you can point me in the right direction. I would like to initialize the ESP32 either as a server or a client at power on. Is that even possible? I cannot find this answer anywhere. Perhaps I have been looking in the wrong places 😉
Thanks in advance, and i do apologize if my question is a bit off topic.
Dear Sara,
Excellent Tutorial! Keep going!
I need to connect to several GATT Servers devices around my house and I would like to get all the information using a single GATT Central device. How could implement it ? Any advise or snippet?
Hey Sara,
I am trying to connect to the server (BME280+ESP32) using my phone app (Serial Bluetooth terminal), and failed. it says “no serial profile found”. I am new to the BLE story. It would be nice to receive BME outputs from a phone with just one ESP32. Thanks
Hi.
I’m not sure what might be causing the issue.
Have you taken a look at this tutorial: https://randomnerdtutorials.com/esp32-bluetooth-low-energy-ble-arduino-ide/
Maybe it helps.
Regards,
Sara
got it working with some revisions. in case others might be interested (it also allows your phone as a display for monitoring and debugging) …
#include <BLEDevice.h>
#include <BLEServer.h>
#include <BLEUtils.h>
#include <BLE2902.h>
#include <Wire.h>
#include <Adafruit_Sensor.h>
#include <Adafruit_BME280.h>
BLEServer *pServer = NULL;
BLECharacteristic * pTxCharacteristic;
bool deviceConnected = false;
bool oldDeviceConnected = false;
uint8_t txValue = 0;
char txBuffer[100];
String txString = “BOM”;
//BLE server name
#define bleServerName “ESP32_BME280”
Adafruit_BME280 bme; // I2C
float temp;
float tempF;
float hum;
// See the following for generating UUIDs:
// https://www.uuidgenerator.net/
#define SERVICE_UUID “6E400001-B5A3-F393-E0A9-E50E24DCCA9E” // UART service UUID
#define CHARACTERISTIC_UUID_RX “6E400002-B5A3-F393-E0A9-E50E24DCCA9E”
#define CHARACTERISTIC_UUID_TX “6E400003-B5A3-F393-E0A9-E50E24DCCA9E”
class MyServerCallbacks: public BLEServerCallbacks {
void onConnect(BLEServer* pServer) {
deviceConnected = true;
};
void onDisconnect(BLEServer* pServer) {

  deviceConnected = false;

}
};
class MyCallbacks: public BLECharacteristicCallbacks {
void onWrite(BLECharacteristic *pCharacteristic) {
std::string rxValue = pCharacteristic->getValue();
if (rxValue.length() > 0) {Serial.println("*********");
Serial.print("Received Value: ");
for (int i = 0; i < rxValue.length(); i++)
Serial.print(rxValue[i]);
Serial.println();
Serial.println("*********");
}
}
};
void initBME(){
if (!bme.begin(0x76)) {
Serial.println(“Could not find a valid BME280 sensor, check wiring!”);
while (1);
}
}
void setup() {
Serial.begin(115200);
// Init BME Sensor
initBME();
// Create the BLE Device
BLEDevice::init(“ESP_B_UART”);
// Create the BLE Server
pServer = BLEDevice::createServer();
pServer->setCallbacks(new MyServerCallbacks());
// Create the BLE Service
BLEService *pService = pServer->createService(SERVICE_UUID);
// Create a BLE Characteristic
pTxCharacteristic = pService->createCharacteristic(CHARACTERISTIC_UUID_TX,BLECharacteristic::PROPERTY_NOTIFY);
// BLE2902 needed to notify
pTxCharacteristic->addDescriptor(new BLE2902());
BLECharacteristic * pRxCharacteristic = pService->createCharacteristic(CHARACTERISTIC_UUID_RX,BLECharacteristic::PROPERTY_WRITE);
pRxCharacteristic->setCallbacks(new MyCallbacks());
// Start the service
pService->start();
// Start advertising
pServer->getAdvertising()->addServiceUUID(pService->getUUID());
pServer->getAdvertising()->start();
Serial.println(“Waiting a client connection to notify…”);
}
void loop() {
// disconnecting
if (!deviceConnected && oldDeviceConnected) {
delay(500); // give the bluetooth stack the chance to get things ready
pServer->startAdvertising(); // restart advertising
Serial.println(“start advertising”);
oldDeviceConnected = deviceConnected;
}
// connecting
if (deviceConnected && !oldDeviceConnected) {
// do stuff here on connecting
oldDeviceConnected = deviceConnected;
}
// when a client is connected, sending dataif (deviceConnected) {
// Read temperature as Celsius (the default)
temp = bme.readTemperature();
// Fahrenheit
tempF = 1.8*temp + 32;
// Read humidity
hum = bme.readHumidity();
txString = String(String(temp) + "C " + String(tempF) + "F " + String(hum) + "%\n");
txString.toCharArray(txBuffer,txString.length()+1);
pTxCharacteristic->setValue((unsigned char*)txBuffer,txString.length());
pTxCharacteristic->notify();
Serial.print("BME280 (TempC TempF Humidity%): ");
Serial.print(txString);
delay(2000); // bluetooth stack will go into congestion, if too many packets are sent
}
}
Muito obrigado pelo tutorial!
Funcionou tudo OK. O Server eu testei com um ESP32 C3.
Good day!
I would like to ask for advice on the following error when trying to exchange data via bluetooth:
lld_pdu_get_tx_flush_nb HCI packet count mismatch (0, 1)
How can it be avoided?
Thank you in advance
Regards,
Bulat
Thanks for your work, Sarah.
Can you advise me how to get rid of the lld_pdu_get_tx_flush_nb HCI packet count mismatch (0, 1) error?
Hi.
I’m sorry, but I’m not familiar with that error.
Regards,
Sara
You might want to check this out, https://www.esp32.com/viewtopic.php?t=21912
I have been having a lot of strange problems with various ESP32 boards. Apparently there is a great deal of variation. I recently set up a mesh network. Boards marked “DO IT” worked but those marked “WEMOS” did not. All ESP8266 devices worked fine.
Thanks for the feedback, Allen. I would be grateful if you could share your working code. (Either to my mail ([email protected]), or somehow by link)
Thank you in advance.
Regards,
Bulat
My working code is not for BLE. It is for Mesh networking. It is just the same kind of error problems with ESP32 devices. If you still want it I will try to get some links up in the next week or so.
Allen
Hi,
I wonder if I could connect the client ESP32 to a PC, and use the serial monitor in Arduino IDE to transfer some numbers to the server ESP32. This is just like entering a command to the remote server ESP32. Am I able to do that? Thank you very much.
Hi, I added this to an existing project. My device that sends data to the other one, the recieving device has a bunch of gibberish in the serial monitor for the values, not the normal text or print statements. Is this a data type conversion issue?
Hi Rui / Sara,
I need to send a temperature value from one ESP32 to another using Bluetooth. I reviewed your project for this using BLE. The problem I have is with the connecting. I have to push the reset button on both boards in order for it to connect. If the connection is lost, I again have to reset both boards to get them connected again.
Can the program be changed so that if a connection is lost then both boards will go into a mode to automatically reconnect? Having to reset both boards will be a problem.
I can receive the data on my phone once I connect with the BT Terminal app without having to restart the master.
Any thoughts? Can this also be done with Bluetooth Classic?
Thank you
Mike Oshinski
Hi, and thank you. I keep getting this error when I fire the client:
Failed to find our characteristic UUID
I restarted the whole setup various times. Is there something I should be looking into?
I’ve just realized that it had to do with my comment to get temp in Fahrenheit in line 18 of the server
//Default Temperature is in Celsius
//Comment the next line for Temperature in Fahrenheit
#define temperatureCelsius
Do I need to modify something else?
and thank you again for all the help you bring
Hi Sara, hi Rui first a happy new Year.
I want to receive the data from an HLK-LD2410C_96C7
The BLE Scanner show me this data :
Advertised Device: Name: HLK-LD2410_96C7,
Address: a7:91:76:49:96:c7,
manufacturer data: d60508004a4c414953444b,
serviceUUID: 0000af30-0000-1000-8000-00805f9b34fb, rssi: -98
Is it possible to connect an ESP32 to the HLK-LD2410C device ?
Greatings John
Hi.
What do you mean by “connect”?
Regards,
Sara
These sketches have been great to bet me started, but I’ve hit a bump.
If you reboot both devices at the same time, everything is good. However, they don’t reconnect if either one of them is reset. I have to reset both to get them going again.
I was able to edit the Server sketch so that it will reconnect to my phone app automatically (basically just rerunning the Advertising portion of the sketch if deviceConnected becomes false.) That works great, but I can’t figure out how to do the same on the client sketch.
Can you tell me what code needs to be rerun on the client to make it reconnect on it’s own?
Hi Sara love your work, I have a problem when compiling “ESP32 BLE Client – Code”
I get the following message
Compilation error: ‘temperatureNotifyCallback’ was not declared in this scope
Could you help with this.
Hi.
Move the function definition to a place in the code before it is called first time.
Are you using VS Code?
REgards,
Sara
I’am using Arduino IDE. Thanks for your reply
Client code is now compiling I Copied and Pasted to the IDE
again and it worked cant explain what was wrong before but all good now
Thanks.
Por acaso alguém teria um sketch modelo para colocar senha na conexão BLE?
Hallo, ich habe 2 ESP32 Wroom mittels BLE als Server und Client verbunden, um die Werte eines BME 280 auf einem Oled Display gemäß Eurem Beispiel Projekt anzuzeigen. Die Bluetooth Verbindung funktioniert und die Werte werden übertragen. Aber auf dem Oled Display erscheint keine Anzeige. Was muss ich ändern? Das Display funktioniert.
Thanks for your work, Sarah.
Can you advise me how to get new RSSi value from connected server every second.
I’m new, and have problem with class or pointer.
Why the ESP32 with the screen is not the server ?
would this no longer make sense?
especially if we want to manage several sensors and therefore several BLE clients?
Hi SARA,
If ESP32 as a server, Mobile BLE application is Client.
In this case after the successful server(ESP32) client(App) conection , ESp32 need to disconnect the BLE connection between the Mobile application.
What should I do?
Thanks.
Hi ,
Thanks for your excellent contents.
I am struggling to add passkey encryption in ESP32 Client. Always getting Pairing failed!”
Added call back.
// Custom Security Callback Class
class MySecurity : public BLESecurityCallbacks {
uint32_t onPassKeyRequest() {
Serial.println(“Requested passkey”);
// Return the passkey expected by the server
return passkey; // Replace with your passkey
}
void onPassKeyNotify(uint32_t pass_key) {
Serial.printf(“Passkey Notify: %d\n”, pass_key);
}
bool onConfirmPIN(uint32_t pass_key) {
Serial.printf(“Confirm Passkey: %d\n”, pass_key);
return true; // Accept the passkey
}
bool onSecurityRequest() {
return true;
}
void onAuthenticationComplete(esp_ble_auth_cmpl_t auth_cmpl) {
if(auth_cmpl.success) {
Serial.println(“Pairing success!”);
} else {
Serial.println(“Pairing failed!”);
}
}
};
Calling this before “LEClient* pClient = BLEDevice::createClient();”
BLEDevice::setEncryptionLevel(ESP_BLE_SEC_ENCRYPT);
BLEDevice::setSecurityCallbacks(new MySecurity());
BLESecurity *pSecurity = new BLESecurity();

pSecurity->setAuthenticationMode(ESP_LE_AUTH_REQ_SC_ONLY); // Secure Connections Only

pSecurity->setCapability(ESP_IO_CAP_OUT); // Display Only (client provides passkey)

pSecurity->setRespEncryptionKey(ESP_BLE_ENC_KEY_MASK | ESP_BLE_ID_KEY_MASK);

pSecurity->setStaticPIN(passkey);

pSecurity->setKeySize(16);
Hi Sara,
Good day.
Is there any simple sample sketch for Server and Client which both of them can send and receive data between Server and Client. Thanks in advance
I am going to ask a really simple question, as I am new to this, so please bear with me.
I have mostly got all this working and have client and server talking to eachother.
I want to send the data between them using numerical data, ie integers, rather than character strings. I have managed to do this at the server end, but can not figure out what I need to change at the client end.
David
Hi Rui / Sara,
I am a freshman for Arduino.
Your website/ tutorial really helped me.
I have a question about the below function:
I guess there is an ” else ” missed.
the statemant I sandwiched with “//////////////////////…” seems always go through ( connectToServer() always delivers true ) no matter previous if result.
bool connectToServer(BLEAddress pAddress) {
BLEClient* pClient = BLEDevice::createClient();
// Connect to the remove BLE Server.
pClient->connect(pAddress);
Serial.println(” – Connected to server”);
// Obtain a reference to the service we are after in the remote BLE server.
BLERemoteService* pRemoteService = pClient->getService(bmeServiceUUID);
if (pRemoteService == nullptr) {
Serial.print(“Failed to find our service UUID: “);
Serial.println(bmeServiceUUID.toString().c_str());
return (false);
}
// Obtain a reference to the characteristics in the service of the remote BLE server.
temperatureCharacteristic = pRemoteService->getCharacteristic(temperatureCharacteristicUUID);
humidityCharacteristic = pRemoteService->getCharacteristic(humidityCharacteristicUUID);
if (temperatureCharacteristic == nullptr || humidityCharacteristic == nullptr) {
Serial.print(“Failed to find our characteristic UUID”);
return false;
}
/////////////////////////////////////////////////////////////////////////////////////////////////////////////////////////////////////////////
Serial.println(” – Found our characteristics”);
//Assign callback functions for the Characteristics
temperatureCharacteristic->registerForNotify(temperatureNotifyCallback);
humidityCharacteristic->registerForNotify(humidityNotifyCallback);
return true;
////////////////////////////////////////////////////////////////////////////////////////////////////////////////////////////////////////////
}
I got this working after there were multiple library conflicts. Then the UART project. Both suffer with the ESP32S3 Dev board, the com port somehow.
I want to build a PC/phone terminal for these, what platform do you recommend?
Hi.
I’m sorry, but I ddidn’t really understand your question.
Can you reformulate?
Regards,
Sara
A phone/PC software building program – and not node red!!! Awful.
To build an app. To interact with the Bluetooth device.
Hello,
Thanks for your excellent work on BLE.
I use platformIO to develop project under ESP32 board.
I installed the BLE library (ESP32 BLE Arduino by Neil Kolban) but on the repository this library is deprecated.
“This repository is deprecated. The BLE code is now part of the ESP32 Arduino core, making it automatically available to any Arduino ESP32 project without the need for manual import.”
Which library I have lo load into platformIO?
Tanks in advance
Claudio
Hi.
You don’t need to load any library.
It is automatically included.
Regards,
Sara