There is a wide variety of sensors, modules, and peripherals compatible with the ESP8266 NodeMCU boards. We have tutorials for the most popular components. This article is a compilation of 25 free guides for ESP8266 sensors and modules. Most guides cover programming the ESP8266 using the Arduino core, but we also have tutorials for MicroPython.

We have a similar guide for the ESP32: 29 Free Guides for Sensors and Modules [ESP32].
Here’s a quick list of the sensors/modules:
Environmental Sensors:
- DS18B20 Temperature Sensor
- Type-K Thermocouple Temperature Sensor
- DHT11/DHT22 Temperature and Humidity Sensor
- BME280 Temperature, Humidity, and Pressure Sensor
- BME680 Environmental Sensor (Gas, Pressure, Humidity, Temperature)
- BMP388 Altimeter Sensor (Pressure, Altitude, Temperature)
- BH1750 Light Sensor
- TDS Sensor (Total Dissolved Solids)
- Anemometer (wind speed sensor)
Motion Related Sensors:
- PIR Motion Sensor
- Door Sensor (reed switch)
- HC-SR04 Ultrasonic Sensor
- MPU6050 Accelerometer and Gyroscope
- RCWL-0516 Microwave Radar
- NEO-6M GPS Module
Other Sensors/Modules/Peripherals:
Displays:
Communication:
Motors:
Environmental Sensors
1. DS18B20 Temperature Sensor

The DS18B20 temperature sensor is a one-wire digital temperature sensor. This means that it just requires one data line (and GND) to communicate with your ESP8266 board. Each DS18B20 temperature sensor has a unique 64-bit serial code. This allows you to wire multiple sensors to the same data wire. So, you can get temperature from multiple sensors using just one GPIO.
The DS18B20 temperature sensor is also available in waterproof version.

To get started, you can follow the next tutorials:
Arduino core:
MicroPython:
Get a DS18B20 Temperature Sensor.
Get a DS18B20 Temperature Sensor (waterproof version).
2. Type-K Thermocouple Temperature Sensor

A K-type thermocouple is a type of temperature sensor with a wide measurement range like −200 to 1260ºC (−326 to 2300ºF). To get the temperature from the thermocouple we need a thermocouple amplifier. We use the MAX6675 amplifier that is sold together with the thermocouple, but you can use any other amplifier, like the MAX31855.
To get started, follow the next tutorial:
Arduino core:
Get the Type-K Thermocouple temperature sensor.
3. DHT11/DHT22 Temperature and Humidity Sensor

The DHT11 and DHT22 sensors are used to measure temperature and relative humidity. These sensors contain a chip that does analog to digital conversion and spits out a digital signal with the temperature and humidity. This makes them very easy to use with any microcontroller.
To get started, follow the next tutorials:
Arduino Core:
MicroPython:
Get a DHT22 temperature and humidity sensor.
Get a DHT11 temperature and humidity sensor.
4. BME280 Temperature, Humidity, and Pressure Sensor

The BME280 sensor module reads barometric pressure, temperature, and humidity. Because pressure changes with altitude, you can also estimate altitude. There are several versions of this sensor module: some can communicate using only I2C communication protocol, and others have the additional option to use the SPI communication protocol. We usually use the I2C protocol with this sensor. This sensor is very versatile and we use it in many of our tutorials.
To get started, follow the next tutorials:
Arduino core:
MicroPython:
Get a BME280 temperature, humidity, and pressure sensor.
5. BME680 Environmental Sensor (Gas, Pressure, Humidity, Temperature)

The BME680 is an environmental sensor that combines gas, pressure, humidity, and temperature sensors. The gas sensor can detect a broad range of gases like volatile organic compounds (VOC). For this reason, the BME680 can be used in indoor air quality control.
To get started, follow the next tutorials:
Arduino core:
MicroPython:
Get a BME680 environmental sensor.
6. BMP388 Altimeter Sensor (Pressure, Altitude, Temperature)

The BMP388 is a precise, low-power, low-noise absolute barometric pressure sensor that measures absolute pressure and temperature. Because pressure changes with altitude, we can also estimate altitude with great accuracy. For this reason, this sensor is handy for drone navigation and other applications like vertical velocity calculation; internet of things; weather forecast, and weather stations; health care applications; fitness applications; and much more.
To get started, follow the next tutorial:
Arduino core:
Get a BMP388 altimeter sensor.
7. BH1750 Light Sensor

The BH1750 is a 16-bit ambient light sensor that communicates via I2C protocol. It outputs luminosity measurements in lux (SI-derived unit of illuminance). It can measure a minimum of 1 lux and a maximum of 65535 lux. It can be used in a wide variety of projects. For example: to detect if it is day or night; to adjust or turn on/off LED’s brightness accordingly to ambient light; to adjust LCDs and screen’s brightness; to detect if an LED is lit; etc.
To get started, follow the next tutorial:
Arduino core:
Get a BH1750 ambient light sensor.
8. TDS Sensor (Total Dissolved Solids)

A TDS meter indicates the total dissolved solids like salts, minerals, and metals, in a solution. This parameter can be used to give you an idea of water quality and compare water from different sources. One of the main applications of a TDS meter is aquarium water quality monitoring.
To get started, follow the next tutorial:
Arduino core:
Get a TDS (total dissolved solids) sensor.
9. Anemometer (Wind Speed Sensor)

An anemometer is a device that allows us to measure wind speed. It is commonly used in weather stations. Learn how to use it with the ESP8266 board:
Arduino core:
Micropython:
Get a wind speed sensor compatible with the ESP8266.
Motion Related Sensors
10. PIR Motion Sensor

The PIR motion sensor is ideal to detect movement. PIR stands for “Passive Infrared” and it measures infrared light from objects in its field of view. So, it can detect motion based on changes in infrared light in the environment. It is ideal to detect if a human or animal has moved in or out of the sensor range.
Get started with the following tutorials:
Arduino core:
MicroPython:
Get a PIR Motion Sensor (HC-SR501).
11. Door Sensor (reed switch)

A magnetic contact switch is a reed switch encased in a plastic shell so that you can easily apply it on a door, a window, or a drawer to detect if it is open or closed.
We have several tutorials with the ESP32 that use a reed switch and send notifications when the door is opened or closed:
- ESP8266 NodeMCU Door Status Monitor with Telegram Notifications
- ESP8266 NodeMCU Door Status Monitor with Email Notifications (IFTTT)
12. HC-SR04 Ultrasonic Sensor

The HC-SR04 ultrasonic sensor uses sonar to determine the distance to an object. This sensor reads from 2cm to 400cm (0.8inch to 157inch) with an accuracy of 0.3cm (0.1inches), which is good for most hobbyist projects. In addition, this particular module comes with ultrasonic transmitter and receiver modules.
Get started with one of the following tutorials:
Arduino core:
MicroPython:
Get an HC-SR04 ultrasonic sensor.
13. MPU6050 Accelerometer and Gyroscope

The MPU-6050 IMU (Inertial Measurement Unit) is a 3-axis accelerometer and 3-axis gyroscope sensor. The accelerometer measures the gravitational acceleration and the gyroscope measures the rotational velocity. Additionally, this module also measures temperature. This sensor is ideal to determine the orientation of a moving object.
To get started, follow the next tutorial:
Arduino core:
Get an MPU6050 accelerometer and gyroscope.
14. RCWL-0516 Microwave Radar Sensor
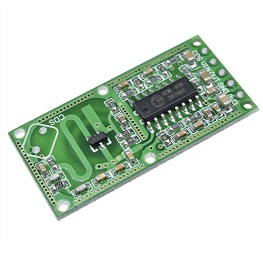
The RCWL-0516 is a small, inexpensive sensor that uses microwave radar to detect the presence of moving objects. The RCWL-0516 sensor has a single output pin that goes HIGH when it detects movement. It outputs LOW when no motion is detected. This sensor is many times used as an alternative to the PIR motion sensor.
Get started with the following tutorial:
Get an RCWL-0516 Microwave Radar Proximity Sensor.
15. NEO-6M GPS Module

The NEO-6M GPS module is a GPS receiver compatible with most microcontroller boards. It can get data about location, speed, altitude, and time.
Arduino core:
Other Sensors/Modules/Peripherals
16. Potentiometer

A potentiometer, also referred to as a pot, is a manually adjustable resistor that can be used in numerous applications: adjust the speed of a DC motor, adjust the position of a stepper or servo motor, adjust threshold values, adjust light intensity, and much more.
To get a value from a potentiometer, you need to know how to read analog signals with the ESP8266. Get started with the following tutorials:
Arduino core:
MicroPython:
To learn how a potentiometer works, we recommend taking a quick look at the following guide:
Get a potentiometers assortment kit.
17. Relay Module

A relay is an electrically operated switch and like any other switch, it that can be turned on or off, letting the current go through or not. It can be controlled with low voltages, like the 3.3V provided by the ESP8266 GPIOs, and allows us to control high voltages like 12V, 24V, or mains voltage (230V in Europe and 120V in the US).
Using a relay with the ESP8266 is a great way to control AC household appliances remotely. Get started with the following tutorials:
Arduino core:
MicroPython:
Get a relay module:
- 5V 2-channel relay module (with optocoupler)
- 5V 1-channel relay module (with optocoupler)
- 5V 8-channel relay module (with optocoupler)
- 5V 16-channel relay module (with optocoupler)
- 3.3V 1-channel relay module (with optocoupler)
18. Load Cell with HX711 Amplifier

The load cell you see in the picture above is a strain gauge load cell. A strain gauge is an electrical sensor that measures force or strain on an object. The resistance of the strain gauge varies when an external force is applied to an object, which results in a deformation of the object’s shape (in this case, the metal bar). The change of the resistance is proportional to the load applied, which allows us to calculate the weight of objects.
Get started with the following tutorial:
Arduino core:
Get a load cell with the HX711 amplifier.
Displays
19. OLED Display (SSD1306)

The organic light-emitting diode (OLED) display is a monocolor display that doesn’t require backlight, which results in a very nice contrast in dark environments. Additionally, its pixels consume energy only when they are on, so the OLED display consumes less power when compared with other displays. It’s available with different drivers, but we recommend getting the one with the SSD1306 driver, which is the most supported. There is also a wide variety of OLED sizes. We usually use the 0.96-inch display with 128×64 pixels.
Arduino core:
- ESP8266 0.96 inch OLED Display with Arduino IDE
- ESP32/ESP8266: DHT Temperature and Humidity Readings in OLED Display
MicroPython:
- MicroPython: OLED Display with ESP32 and ESP8266
- MicroPython: SSD1306 OLED Display Scroll Functions and Draw Shapes (ESP32/ESP8266)
Get an 0.96inch SSD1306 OLED display.
20. I2C LCD (Liquid Crystal Display)

The simplest and cheapest display screen around is the liquid crystal display (LCD). LCDs are found in everyday electronics devices like vending machines, calculators, parking meters, and printers, and are ideal for displaying text or small icons.
LCDs are measured according to the number of rows and columns of characters that fit on the screen. You’ll find sizes ranging from 8×1 to 40×4. A 16×2 LCD can display 2 rows of 16 characters each and this is the one we use most in our projects. We recommend getting one that supports I2C because it makes wiring and coding even easier.
Get started with the following tutorial:
Arduino core:
21. RGB LED Strip

LED strips are just amazing, and there are a wide variety of LED strips to choose from. They can be analog, or digital, and vary in the density and number of LEDs, power supply, etc. To learn more about the main differences between LED strips, I recommend taking a look at the following article: What’s the Best LED Strip For Your Project?
Analog LED strips have their LEDs wired in parallel. The whole strip works as a giant RGB LED. So, you can light up your whole strip in many different colors, but you can’t control LEDs individually. This means your strip can only be one color at a time. This type of LED strips are cheaper than the digital ones and easier to use. You can follow the next tutorial that shows how to use those LED strips:
Arduino core:
When it comes to digital LED strips, you can control each LED individually – these are also called addressable LED strips. You can chose each LED color, its brightness and when they should be on and off. This allows you to do all sorts of crazy and awesome effects. Our favorite addressable RGB LED strip is the WS2812B. We have a MicroPython guide showing how to control an addressable RGB LED strip and produce amazing effects.
MicroPython:
Get a WS2812B addressable RGB LED Strip.
Communication
22. TCA9548A I2C Multiplexer

The I2C communication protocol allows you to communicate with multiple I2C devices on the same I2C bus as long as each device has a unique I2C address. However, it will not work if you want to connect multiple I2C devices with the same address.
The TCA9548A I2C multiplexer allows you to communicate with up to 8 I2C devices with the same I2C bus. The multiplexer communicates with a microcontroller using the I2C communication protocol. Then, you can select which I2C bus on the multiplexer you want to address.
Get started with the following tutorial:
Arduino core:
Get a TCA9584A I2C multiplexer.
23. MRFC522 RFID Reader/Writer

RFID means radio-frequency identification. RFID uses electromagnetic fields to transfer data over short distances. RFID is useful for identifying people, making transactions, opening doors, and many other applications.
Learn how to use the MFRC522 RFID Reader with the ESP8266:
Motors
24. Stepper Motor

A stepper motor is a brushless DC electric motor that divides a full rotation into a number of steps. It moves one step at a time, and each step is the same size. This allows us to rotate the motor at a precise angle to a precise position. The stepper motor can rotate clockwise or counterclockwise.
To get started, follow the next tutorial:
Arduino core:
Get a stepper motor (2BYJ-48).
25. DC Motor

Learn how to control a DC motor (speed and direction) with the ESP8266 using the L298N motor driver. To get started, follow the next tutorial:
Arduino core:
Wrapping Up
This was our compilation of tutorials for the most popular sensors, modules, and peripherals compatible with the ESP8266 NodeMCU boards.
If you have a sensor/module that you would like to be covered on our website, just write a comment below.
We hope you find this article useful. Don’t forget to bookmark this page for the future and share it with a friend that also likes electronics.
If you want to learn more about the ESP8266, check out the following resources:
- Home Automation using ESP8266
- Build Web Servers with ESP32 and ESP8266
- Firebase Web App with ESP32 and ESP8266
- Free ESP8266 Projects and Tutorials
Thanks for reading


Great article and overview, just missing the capacitive soil moisture sensor like these:
amazon.com/capacitive-soil-moisture-sensor/s?k=capacitive+soil+moisture+sensor
Hi.
Thanks for the suggestion.
We have some ESP32 projects with that sensor in the “Learn ESP32” eBook. However, we don’t have any tutorials for the ESP8266.
That’s a great addition to our blog.
I’ll add that to our to-do list.
Regards,
Sara
Hello Sara,
I hope I’m not bothering you by asking, but have you already received/written a tutorial regarding the capacitive soil moisture sensor?
Best regards,
Sebastian
Hi.
we have a guide for the Arduino: https://randomnerdtutorials.com/guide-for-soil-moisture-sensor-yl-69-or-hl-69-with-the-arduino/
It should be similar for the ESP8266.
Regards,
Sara
Thank you very much for the link!
I think I can figure it out then 🙂
BR,
Sebastian
Hello Ruy, hola Ruy (entiendes español creo, o eres brasilero?)
I whish to have all this information compiled into one file. I thought, I could download it all and take it with me to the countryside where is my house and I have not all the time internet there, sometimes with many interruptions.
I have many of these sensors and some ESP8266 doing nothing in a box, so I would get use of them. Can you help me, please?
Hi.
Unfortunately, at the moment, we don’t have this compiled into a PDF.
But that’s a great suggestion. I’ll guess we’ll add that to the free eBooks in the future.
Regards,
Sara
P.S. We are Portuguese.
Hi Sara,
Thanks for all these great lectures, I have learnt very much. Concerning the BLE sensors I missed the inclusion of deep-sleep which we need to make battery driven sensors.
Could you pay attention to this fact during any of your following projects?
Best regards
Franz