This guide shows how to use a microSD card with the ESP32: you’ll learn how to read and write files to the microSD card. To interface the microSD card with the ESP32 board, we’ll use a microSD card module (SPI communication protocol). Using a microSD card with the ESP32 is especially useful for data logging or storing files that don’t fit in the filesystem (SPIFFS). The ESP32 will be programmed using the Arduino core.

In this tutorial, we’ll cover the following topics:
- Introducing the MicroSD Card Module and Pinout
- Interface ESP32 with microSD Card Module
- Testing the microSD Card Module: read, write and handle files
- Use custom SPI pins with the microSD card
- ESP32 Data Logging to microSD Card (sensor readings)
- ESP32 Web Server with Files from microSD Card
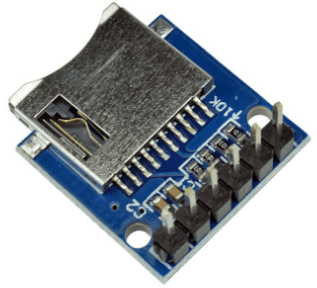
MicroSD Card Module
There are different microSD card modules compatible with the ESP32. We’re using the microSD card module sown in the following figure – it communicates using SPI communication protocol. You can use any other microSD card module with an SPI interface.

This microSD card module is also compatible with other microcontrollers like the Arduino and the ESP8266 NodeMCU boards. To learn how to use the microSD card module with the Arduino, you can follow the next tutorial:
Where to Buy?
You can click the link below to check different stores where you can get the microSD card module:
MicroSD Card Module Pinout – SPI
The microSD card module communicates using SPI communication protocol. You can connect it to the ESP32 using the default SPI pins.
| MicroSD card module | ESP32 |
| 3V3 | 3.3V |
| CS | GPIO 5 |
| MOSI | GPIO 23 |
| CLK | GPIO 18 |
| MISO | GPIO 19 |
| GND | GND |
Parts Required

For this tutorial, you need the following parts:
- ESP32 development board (read: Best ESP32 development boards)
- MicroSD Card Module
- MicroSD Card
- Jumper Wires
- Breadboard
You can use the preceding links or go directly to MakerAdvisor.com/tools to find all the parts for your projects at the best price!

ESP32 with microSD Card Module – Schematic Diagram
To wire the microSD card module to the ESP32 board, you can follow the next schematic diagram (for the default ESP32 SPI pins):

Recommended reading: ESP32 Pinout Reference: Which GPIO pins should you use?
Preparing the microSD Card
Before proceeding with the tutorial, make sure you format your microSD card as FAT32. Follow the next instructions to format your microSD card or use a software tool like SD Card Formater (compatible with Windows and Mac OS).
1. Insert the microSD card into your computer. Go to My Computer and right-click on the SD card. Select Format as shown in the figure below.

2. A new window pops up. Select FAT32, press Start to initialize the formatting process and follow the onscreen instructions.

Preparing Arduino IDE
We’ll program the ESP32 board using Arduino IDE. So, make sure you have the ESP32 add-on installed. Follow the next tutorial:
If you prefer using VSCode + PlatformIO, follow the next tutorial instead:
ESP32 Handling Files with a MicroSD Card Module
There are two different libraries for the ESP32 (included in the Arduino core for the ESP32): the SD library and the SDD_MMC.h library.
If you use the SD library, you’re using the SPI controller. If you use the SDD_MMC library you’re using the ESP32 SD/SDIO/MMC controller. You can learn more about the ESP32 SD/SDIO/MMC driver.

There are several examples in Arduino IDE that show how to handle files on the microSD card using the ESP32. In the Arduino IDE, go to File > Examples > SD(esp32) > SD_Test, or copy the following code.
/*
  Rui Santos
  Complete project details at https://RandomNerdTutorials.com/esp32-microsd-card-arduino/

  This sketch can be found at: Examples > SD(esp32) > SD_Test
*/

#include "FS.h"
#include "SD.h"
#include "SPI.h"

void listDir(fs::FS &fs, const char * dirname, uint8_t levels){
  Serial.printf("Listing directory: %s\n", dirname);

  File root = fs.open(dirname);
  if(!root){
    Serial.println("Failed to open directory");
    return;
  }
  if(!root.isDirectory()){
    Serial.println("Not a directory");
    return;
  }

  File file = root.openNextFile();
  while(file){
    if(file.isDirectory()){
      Serial.print("  DIR : ");
      Serial.println(file.name());
      if(levels){
        listDir(fs, file.name(), levels -1);
      }
    } else {
      Serial.print("  FILE: ");
      Serial.print(file.name());
      Serial.print("  SIZE: ");
      Serial.println(file.size());
    }
    file = root.openNextFile();
  }
}

void createDir(fs::FS &fs, const char * path){
  Serial.printf("Creating Dir: %s\n", path);
  if(fs.mkdir(path)){
    Serial.println("Dir created");
  } else {
    Serial.println("mkdir failed");
  }
}

void removeDir(fs::FS &fs, const char * path){
  Serial.printf("Removing Dir: %s\n", path);
  if(fs.rmdir(path)){
    Serial.println("Dir removed");
  } else {
    Serial.println("rmdir failed");
  }
}

void readFile(fs::FS &fs, const char * path){
  Serial.printf("Reading file: %s\n", path);

  File file = fs.open(path);
  if(!file){
    Serial.println("Failed to open file for reading");
    return;
  }

  Serial.print("Read from file: ");
  while(file.available()){
    Serial.write(file.read());
  }
  file.close();
}

void writeFile(fs::FS &fs, const char * path, const char * message){
  Serial.printf("Writing file: %s\n", path);

  File file = fs.open(path, FILE_WRITE);
  if(!file){
    Serial.println("Failed to open file for writing");
    return;
  }
  if(file.print(message)){
    Serial.println("File written");
  } else {
    Serial.println("Write failed");
  }
  file.close();
}

void appendFile(fs::FS &fs, const char * path, const char * message){
  Serial.printf("Appending to file: %s\n", path);

  File file = fs.open(path, FILE_APPEND);
  if(!file){
    Serial.println("Failed to open file for appending");
    return;
  }
  if(file.print(message)){
      Serial.println("Message appended");
  } else {
    Serial.println("Append failed");
  }
  file.close();
}

void renameFile(fs::FS &fs, const char * path1, const char * path2){
  Serial.printf("Renaming file %s to %s\n", path1, path2);
  if (fs.rename(path1, path2)) {
    Serial.println("File renamed");
  } else {
    Serial.println("Rename failed");
  }
}

void deleteFile(fs::FS &fs, const char * path){
  Serial.printf("Deleting file: %s\n", path);
  if(fs.remove(path)){
    Serial.println("File deleted");
  } else {
    Serial.println("Delete failed");
  }
}

void testFileIO(fs::FS &fs, const char * path){
  File file = fs.open(path);
  static uint8_t buf[512];
  size_t len = 0;
  uint32_t start = millis();
  uint32_t end = start;
  if(file){
    len = file.size();
    size_t flen = len;
    start = millis();
    while(len){
      size_t toRead = len;
      if(toRead > 512){
        toRead = 512;
      }
      file.read(buf, toRead);
      len -= toRead;
    }
    end = millis() - start;
    Serial.printf("%u bytes read for %u ms\n", flen, end);
    file.close();
  } else {
    Serial.println("Failed to open file for reading");
  }


  file = fs.open(path, FILE_WRITE);
  if(!file){
    Serial.println("Failed to open file for writing");
    return;
  }

  size_t i;
  start = millis();
  for(i=0; i<2048; i++){
    file.write(buf, 512);
  }
  end = millis() - start;
  Serial.printf("%u bytes written for %u ms\n", 2048 * 512, end);
  file.close();
}

void setup(){
  Serial.begin(115200);
  if(!SD.begin(5)){
    Serial.println("Card Mount Failed");
    return;
  }
  uint8_t cardType = SD.cardType();

  if(cardType == CARD_NONE){
    Serial.println("No SD card attached");
    return;
  }

  Serial.print("SD Card Type: ");
  if(cardType == CARD_MMC){
    Serial.println("MMC");
  } else if(cardType == CARD_SD){
    Serial.println("SDSC");
  } else if(cardType == CARD_SDHC){
    Serial.println("SDHC");
  } else {
    Serial.println("UNKNOWN");
  }

  uint64_t cardSize = SD.cardSize() / (1024 * 1024);
  Serial.printf("SD Card Size: %lluMB\n", cardSize);

  listDir(SD, "/", 0);
  createDir(SD, "/mydir");
  listDir(SD, "/", 0);
  removeDir(SD, "/mydir");
  listDir(SD, "/", 2);
  writeFile(SD, "/hello.txt", "Hello ");
  appendFile(SD, "/hello.txt", "World!\n");
  readFile(SD, "/hello.txt");
  deleteFile(SD, "/foo.txt");
  renameFile(SD, "/hello.txt", "/foo.txt");
  readFile(SD, "/foo.txt");
  testFileIO(SD, "/test.txt");
  Serial.printf("Total space: %lluMB\n", SD.totalBytes() / (1024 * 1024));
  Serial.printf("Used space: %lluMB\n", SD.usedBytes() / (1024 * 1024));
}

void loop(){

}
This example shows how to do almost any task you may need with the microSD card:
- List a directory;
- Create a directory;
- Remove a directory;
- Read a file content;
- Write content to a file;
- Append content to file;
- Rename a file;
- Delete a file;
- Initialize microSD card;
- Get microSD card type;
- Get microSD card size;
Alternatively, you can use the SD_MMC examples – these are similar to the SD examples, but use the SDMMC driver. For the SDMMC driver, you need a compatible microSD card module. The module we’re using in this tutorial doesn’t support SDMMC.
How the Code Works
First, you need to include the following libraries: FS.h to handle files, SD.h to interface with the microSD card and SPI.h to use SPI communication protocol.
#include "FS.h"
#include "SD.h"
#include "SPI.h"
The example provides several functions to handle files on the microSD card.
List a directory
The listDir() function lists the directories on the SD card. This function accepts as arguments the filesystem (SD), the main directory’s name, and the levels to go into the directory.
void listDir(fs::FS &fs, const char * dirname, uint8_t levels){
  Serial.printf("Listing directory: %s\n", dirname);

  File root = fs.open(dirname);
  if(!root){
    Serial.println("Failed to open directory");
    return;
  }
  if(!root.isDirectory()){
    Serial.println("Not a directory");
    return;
  }

  File file = root.openNextFile();
  while(file){
    if(file.isDirectory()){
      Serial.print("  DIR : ");
      Serial.println(file.name());
      if(levels){
        listDir(fs, file.name(), levels -1);
      }
    } else {
      Serial.print("  FILE: ");
      Serial.print(file.name());
      Serial.print("  SIZE: ");
      Serial.println(file.size());
    }
     file = root.openNextFile();
  }
}
Here’s an example of how to call this function. The / corresponds to the microSD card root directory.
listDir(SD, "/", 0);Create a Directory
The createDir() function creates a new directory. Pass as an argument the SD filesystem and the directory name path.
void createDir(fs::FS &fs, const char * path){
  Serial.printf("Creating Dir: %s\n", path);
  if(fs.mkdir(path)){
    Serial.println("Dir created");
  } else {
    Serial.println("mkdir failed");
  }
}
For example, the following command creates a new directory on the root called mydir.
createDir(SD, "/mydir");Remove a Directory
To remove a directory from the microSD card, use the removeDir() function and pass as an argument the SD filesystem and the directory name path.
void removeDir(fs::FS &fs, const char * path){
  Serial.printf("Removing Dir: %s\n", path);
  if(fs.rmdir(path)){
    Serial.println("Dir removed");
  } else {
    Serial.println("rmdir failed");
  }
}
Here is an example:
removeDir(SD, "/mydir");Read File Content
The readFile() function reads the content of a file and prints the content in the Serial Monitor. As with previous functions, pass as an argument the SD filesystem and the file path.
void readFile(fs::FS &fs, const char * path){
  Serial.printf("Reading file: %s\n", path);

  File file = fs.open(path);
  if(!file){
    Serial.println("Failed to open file for reading");
    return;
  }

  Serial.print("Read from file: ");
  while(file.available()){
    Serial.write(file.read());
  }
  file.close();
}
For example, the following line reads the content of the hello.txt file.
readFile(SD, "/hello.txt")Write Content to a File
To write content to a file, you can use the writeFile() function. Pass as an argument, the SD filesystem, the file path and the message
void writeFile(fs::FS &fs, const char * path, const char * message){
  Serial.printf("Writing file: %s\n", path);

  File file = fs.open(path, FILE_WRITE);
  if(!file){
    Serial.println("Failed to open file for writing");
    return;
  }
  if(file.print(message)){
    Serial.println("File written");
  } else {
    Serial.println("Write failed");
  }
  file.close();
}
The following line writes Hello in the hello.txt file.
writeFile(SD, "/hello.txt", "Hello ");Append Content to a File
Similarly, you can append content to a file (without overwriting previous content) using the appendFile() function.
void appendFile(fs::FS &fs, const char * path, const char * message){
  Serial.printf("Appending to file: %s\n", path);

  File file = fs.open(path, FILE_APPEND);
  if(!file){
    Serial.println("Failed to open file for appending");
    return;
  }
  if(file.print(message)){
    Serial.println("Message appended");
  } else {
    Serial.println("Append failed");
  }
  file.close();
}
The following line appends the message World!\n in the hello.txt file. The \n means that the next time you write something to the file, it will be written in a new line.
appendFile(SD, "/hello.txt", "World!\n");Rename a File
You can rename a file using the renameFile() function. Pass as arguments the SD filesystem, the original filename, and the new filename.
void renameFile(fs::FS &fs, const char * path1, const char * path2){
  Serial.printf("Renaming file %s to %s\n", path1, path2);
  if (fs.rename(path1, path2)) {
    Serial.println("File renamed");
  } else {
    Serial.println("Rename failed");
  }
}
The following line renames the hello.txt file to foo.txt.
renameFile(SD, "/hello.txt", "/foo.txt");Delete a File
Use the deleteFile() function to delete a file. Pass as an argument the SD filesystem and the file path of the file you want to delete.
void deleteFile(fs::FS &fs, const char * path){
  Serial.printf("Deleting file: %s\n", path);
  if(fs.remove(path)){
    Serial.println("File deleted");
  } else {
    Serial.println("Delete failed");
  }
}
The following line deletes the foo.txt file from the microSD card.
deleteFile(SD, "/foo.txt");Test a File
The testFileIO() functions shows how long it takes to read the content of a file.
void testFileIO(fs::FS &fs, const char * path){
  File file = fs.open(path);
  static uint8_t buf[512];
  size_t len = 0;
  uint32_t start = millis();
  uint32_t end = start;
  if(file){
    len = file.size();
    size_t flen = len;
    start = millis();
    while(len){
      size_t toRead = len;
      if(toRead > 512){
        toRead = 512;
      }
      file.read(buf, toRead);
      len -= toRead;
    }
    end = millis() - start;
    Serial.printf("%u bytes read for %u ms\n", flen, end);
    file.close();
  }
  else {
    Serial.println("Failed to open file for reading");
  }

  file = fs.open(path, FILE_WRITE);
  if(!file){
    Serial.println("Failed to open file for writing");
    return;
  }

  size_t i;
  start = millis();
  for(i=0; i<2048; i++){
    file.write(buf, 512);
  }
  end = millis() - start;
  Serial.printf("%u bytes written for %u ms\n", 2048 * 512, end);
  file.close();
}
The following function tests the test.txt file.
testFileIO(SD, "/test.txt");Initialize the microSD Card
In the setup(), the following lines initialize the microSD card with SD.begin().
Serial.begin(115200);
if(!SD.begin()){
  Serial.println("Card Mount Failed");
  return;
}
uint8_t cardType = SD.cardType();

if(cardType == CARD_NONE){
  Serial.println("No SD card attached");
  return;
}
If you don’t pass any argument to the begin() function, it will try to initialize SPI communication with the microSD card on the default chip select (CS) pin. If you want to use another CS pin, you can pass it as an argument to the begin() function. For example, if you wanted to use GPIO 17 as a CS pin, you should use the following lines of code:
Serial.begin(115200);
if(!SD.begin(17)){
  Serial.println("Card Mount Failed");
  return;
}
uint8_t cardType = SD.cardType();
If you want to use custom SPI pins with the microSD card, go to this section.
Get microSD Card Type
The following lines print the microSD card type on the Serial Monitor.
Serial.print("SD Card Type: ");
if(cardType == CARD_MMC){
  Serial.println("MMC");
} else if(cardType == CARD_SD){
  Serial.println("SDSC");
} else if(cardType == CARD_SDHC){
  Serial.println("SDHC");
} else {
  Serial.println("UNKNOWN");
}
Get microSD Card Size
You can get the microSD card size by calling the cardSize() method:
uint64_t cardSize = SD.cardSize() / (1024 * 1024);
Serial.printf("SD Card Size: %lluMB\n", cardSize);
Testing MicroSD Card Functions
The following lines call the functions we’ve seen previously.
listDir(SD, "/", 0);
createDir(SD, "/mydir");
listDir(SD, "/", 0);
removeDir(SD, "/mydir");
listDir(SD, "/", 2);
writeFile(SD, "/hello.txt", "Hello ");
appendFile(SD, "/hello.txt", "World!\n");
readFile(SD, "/hello.txt");
deleteFile(SD, "/foo.txt");
renameFile(SD, "/hello.txt", "/foo.txt");
readFile(SD, "/foo.txt");
testFileIO(SD, "/test.txt");
Serial.printf("Total space: %lluMB\n", SD.totalBytes() / (1024 * 1024));
Serial.printf("Used space: %lluMB\n", SD.usedBytes() / (1024 * 1024));
Demonstration
Upload the previous sketch to your ESP32 board. After that, open the Serial Monitor and press the ESP32 on-board RST button. If the initialization succeeds, you’ll get similar messages on the Serial Monitor.


Use Custom SPI Pins with the MicroSD Card
The SD.h and SD_MMC.h libraries use the VSPI SPI pins (23, 19, 18, 5) by default. You can set other pins as SPI pins. The ESP32 features two SPI interfaces: HSPI and VSPI on the following pins:
| SPI | MOSI | MISO | CLK | CS |
| VSPI | GPIO 23 | GPIO 19 | GPIO 18 | GPIO 5 |
| HSPI | GPIO 13 | GPIO 12 | GPIO 14 | GPIO 15 |
Recommended reading: ESP32 Pinout Reference: Which GPIO pins should you use?
To use other SPI pins, you can proceed as follows:
At the beginning of your code, declare the pins you want to use, for example:
#define SCK  17
#define MISO  19
#define MOSI  23
#define CS  5
Create a new SPI class on HSPI or VSPI. We’re using VSPI. Both will work fine.
SPIClass spi = SPIClass(VSPI);In the setup(), initialize SPI communication protocol on the pins defined previously:
spi.begin(SCK, MISO, MOSI, CS);Finally, initialize the microSD card with the begin() method. Pass as argument the CS pin, the SPI instance you want to use, and the bus frequency.
if (!SD.begin(CS,spi,80000000)) {
  Serial.println("Card Mount Failed");
  return;
}
Here is the sample code modified to use custom SPI pins:
/*
  Rui Santos
  Complete project details at https://RandomNerdTutorials.com/esp32-microsd-card-arduino/

  This sketch was mofidied from: Examples > SD(esp32) > SD_Test
*/

#include "FS.h"
#include "SD.h"
#include "SPI.h"

#define SCK  17
#define MISO  19
#define MOSI  23
#define CS  5

SPIClass spi = SPIClass(VSPI);

void listDir(fs::FS &fs, const char * dirname, uint8_t levels){
  Serial.printf("Listing directory: %s\n", dirname);

  File root = fs.open(dirname);
  if(!root){
    Serial.println("Failed to open directory");
    return;
  }
  if(!root.isDirectory()){
    Serial.println("Not a directory");
    return;
  }

  File file = root.openNextFile();
  while(file){
    if(file.isDirectory()){
      Serial.print("  DIR : ");
      Serial.println(file.name());
      if(levels){
        listDir(fs, file.name(), levels -1);
      }
    } else {
      Serial.print("  FILE: ");
      Serial.print(file.name());
      Serial.print("  SIZE: ");
      Serial.println(file.size());
    }
    file = root.openNextFile();
  }
}

void createDir(fs::FS &fs, const char * path){
  Serial.printf("Creating Dir: %s\n", path);
  if(fs.mkdir(path)){
    Serial.println("Dir created");
  } else {
    Serial.println("mkdir failed");
  }
}

void removeDir(fs::FS &fs, const char * path){
  Serial.printf("Removing Dir: %s\n", path);
  if(fs.rmdir(path)){
    Serial.println("Dir removed");
  } else {
    Serial.println("rmdir failed");
  }
}

void readFile(fs::FS &fs, const char * path){
  Serial.printf("Reading file: %s\n", path);

  File file = fs.open(path);
  if(!file){
    Serial.println("Failed to open file for reading");
    return;
  }

  Serial.print("Read from file: ");
  while(file.available()){
    Serial.write(file.read());
  }
  file.close();
}

void writeFile(fs::FS &fs, const char * path, const char * message){
  Serial.printf("Writing file: %s\n", path);

  File file = fs.open(path, FILE_WRITE);
  if(!file){
    Serial.println("Failed to open file for writing");
    return;
  }
  if(file.print(message)){
    Serial.println("File written");
  } else {
    Serial.println("Write failed");
  }
  file.close();
}

void appendFile(fs::FS &fs, const char * path, const char * message){
  Serial.printf("Appending to file: %s\n", path);

  File file = fs.open(path, FILE_APPEND);
  if(!file){
    Serial.println("Failed to open file for appending");
    return;
  }
  if(file.print(message)){
    Serial.println("Message appended");
  } else {
    Serial.println("Append failed");
  }
  file.close();
}

void renameFile(fs::FS &fs, const char * path1, const char * path2){
  Serial.printf("Renaming file %s to %s\n", path1, path2);
  if (fs.rename(path1, path2)) {
    Serial.println("File renamed");
  } else {
    Serial.println("Rename failed");
  }
}

void deleteFile(fs::FS &fs, const char * path){
  Serial.printf("Deleting file: %s\n", path);
  if(fs.remove(path)){
    Serial.println("File deleted");
  } else {
    Serial.println("Delete failed");
  }
}

void testFileIO(fs::FS &fs, const char * path){
  File file = fs.open(path);
  static uint8_t buf[512];
  size_t len = 0;
  uint32_t start = millis();
  uint32_t end = start;
  if(file){
    len = file.size();
    size_t flen = len;
    start = millis();
    while(len){
      size_t toRead = len;
      if(toRead > 512){
        toRead = 512;
      }
      file.read(buf, toRead);
      len -= toRead;
    }
    end = millis() - start;
    Serial.printf("%u bytes read for %u ms\n", flen, end);
    file.close();
  } else {
    Serial.println("Failed to open file for reading");
  }


  file = fs.open(path, FILE_WRITE);
  if(!file){
    Serial.println("Failed to open file for writing");
    return;
  }

  size_t i;
  start = millis();
  for(i=0; i<2048; i++){
    file.write(buf, 512);
  }
  end = millis() - start;
  Serial.printf("%u bytes written for %u ms\n", 2048 * 512, end);
  file.close();
}

void setup(){
  Serial.begin(115200);
  spi.begin(SCK, MISO, MOSI, CS);

  if (!SD.begin(CS,spi,80000000)) {
    Serial.println("Card Mount Failed");
    return;
  }
  uint8_t cardType = SD.cardType();

  if(cardType == CARD_NONE){
    Serial.println("No SD card attached");
    return;
  }

  Serial.print("SD Card Type: ");
  if(cardType == CARD_MMC){
    Serial.println("MMC");
  } else if(cardType == CARD_SD){
    Serial.println("SDSC");
  } else if(cardType == CARD_SDHC){
    Serial.println("SDHC");
  } else {
    Serial.println("UNKNOWN");
  }

  uint64_t cardSize = SD.cardSize() / (1024 * 1024);
  Serial.printf("SD Card Size: %lluMB\n", cardSize);

  listDir(SD, "/", 0);
  createDir(SD, "/mydir");
  listDir(SD, "/", 0);
  removeDir(SD, "/mydir");
  listDir(SD, "/", 2);
  writeFile(SD, "/hello.txt", "Hello ");
  appendFile(SD, "/hello.txt", "World!\n");
  readFile(SD, "/hello.txt");
  deleteFile(SD, "/foo.txt");
  renameFile(SD, "/hello.txt", "/foo.txt");
  readFile(SD, "/foo.txt");
  testFileIO(SD, "/test.txt");
  Serial.printf("Total space: %lluMB\n", SD.totalBytes() / (1024 * 1024));
  Serial.printf("Used space: %lluMB\n", SD.usedBytes() / (1024 * 1024));
}

void loop(){

}
Example: ESP32 Data Logging to microSD Card
Using a microSD card is especially useful for data logging projects. As an example, we’ll show you how to save sensor readings from a BME280 sensor with timestamps (epoch time).

Prerequisites
For this example, make sure you have the following libraries installed:
You can install these libraries using the Arduino library manager. In your Arduino IDE, go to Sketch > Include Library > Manage Libraries… Then, search for the library names and install them.
If you’re using VS Code with PlatformIO, copy the following lines to the platformio.ini file to include all the necessary libraries.
lib_deps = adafruit/Adafruit BME280 Library @ ^2.1.0
  adafruit/Adafruit Unified Sensor @ ^1.1.4
Schematic Diagram
For this example, you need to wire the microSD card module and the BME280 sensor to the ESP32. Here’s a list of the parts required:
- ESP32 development board (read: Best ESP32 development boards)
- BME280 sensor
- MicroSD Card Module
- MicroSD Card
- Jumper Wires
- Breadboard
Wire the circuit by following the next schematic diagram.

You can also take a look at the following tables:
| BME280 | ESP32 |
| VIN | 3V3 |
| GND | GND |
| SCL | GPIO 22 |
| SDA | GPIO 21 |
| microSD card module | ESP32 |
| 3V3 | 3.3V |
| CS | GPIO 5 |
| MOSI | GPIO 23 |
| CLK | GPIO 18 |
| MISO | GPIO 19 |
| GND | GND |
Code
Copy the following code to your Arduino IDE. This sketch gets BME280 sensor readings (temperature, humidity, and pressure) and logs them in a file on the microSD card every 30 seconds. It also logs the timestamp (epoch time requested to an NTP server).
/*
  Rui Santos
  Complete project details at https://RandomNerdTutorials.com/esp32-microsd-card-arduino/

  Permission is hereby granted, free of charge, to any person obtaining a copy
  of this software and associated documentation files.

  The above copyright notice and this permission notice shall be included in all
  copies or substantial portions of the Software.
*/

// Libraries for SD card
#include "FS.h"
#include "SD.h"
#include <SPI.h>

//Libraries for BME280 sensor
#include <Adafruit_Sensor.h>
#include <Adafruit_BME280.h>

// Libraries to get time from NTP Server
#include <WiFi.h>
#include "time.h"

// Replace with your network credentials
const char* ssid     = "REPLACE_WITH_YOUR_SSID";
const char* password = "REPLACE_WITH_YOUR_PASSWORD";

// Timer variables
unsigned long lastTime = 0;
unsigned long timerDelay = 30000;

// BME280 I2C
Adafruit_BME280 bme;

// Variables to hold sensor readings
float temp;
float hum;
float pres;
String dataMessage;

// NTP server to request epoch time
const char* ntpServer = "pool.ntp.org";

// Variable to save current epoch time
unsigned long epochTime;

// Function that gets current epoch time
unsigned long getTime() {
  time_t now;
  struct tm timeinfo;
  if (!getLocalTime(&timeinfo)) {
    //Serial.println("Failed to obtain time");
    return(0);
  }
  time(&now);
  return now;
}

// Initialize WiFi
void initWiFi() {
  WiFi.mode(WIFI_STA);
  WiFi.begin(ssid, password);
  Serial.print("Connecting to WiFi ..");
  while (WiFi.status() != WL_CONNECTED) {
    Serial.print('.');
    delay(1000);
  }
  Serial.println(WiFi.localIP());
}

// Init BME280
void initBME(){
  if (!bme.begin(0x76)) {
    Serial.println("Could not find a valid BME280 sensor, check wiring!");
    while (1);
  }
}

// Initialize SD card
void initSDCard(){
   if (!SD.begin()) {
    Serial.println("Card Mount Failed");
    return;
  }
  uint8_t cardType = SD.cardType();

  if(cardType == CARD_NONE){
    Serial.println("No SD card attached");
    return;
  }
  Serial.print("SD Card Type: ");
  if(cardType == CARD_MMC){
    Serial.println("MMC");
  } else if(cardType == CARD_SD){
    Serial.println("SDSC");
  } else if(cardType == CARD_SDHC){
    Serial.println("SDHC");
  } else {
    Serial.println("UNKNOWN");
  }
  uint64_t cardSize = SD.cardSize() / (1024 * 1024);
  Serial.printf("SD Card Size: %lluMB\n", cardSize);
}

// Write to the SD card
void writeFile(fs::FS &fs, const char * path, const char * message) {
  Serial.printf("Writing file: %s\n", path);

  File file = fs.open(path, FILE_WRITE);
  if(!file) {
    Serial.println("Failed to open file for writing");
    return;
  }
  if(file.print(message)) {
    Serial.println("File written");
  } else {
    Serial.println("Write failed");
  }
  file.close();
}

// Append data to the SD card
void appendFile(fs::FS &fs, const char * path, const char * message) {
  Serial.printf("Appending to file: %s\n", path);

  File file = fs.open(path, FILE_APPEND);
  if(!file) {
    Serial.println("Failed to open file for appending");
    return;
  }
  if(file.print(message)) {
    Serial.println("Message appended");
  } else {
    Serial.println("Append failed");
  }
  file.close();
}

void setup() {
  Serial.begin(115200);

  initWiFi();
  initBME();
  initSDCard();
  configTime(0, 0, ntpServer);

  // If the data.txt file doesn't exist
  // Create a file on the SD card and write the data labels
  File file = SD.open("/data.txt");
  if(!file) {
    Serial.println("File doesn't exist");
    Serial.println("Creating file...");
    writeFile(SD, "/data.txt", "Epoch Time, Temperature, Humidity, Pressure \r\n");
  }
  else {
    Serial.println("File already exists");
  }
  file.close();
}

void loop() {
  if ((millis() - lastTime) > timerDelay) {
    //Get epoch time
    epochTime = getTime();

    //Get sensor readings
    temp = bme.readTemperature();
    //temp = 1.8*bme.readTemperature() + 32;
    hum = bme.readHumidity();
    pres = bme.readPressure()/100.0F;

    //Concatenate all info separated by commas
    dataMessage = String(epochTime) + "," + String(temp) + "," + String(hum) + "," + String(pres)+ "\r\n";
    Serial.print("Saving data: ");
    Serial.println(dataMessage);

    //Append the data to file
    appendFile(SD, "/data.txt", dataMessage.c_str());

    lastTime = millis();
  }
}
Insert your network credentials in the following variables and the code will work straight away:
const char* ssid     = "REPLACE_WITH_YOUR_SSID";
const char* password = "REPLACE_WITH_YOUR_PASSWORD";
This example uses the functions we’ve seen previously to write and append data to the microSD card (writeFile() and appendFile() functions).
To better understand how this example works, we recommend taking a look at the following tutorials:
- Get Epoch/Unix Time with the ESP32 (Arduino)
- ESP32 with BME280 Sensor using Arduino IDE (Pressure, Temperature, Humidity)
Demonstration
Upload the code to your board. You can check on the Serial Monitor if everything is working as expected.

Let the project run for a while to gather some readings. Then, insert the microSD card on your computer, and you should have a file called data.txt with the sensor readings.

Example: ESP32 Web Server with Files from microSD Card
You can save the files to build a web server with the ESP32 on a microSD card (HTML, CSS, JavaScript, and image files). This can be useful if the files are too big to fit on the ESP32 filesystem, or it can also be more convenient depending on your project.

To show you how to do this, we’ll create a simple web server that serves a HTML, a CSS and a PNG file to build a web page and display a favicon.
Move the following files to your microSD card (click on the links to download the files):
Note: move only the files to the microSD card, not the folders.
Then, upload the following code to your Arduino IDE.
/*
  Rui Santos
  Complete project details at https://RandomNerdTutorials.com/esp32-web-server-microsd-card/

  Permission is hereby granted, free of charge, to any person obtaining a copy
  of this software and associated documentation files.

  The above copyright notice and this permission notice shall be included in all
  copies or substantial portions of the Software.
*/

#include <Arduino.h>
#include <WiFi.h>
#include <AsyncTCP.h>
#include <ESPAsyncWebServer.h>
#include "FS.h"
#include "SD.h"
#include "SPI.h"

// Replace with your network credentials
const char* ssid = "REPLACE_WITH_YOUR_SSID";
const char* password = "REPLACE_WITH_YOUR_PASSWORD";

// Create AsyncWebServer object on port 80
AsyncWebServer server(80);

void initSDCard(){
  if(!SD.begin()){
    Serial.println("Card Mount Failed");
    return;
  }
  uint8_t cardType = SD.cardType();

  if(cardType == CARD_NONE){
    Serial.println("No SD card attached");
    return;
  }

  Serial.print("SD Card Type: ");
  if(cardType == CARD_MMC){
    Serial.println("MMC");
  } else if(cardType == CARD_SD){
    Serial.println("SDSC");
  } else if(cardType == CARD_SDHC){
    Serial.println("SDHC");
  } else {
    Serial.println("UNKNOWN");
  }
  uint64_t cardSize = SD.cardSize() / (1024 * 1024);
  Serial.printf("SD Card Size: %lluMB\n", cardSize);
}

void initWiFi() {
  WiFi.mode(WIFI_STA);
  WiFi.begin(ssid, password);
  Serial.print("Connecting to WiFi ..");
  while (WiFi.status() != WL_CONNECTED) {
    Serial.print('.');
    delay(1000);
  }
  Serial.println(WiFi.localIP());
}

void setup() {
  Serial.begin(115200);
  initWiFi();
  initSDCard();

  server.on("/", HTTP_GET, [](AsyncWebServerRequest *request){
    request->send(SD, "/index.html", "text/html");
  });

  server.serveStatic("/", SD, "/");

  server.begin();
}

void loop() {

}
Insert your network credentials in the following variables, and the code should work straight away:
// Replace with your network credentials
const char* ssid = "REPLACE_WITH_YOUR_SSID";
const char* password = "REPLACE_WITH_YOUR_PASSWORD";
Demonstration
After uploading the files to the microSD card and the sketch to your ESP32 board, open the Serial Monitor at a baud rate of 115200. Press the ESP32 on-board RST button. The ESP32 IP address will be displayed on the Serial Monitor.

On your local network, open a web browser and type the ESP32 IP address. You should get access to the following web page built with the files stored on the microSD card.

For a detailed explanation of this project, refer to the following tutorial:
Wrapping Up
In this tutorial, you’ve learned how to interface a microSD card with the ESP32 and read and write files. You’ve also learned how to use it for data logging projects or storing files to serve in your web server projects.
For more in-depth projects with the microSD card, we recommend taking a look at the following:
We hope you’ve found this tutorial useful. Learn more about the ESP32 with our resources:


Excellent article on MicroSD card usage. Having all that information in one place is so useful. I have seen most of it before but in bits and pieces from all over the place and got myself very confused in the process. Well done you guys.
Ian.
The SPI information is very useful, thank you.
On an ESP32, accessing a MicroSD card using MMC ( either in 1 bit or 2 nit mode) is also possible. Usually I/O is many times faster.
The ESP32-CAM already has a Micro SD slot on board. Will this code work on that?
Yes. I think it will.
You just need to declare the right pins.
Additionally, with the ESP32-CAM you can also use SDMMC interface.
Regards,
Sara
Hi Sara,
I have tried all the sketches for interfacing to an SD card and all give me the error “Card Mount Failed”. All connections are correct and I am using an ESP32 with the correct pins connected to the SD card. The SD card is powered with the 3.3 volts from the ESP32 (the SD cards run on 3.3 volts, not 5V).
I tried the examples from the IDE (Version 2.3.3), including the SDMMC, as well as some of your sketches. All have the same problem.
Have you tried this lately ?
Thanks for your support.
This code will run on the ESP32-CAM board with a few changes as follows to convert the code from SD to SD-MMC. It may also work with SD as Sara suggested. Here are the steps to change the code.
1. Replace #include “SD.h” with #include “SD_MMC.h”
2. Remove #include “SPI.h” completely, or just comment out
3. Leave #include “FS.h” as is
4. Change all uses of SD to SD_MMC – examples are:
‘listDir(SD, “/”, 0);’ becomes ‘listDir(SD_MMC, “/”, 0);’
‘if(!SD.begin()){‘ becomes ‘if(!SD_MMC.begin()){‘
‘uint8_t cardType = SD.cardType();’ becomes ‘uint8_t cardType = SD_MMC.cardType();’
Make sure you set the board type to ‘A1 Thinker ESP32-CAM’. That’s it.
Thanks for providing this info.
Regards,
Sara
What is the max size of sdcard ? Thank you.
Hi.
I’m not sure if there is a limit for the sd card size.
I tested with a 16GB sd card.
Regards,
Sara
ok
First, a fact (as far as I can tell, and as far as I have actually tested):
SD cards formatted as FAT32 work just fine with the SD and FS libraries. Cards formatted as exFAT do not work.
Second, the not-so-good news…
SD Cards larger than 32 MBytes are (usually) supplied formatted as exFAT. You can’t format these large devices with the ‘usual’ Windows 10 format program. The funny thing is that if you format the large cards as FAT32 (using some kind of third-party application) Windows 10 can read and write them just fine.
Finally, The Good News…
I have just now used fat32format.exe from Ridgecrop Consultants to format my Kingston 64 GByte SD card as FAT32 and tested it with the Arduino SD and FS libraries shown in this example. (My present ESP application is using a 16 GB SD card, but your question piqued my interest, and led me to discover something that I very well may find useful for future projects.)
Hi Dave.
Thank you so much for sharing that information.
I didn’t know about that.
Regards,
Sara
Wow, amazing useful information! Thank you Dave so much for it!!
I can confirm that Ridgecrop Consultants’ software successfully formatted a Sandisk Extreme 256GB SD card for use with the ESP32. I used their new GUI version called ‘guiformat.exe’ and set the Allocation Unit Size to 65536 since all of the files I will be creating are large. The card originally showed as exFAT in Windows disk manager and didn’t work with the ESP32; now it shows as FAT32 in Windows disk manager and works with the ESP32. I used an ESP32-CAM and the normal FS.h and SD_MMC.h libraries.
Just wanted to thank you for this post!! I have an ESP32 project with some huge files on the SD card, and I was limited to the 64GB cards I was using. But using your method, I can now use 256GB SD cards formatted with guiformat-x64.exe from and they work GREAT on my ESP32 project using SD_MMC.h libs. Link to formatting tool I used: http://ridgecrop.co.uk/index.htm?guiformat.htm (fat32format.exe doesn’t run for me, I needed to use guiformat-x64.exe on Windows 10 64-bit).
Great explanation of useful functions in the FS and SD libraries!
However…
The SD Modules you gave links for in Aliexpress are out of stock as of this writing. All of the ones in the various Amazon links are designed for “classic” Arduino usage and require 5 Volts, not 3.3 Volts on their VCC Connection. These modules have on-board 3.3 Volt regulators and level shifters and will work with ESP32 (and other 3.3 Volt processor modules) if you feed the SD module from the Vin pin of the ESP.
If you feed these particular SD modules from the ESP 3.3 V pin, the SD will be working at something around 2.2 Volts and the very well may not function. (My SanDisk 16 GB SD cards do not.)
Bottom line: Be VERY careful about feeding 5V to anything connected to an ESP32 module. MAKE DANG SURE that your SD Module has the on-board regulator and level shifter.
You can see the blocky regulator and the small 14-pin level shifter. If people have ANY question about whether their SD module actually is designed for 5 Volt operation, don’t connect 5 Volts to Vcc. Ask someone who can give a definitive answer.
Best Regards,
Dave
Hi Dave.
Thanks for pointing that out.
I’ll update the links on maker advisor.
Regards,
Sara
Using the HiLetgo micro SD TF card adapter, I was getting an error of “card not mounted”. After some research, I discovered that instead of using the 3.3V pin, I needed to power the card reader from the 5V pin of the ESP32. After making that change, it worked fine.
Even if it states to use 3.3V? I get the same error message using the card modules in this article but I don’t wanna try burn my sd card
Just a small tip regarding those sd cardreaders.
As you can see in the picture of the card-reader, they are equipped with a little switch which detects if a card is inserted or not.
When a card is inserted, this pin is pulled to ground
Sadly, this switch is not connected to the output pins of the module.
So I measured with a multimeter which from those 10 pins towards the card-reader is pulled to ground and soldered a wire on this pin (for me it was the pin far left).
This wire I connected to a GPIO-pin of my esp32.
Now I can detect if my card is inserted or removed and remount the SD-card it in software accordingly.
Just be sure not to remove a card when your esp is writing to it.
Thanks for the tip 🙂
interesting solution, would do you show what was the result?
Will the SD card be readable after it has been removed and reinserted without removing power or reset of the system?
I am going to say ‘No’ because that would be rather an unwise thing to do, especially on a regular basis. I was having loads of trouble with SD cards and the code for using them until I found out how to repair them after removing them with the power on. Others may disagree.
Hi, can someone please help me. I tried to do the tutorial but somehow my esp32 board will have error that has something to do with flashing bootloader. Right now, if I want to upload my sketch, I need to hold the EN button then hold the BOOT button and after that release the EN button first followed by BOOT button. Only then my board will be recognised by my PC to upload the sketch
Can someone please help me revert back my esp32 board back to normal
Hi.
Take a look at these articles and see if it helps:
https://randomnerdtutorials.com/esp32-troubleshooting-guide/
https://randomnerdtutorials.com/solved-failed-to-connect-to-esp32-timed-out-waiting-for-packet-header/
Regards,
Sara
I’ve been following some of your tutorials and they’ve really helped me out! I’ve been dealing with Arduino for a while now, and finally took the leap to convert to ESP!! The initial tutorials were all fine, but I’m having a really hard time trying to make the SD card work. The shield is fine and works on Arduino’s 5V, card is formated as FAT32, apparently the wires are all connected as they should be, and when I try to run the code it simply won’t initialize the SD card.
What I found really weird is that it’s as if it skips a bunch of functions on “setup()”, even tried a simples Serial.print and is simply won’t show… I checked the voltages with a multimeter and it’s fine (4.9-5V), and even feeding the system through a standalone PCB power source and nothing… Any clues what it could be? My guess is it could be because my SD shield is a bit different than yours… But it should still work (provided the pins are corecctly connected to it)
Double-check the pinout.
What’s the shield that you have?
Regards,
Sara
Hi random nerd,
I followed this tutorial, but there is no output shown in the serial monitor.
Please help me on this.
Thanks
Jegan
Do you get any errors?
Regards,
Sara
I checked it at least 50 times! Tried with a bunch of different shields and nothing… But I just found out the problem! The microSD I was using was compatible with my Arduino (so it worked every time I went back to it to test) but for some reason wasn’t compatible with my ESP. I just tried a different one and bingo!
Thanks a lot for your help, and great tutorials!!
PS: I tried checking the web to see if there was any way of testing/checking wether a card was compatible and couldn’t find it… Any clues?
Hi,How can we do this with TTGO T-CALL(ESP32+SIM800L) ? I tried so many codes and I always get error Card Mount failed.Please help.
By the way ,I use 6 pins Micro SD card module the pins:CS,SCK,MOSI,MISO,VCC,GND
Hi.
You’re probably initializing the microSD card on the wrong pins. Please double-check the connections.
Regards,
Sara
cs:5 mosi:23 miso:19 sck:18 ?
besides, I noticed pin23 sim800l power pin and pin 5 reset it means I can t use spi pins .How can I remap spi pins?
Hi again.
Those pins seem right.
How are you powering the microSD card module?
Some modules need 5V, others only need 3.3V. If it doesn’t have enough power, it might not initialize properly.
Regards,
Sara
I use external power suply .I tried both 5v and 3.3v.As I said even if it works,Sim800l uses mosi pin?
Hola, he intentado este código pero el modulo lector SD se calienta mucho, este esta conectado a 5V y los demás pines como lo indican aquí, sin embargo, al conectar y correr el código se empieza a calentar muchísimo el lector SD, no guardar archivos ni hace lecturas del sensor, la SD no crea el archivo .txt, agradecería mucho de su ayuda
Hi.
There must be something wrong with your circuit.
In our case, our microSD card module is powered with 3.3V, not 5V.
Connect it to 3.3V.
Regards,
Sara
Wow – This site has helped so much over the last year – i came here looking for how to remap the SD pins to work on a data logging project and found it – thank you so much for keeping the site current – the level of info is perfect with a great breakdown of how it all works
Thanks.
I’m glad you find it useful.
Regards,
Sara
I tried to use the Custom Pins code in the way you posted it SCK =17, CS = 5 , MISO 19, MOSI 23. But i get the “SD Card Mount Failed” error, i double checked everything is well Connected but still i can’t get it to work… Any possible reasons? I’m using Arduino IDE and ESP32 board. It will be very useful since i’m using a 3.5″ RPi Touch Display along with the SD module but the display uses the default SPI pins(23,19,18,5) and i’m trying to use custom pins for the SD, i also used the second SPI pins(12,13,14,15) but still i can’t get it to work. I would appreciate any help.
Hi.
Did you try the code with only the SD card with the custom pins? Without the display?
Also, note that if you’re using two SPI devices, depending on your code, you might need to instantiate two SPI instances with different names.
I hope this helps.
Regards,
Sara
Estou com o mesmo erro de usar Pins personalizados , percebi que o SCK=17 na verdade é SCK=18, mas mesmo mudando continua com o erro.
Infelizmente o código contem erro para SPI não padrão, Não funciona.
Olá.
Que erro é que está a ter e que códgo está a usar?
Cumprimentos,
Sara
It’s really great to come onto a web site like this and find that there is someone knowledgeable and helpful ACTUALLY answering questions quite promptly (I mean you Sara) and that other contributors and users are supplying helpful insights from their experience.
I have been to other sites and been fed up with the lack of answers or the snotty tone and snide unhelpful comments of their users and admins.
This, here, is a very refreshing, pleasant and useful place that has helped me, and I notice, many others, on many occasions.
I’m going to try the voltage idea, and the formatting ideas above because my 32gb Kingston microSD is getting the “failed to mount” error.
Well done to the Santos team! Great site.
Up until just recently I have been beginning to despair of the ESP32 as I have been unable to write to it because of some error messages in the Arduino IDE. I tried using different versions of the board andvthe IDE but to no avail. It wasn’t until I read a comment on a similar post that I had any success. The comment said that this chap had the same issue on his Windows10 machine, but on his laptop he had no problem. So, lightbulb moment, I got out my old Sony Vaio running Windows 7 and, behold, the problem no longer happened.
Hi Richard.
Thanks for your nice words. I make an effort to help as many people as possible.
As for your issue: make sure that your microSD card module is wired properly and that the microSD card is connected properly.
Additionally, double-check the voltage used by your microSD card module. Some might require 5V to operate instead of 3.3V.
Regards,
Sara
Thanks so much to you all again, it was indeed a voltage issue, and once I connected the Vcc pin of the microSD card reader to V5 on the ESP32 everything worked as it should and the sketch above performed as expected.
Keep it up, no doubt I’ll be back for more education later 🙂
Regards and thanks
Richard
Would it be possible for ESP32 to have WiFi, Ethernet and SD Card at the same time? Local connections should accept either WiFi or Wired network, and deliver files from the SD card over the web-interface.
Hi.
It is possible to use WiFi an SD card.
I never tried it with ethernet, but it should also work.
Regards,
Sara
Hey Sara!
I’m on a social project, that is planting algae in Africa. Our sensor is now supposed to store data in an SD-card. We followed your tutorial while using an esp32 firebeetle bord and a similar reader to yours. We were pretty sure to get a quick success with your detailed description! (Thank you for that!)
Sadly, no matter what we try, we get the error “File system is not mounted” by the program.
What indicates/means this error and do you have any ideas what might cause this?
Thanks in advance for helping out some amateurs! :))
Kind regards,
Felicia
Hi.
What is the microSD card that you are using?
Format your microSD card as FAT32. Other formats might not work and prevent mounting the filesystem.
Additionally, double-check all connections with the microSD card module and check the power supply.
Regards,
Sara
Thank you very much for these great explanations.
How can I have a list of all the files of a SD card with full path names?
Like :
/System Volume Information
/mymusic
/mymusic/mymp3
/mymusic/mymp3/songone.mp3
/mymusic/mymp3/songtwo.mp3
/mymusic/mymp3/songthree.mp3
etc
the example was working with ESP32 1.0.6 and FS library version 1.0
but with ESP32 2.0.0 and FS library version 2.0.0
there is only one level like this
/System Volume Information
/mymusic
/mymp3
/songone.mp3
/songtwo.mp3
/songthree.mp3
I need full path (/mymusic/mymp3/songthree.mp3) to feed my player.
Can you help me?
Thank you.
Hi.
In your Arduino IDE, go to File > Examples > Sd(esp32) > SD test.
That example provides a function called listDir() that lists files in directories.
I’m sure that will help you.
Regards,
Sara
Thank you for your kind reply.
The example is not giving the full path.
This new version is not working like the old one.
I think it is possible to have the full path (ex : /mymusic/mymp3/songthree.mp3)
but I am not enought expert to write the new code.
Can you help me?
Thank you.
Hi.
Check this example too: techtutorialsx.com/2019/02/24/esp32-arduino-listing-files-in-a-spiffs-file-system-specific-path/
Regards,
Sara
Thank you very much for your involvement.
This example can not work because the paths are known by advance
I am trying to do something, with no success by now…
I found nothing googleizing…
Always in progress.
Regards
Hi whogarden,
You obviously realize that your skillsare not up=to-par. But for insppiration, you may have a look
at a project I made that includes a web based file explorer. https://github.com/gitpeut/Reinagalerij. A simple copy and paste will not cut it I am afraid, but it could help you in making something that suits you needs.
Regards
Hey Sara,
Thank you for the guide! I stumbled upon a problem with the readFile and appendFile functions. They don’t work (it prints the “failed to open directory”) when the path has no leading slash (/) and with a leading slash it throws a fatal error (Guru Meditation Error: Core 1 panic’ed (LoadProhibited)) and resets the ESP32. writeFile works fine with a leading slash, all files are created properly.
I store all files in the root directory, might this cause the error?
Or do you have another solution for my problem?
Regards,
Adrian
hi
is there a way to clear all file in SD card with esp32 .
deleting every file takes time.
Hi.
I think this discussion might help: https://forum.arduino.cc/t/recursive-sd-directory-removal/541936/6
I also found this example: https://gist.github.com/jenschr/5713c927c3fb8663d662
Regards,
Sara
YOU are amazing
Thank YOU
great work Sara,
I got it working. i have a few old SD cards, 1, 2GB a few new 16 and 32GB all working OK.
Last week i bought 10 new cards 16GB non is working. They are SDHC Class 10. Very strange!!! All formatted FAT also tried FAT16 still not working. Any help ????
Best regards
Hi Sara,
Love your website and have been following your tutorials for some time now.
I am currently building a project where I store longitude and latitude on an micro SD card and want to send it to a mySQL database when I get home or on my local network. I will then overlay this on GoogleMaps. Do you know if I can send a .txt file to the database or if I can seperate each string of the .txt file. If not do you know where I could find the answers?
Saudações pessoal… Tenho dificuldades em acender duas lâmpadas com o esp32
A página html está armazena no micro SD Card, já acessei a página, só que agora preciso pegar os dois eventos de ligar e desligar as lâmpadas do HTML que está no cartão para o esp32, podendo acionar assim as lâmpadas… Alguém disposto a ajudar?
Hi.
How to read a file on sd line by line?
Hi.
How to read a text file on sd line by line ?
Siga o tutorial acima, e vai entender!
Actualmente já consigo ler arquivos HTML dentro do SD a vontade, e ainda consigo acionar um led. Preste bastante atenão, porque eu pulei esse tutorial muitas vezes sem entender. Só depois com muita paciência pude enteder.
Thank you for a great tutorial. Very well written and informative. I’m having a challenge using custom pins for the interface signals. To start with, I’m using the pin definitions that are the same as the default pins (SCK 18, MISO 23, MOSI 19, CS 5)
SPIClass spi = SPIClass(VSPI);
spi.begin(SCK, MISO, MOSI, CS);
if(!SD.begin(CS,spi,80000000)){
Serial.println(“Card Mount Failed”);
return;
}
The result is:
[E][sd_diskio.cpp:775] sdcard_mount(): f_mount failed: (3) The physical drive cannot work
Card Mount Failed
I would like to change one of the pins to accommodate some other elements in my circuit. Any tips would be greatly appreciated.
Darrell
Hi.
Do you get that error with the default pins?
Regards,
Sara
Hi,
I tried setting up a new class with the standard pin definitions without any luck. I got the card mount failed message. When I changed 80000000 to 8000000, the card mounted, but the data was corrupted.
//**************** SD Card pins

#define SD_CLK  18

#define SD_OUT  23      // MOSI - Microcontroller Out Serial In pin

#define SD_IN   19      // MISO -  Microcontroller In Serial Out pin

#define SD_CS   5
SPIClass spi = SPIClass(VSPI);
spi.begin(SD_CLK,SD_OUT, SD_IN, SD_CS);
if(!SD.begin(SD_CS,spi,80000000)){
Serial.println(“Card Mount Failed”);
return;
}
Thanks for your follow up.
Darrell
I got the same problem. I don’t understand the meaning of the code
if (!SD.begin(CS,spi,8000000))
this doesn’t work.
if ,spi,80000000 is deleted like this
if (!SD.begin(CS)) this works.
is the value 80000000 the speed spi? did you give the wrong value?
I hope you can explain. thanks
Hi.
It is the bus frequency. Learn more here: https://github.com/espressif/arduino-esp32/blob/master/libraries/SD/src/SD.h line 31.
Regards,
Sara
Hi, How can i use this code in loop? I am getting back trace error and mediation error when I use it in loop
Hi.
What part of code are you using in the loop()?
Regards,
Sara
Hey, could I get a copy of your MicroSD module fritzing part, please 🙂
Kind Regards
And do you already have a copy of sd card module for fritzing? because i need it too 🙂
Hello,
I can’t connect the SD card to the esp 32, but everything works with arduino. I’ve tried different libraries, checked the pins many times.
Hi.
Can you provide more details? Do you get errors? What happens exactly?
Regards,
Sara
Hello. First of all I’d like to thank you for this detailed and very helpful article. I was able to build a data logger around a ESP32 just like in your example above. While prototyping I used a 32GB microSD card I had laying around and it worked just fine. Later on I decided that a 32GB SD card is a bit over the top considering that my ploted weather-data needs just a few MB at most. So I purchased a 1GB microSD card which I haven’t got working to this day. I always get the “SD mount failed” message. Both SD cards are formated as required and running in the same hardware setup (thus no problem with the wiring or voltage supply of the card reader I guess). And both cards can be read and written to by my computer.
Maybe you or someone else can provide me with a little help or a new hint I can follow.
Regards
Christian
Hi Sara
Fantastic, but…
I use a Wemos Di ESP8266
and get the message:
no matching function for call to ‘fs::FS::open(const char*&)’
and don’t know what to do!
Can you help me?
Pee Ter
Hi.
This is example is only compatible with ESP32.
At the moment, we don’t have any similar tutorials for ESP8266.
I think this tutorial is compatible with the ESP8266, but I’m not sure: https://randomnerdtutorials.com/guide-to-sd-card-module-with-arduino/
Regards,
Sara
https://drive.google.com/file/d/1FbxKZpRZLa4pe9DIMB2xvxeFbAlnMkdr/view?usp=sharing
Will I be able to use this micro SD Card module for this lesson without any problem??
Hi.
Yes. I think it should work.
Regards,
Sara
Hey, could I get a copy of your MicroSD module fritzing part, please 🙂
Kind Regards
And do you already have a copy of sd card module for fritzing? because i need it too 🙂
May I know if two esp32 can be connected to one sd card? If so, how to connect it? Please help me know about it.
Your contributions are very good… my respects, you could do a tutorial on how to create files with dates using an RTC, SD card, ESP32 and have them be generated automatically after 24 hours and thus have a daily database…
Hi Sara, May you know why I encoutered this error?
“OSError: [Errno 25] Inappropriate ioctl for device”
Hi.
In which situation do you get that error?
Regards,
Sara
Hello, I love the detailed tutorials on RANDOM NERD
TUTORIALS.
My project is to use a LilyGO TTGO-T display together with a SD module.
The board uses SPI for the display. So I used the code for custom SPI pin.
But I got a Guru Error when I tried to access the SD module outside the setup routine. I have been looking for the error for a few weeks now and finally found the solution:
The line ‘SPIClass spi = SPIClass(VSPI);’ must not be inside the setup routine, but outside.
When leaving Setup the class is destroyed.
However, it must remain permanently.
Please correct the code so that others don’t fall for this hard to solve problem.
Thanks for all the effort you put into these pages!
Thomas Diesler
Hi.
Thanks for pointing that out.
I’ll fix the code.
Regards,
Sara
Hi, nice tutorial。
my SD card corrupted when removed from SD card and need be formatted. are there any way fix it? or can the code to check if the write finished or not?
Thanks
Summer
Just tried this “ESP32: Guide for MicroSD Card Module using Arduino IDE” on some SD Card modules (UMLIFE Micro SD SDHC TF Card Adapter Reader Module) that I bought on Amazon a few days ago.
Your code worked flawlessly with these modules without any modifications, thanks for sharing this nice clean code with the world! It really helped me quickly check to make sure the modules operate as advertised.
That’s great!
Regards,
Sara
Hi Sara
Like many others I have found this site extremely useful and educational. I am trying to read a .CSV file from an SD card on an ESP32 into a two dimention array. This seems to be a difficult task judging by the number of queries on adruino forums. I have found this https://forum.arduino.cc/t/a-simple-function-for-reading-csv-text-files/328608 which works on a UNO but I can not get it to compile on the ESP32. Can you help?
Hi.
What errors do you get when you try to compile it on an ESP32?
Regards,
Sara
Hi,
thanks for this very helpful article.
I have on problem:
I made many tests with 32GB (SDHC) formatet with FAT32 as shown and all works fine.
I need a very small memory so I bought a few of 128MB Micro SD cards to same some websites for the ESP32 webserver.
But none of this cards works – I formated also with FAT32, I can write and read with my windows PC but every time I put it in the ESP32 Card slot I got the error message: Card Mount Failed.
Do you have any idea, where the problem may be?
Unfortunately, I don’t know what might be causing the issue.
What type of cards are those 128MB?
Regards,
Sara
Hi Guenter,
Try to format the SD card with FAT16
File System
SD card is a block-addressable storage device, in which the host device can read or write fixed-size blocks by specifying their block number. Most SD cards are preformatted with one or more MBR (Master Boot Record) partitions in which the first partition contains the file system which enables it to work like hard disks.
For SDSC card:
Capacity smaller than 16 MB- FAT 12
Capacity between 16 MB and 32 MB- FAT 16
Capacity larger than 32 MB- FAT 16B
For SDHC cards:
Capacity smaller than 7.8 GB- FAT 32
Capacity greater than 7.8 GB- FAT 32
For SDXC cards:
exFAT
Notes
Arduino library supports only FAT16 and FAT32 file systems. Make sure that your SD card is formatted with these two only otherwise you will get an initialization error.
For formatting your SD card you can download the SD formatter on the following link – sdcard.org/downloads/formatter_4/
Hi Sara, I want to add a timestamp to files I store in the sd card. I’m using an esp32,I can save files on the sd card, but the time stamp goes with the default “01/01/1980 00:00”. Do you have any idea, How to deal with it?
Hi.
You can take a look at this tutorial to see how you can get the date and time on the filename: https://randomnerdtutorials.com/esp32-cam-photo-microsd-card-timestamp/
This tutorial is for an ESP32-CAM, but the relevant functions to get the time and filename work regardless of the board.
Regards,
Sara
Thank you so much for your work and the time you have spent making this ESP32 application(s) available for everyone.
Although I had already a ESP32-CAM with an integrated SD card module I prefer to have a separate SD card module for my ESP32-device.
This module with different dimensions(46×24 mm) as the one you showed in the example has the pins CS, SCK, MOSI, MISO, VCC and GND.
In the spec of this module I wrote that the VCC has to be 5V to work properly. I used the V-IN pin of the ESP32-device as the 5V power supply.
With your article about “ESP32: Guide for MicroSD Card Module using Arduino IDE” I started my experiments.
Formatting my 32 Gb SD card in FAT32 was already done earlier. And is fitted in the card reader.
Firstly I compiled and uploaded your RAW sketch from your web page in Arduino IDE version 1.8.19 and opened the Serial Monitor.
I pressed the EN button on the ESP32-device module. I got a list with result ended with “Used space 1 MB”
Looking more close in the list I saw a line “07:25:38.520 -> “Failed to open directory”.
That line was showing up again.
Now I uploaded the Arduino-IDE-example sketch as you indicate in the comment section on top of your example sketch.
Maybe there are differences between the versions of Arduino IDE because I don’t get to see: Examples > SD(esp32) > SD_Test
however with my Arduino IDE version 1.8.19 I get “Examples > SD > SD_Test (without esp32 between brackets).
The result in the list from Arduino IDE is that de line “Failed to open directory” was not shown and followed by two additional lines:
21:12:40.984 -> FILE: WPSettings.dat SIZE: 12
21:12:40.984 -> FILE: IndexerVolumeGuid SIZE: 76
and then the rest of both lists are the same.
Can you still find out which version you used at the time?
With the app WinMerge I looked at the differences between the Arduino IDE example and your example.
Sketch difference Arduino IDE example “Your” example
(1) listDir(fs, file.path(), levels -1); listDir(fs, file.name(), levels -1);(2) if(!SD.begin()){ if(!SD.begin(5)){
It turned out in (1) to be statement “file.path” instead of “file.name” in your sketch.
The number 5 in (2) does not change the result because I think (GPIO5) is the default use for chip select (CS).
Maybe these differences have been discussed before. However I like to share my experience.
How to connect LAN and SD card on same ES32 Module please share pin connection : currently we are Using For LAN : CS 15 12,13.14 For SD card CS 5 : 18.19.23
Suggest us pin to use SD card and LAN at same time can we use both SPI at a time or not .
try to use the SD card in combination with an ESP32 Hardware is connected and it is working.
But when I try to run the next software from ESP32: Guide for MicroSD Card Module Arduino | Random Nerd Tutorials
with the function // appendFile(SD, “/test.txt”, “button2 active\n “); it is running
when I try to change to appendFile(SD, “/test.txt”, dataString);
I get the error message:
RTCenSD.ino:101:49: error: invalid cast from type ‘String’ to type ‘const char*’
appendFile(SD, “/test.txt”, dataString);
^~~~~~~~~~
What is wrong ?
Hi.
use dataString.cstr() instead of just dataString.
Let me know if that solves the issue.
Regards,
Sara
Hi Sara,
since, as i told in another post, I need to use an E-paper display that is connected through SPI (but uses both the pin 5 for CS and pin 15 for BUSY) together with a SD card module that also works with SPI I tried your example of “custom SPI” pins and I defined the pins as
#define SD_SCK 25
#define SD_MISO 32
#define SD_MOSI 26
#define SD_CS 33
I strictly followed your example ( that, however, uses different pins, 23,19, 17, 5) and I got the error message “card mount failed”
When in your example, with just the SD card connected, I tried to use the “custom” pins 25, 32, 26, 33 I get the same error message.
I’ve found that in another example of yours you used the same pins for a BME280 connected through SPI with success. I could’nt try this because all my sensor work through I2C.
Could you help me to solve this puzzle ? Where is my mistake ?
Thanks a lot
Bruno
Hi.
Have you tried using the regular SPI pins just to check if the microSD card is working?
Double-check your connection and check what is the input voltage of your microSD card module. Ours use 3.3V, but there are other models that need 5V.
Additionally, the microSD card needs to be formatted as FAT32.
Regards,
Sara
Hi Sara
Thanks for your prompt answer
The SD card works without problems if I use an Oled display connected through I2C but it doesn’t work if I use a WeactStudio E-paper display that is connected through SPI according to the suggestion of the manifacturer
As I outlined in another post I tried to use “custom SPI pins” as suggested in one of your tutorials but it didn’t work…
I’ve also contacted ZinggJm who wrote the library forE-display but at the end he just said that I had to follow his example of use of SD card and E-paper display. I tried but I found the example very difficult for me and at the present nobody was able to tell me which are the pins I have to use for SD Card when the WeactStudio is connected.
Really it’s amazing for me this difficulty because it seems a very “normal” request.
Unfortunately I’m old for age but a newbie for this world and I feel fairly disheartened
Hi.
Maybe the connections are right, but there’s something wrong with your code that prevents the card to be initialized properly?
Without looking at the code it’s very difficult to find out what might be wrong.
Can you share your code with me?
Use Pastebin or Git Hub to share the code. Don’t paste it here.
Regards,
Sara
Hi Sara,
I’ve verified several times different options for connecting through SPI both the EPaper display (WeActStudio 2.13″ 3C) and a SDCard module (similar to that used in your tutorial on microSD) but nothing seems to work; on the contrary, if I use an OLED display connected through I2C the SD card works.
I think that the problem is in my code.
Here is the link to Pastebin where I pasted my code, according to your suggestion.
https://pastebin.com/tdwsPmQF
The custom SPI pins were from your tutorial but I still get Card Mount Failed error message.
I’d be very grateful if you could trell me where my mistake is.
THX
Hi Sara,
I think that the problem is in my code.
Here is the link to Pastebin where I pasted my code, according to your suggestion.
https://pastebin.com/tdwsPmQF
The custom SPI pins were from your tutorial but I still get Card Mount Failed error message.
I’d be very grateful if you could trell me where my mistake is.
THX
Hi.
I think it’s because you’re using VSPI for both the display and microSD card.
Take a look at this example and try to initialize the display using hspi as they do in this example: https://github.com/ZinggJM/GxEPD2/blob/master/examples/GxEPD2_Example/GxEPD2_Example.ino
I’m not sure if this is the problem, I’m not familiar with the display or the library.
Regards,
Sara
Hi Sara
Thanks for your help but is it possibile, instead of using HSPI for the display, use it for the SDcard?
Why, if I just define the SD_CS for example as 16 and I share the MOSI as 23 and SCK as 18, there is no error message but the display doesn’t refresh while the SD card works?
Hello
I have tested ESP32 (DOIT V1) with SD adapter and found out that the library does NOT guarantee that the file/data is written. If the card is slow (ex class 4) or the file is big then the file has a lenght of 0 and You can not get listdir – shows empty directory.
  file = SD.open(fname, FILE_WRITE);

  wbytes = file.println("Testing 1,2,3...");

  Serial.println(wbytes);

  file.close();

  Serial.println("Done");
// delay(2000);
listDir(SD, “/”, 0);
Question is: is there any possibility to check/assure that the data is really written and set/reset flag to prevent of closing and/or writing next file/data?
Kind regards
Gregory
Hi,
I want to record ADXL345 vibration sensor data to a SD card in every millisecond. Can I use the above code to do that by changing the delay time. I don’t have much coding experience.
The stored data later use for graphing the vibration level.
Thank you.
I have a 4.0″ TFT SPI 480X320 display hooked up to the VSPI interface and I’m trying to get the SD card to run on the HSPI interface. I have a working script that displays various colored fonts to the screen. I’ve added the following
#define SCK 14
#define MISO 12
#define MOSI 13
#define CS 15
SPIClass myspi = SPIClass(HSPI);
void setup(void) {
tft.begin();
tft.setRotation(1);
myspi.begin(SCK, MISO, MOSI, CS);
if (!SD.begin(CS,myspi,80000000)) {
Serial.println(“Card Mount Failed”);
return;
}
this causes the script to fail. And in the serial monitor I see the following:
rst:0x10 (RTCWDT_RTC_RESET),boot:0x33 (SPI_FAST_FLASH_BOOT)
invalid header: 0xffffffff
Any idea how I can get this to work?
WD
Thank you for your projects! They are awesome! A quick question though, data in the file is stored line by line. Is there any possibility the web server to read the data and output them line by line instead of one line for all? Any suggestions?
Hi .
do you have create dir by a variable name?
Hello guys i have problem with esp32 >>s3<< SPI pins connections (i tried same code with esp32 and it work correctly ) but i can’t connect sd card module with s3 board .
example 1 )
{
#define SCK 12// 12
#define MISO 13// 13
#define MOSI 11//11
#define CS 10//5
// SPIClass spi = SPIClass(FSPI); //HSPI // SPI
SPIClass spi = SPIClass(HSPI); //HSPI
}
example 2 )
{
#define SD_MOSI 11// 14 //11 //23
#define SD_MISO 13// 15//13 //19
#define SD_SCLK 12// 16//12 //18
#define SD_CS 10//34// 13 //5 //5
// SPIClass spi = SPIClass(FSPI); //HSPI // SPI
SPIClass spi = SPIClass(HSPI); //HSPI
SPI.begin(SD_SCLK, SD_MISO, SD_MOSI, SD_CS);
}
i tried changed pins , other code but same result (“Card Mount Failed”)) please help me to connect sd card module with esp32 s3 wroom 1 board
Hi,
I found that the SD card must be given 5 volts. It will convert it to 3.3V on its own.
thank you for your reply , my sd card module get 5 volt i think problem is Spi pins connection , i try many combinations but i cant get result (
// SPIClass spi = SPIClass(FSPI); //HSPI // SPI
SPIClass spi = SPIClass(HSPI); //HSPI
)
i print SPI pins for s3 and connect it , i read other papers unfortunaly can’t get result
I had lillygo ttgo t8 v1.7 board which is an experimental board based on esp32. I wanted to run 2 spi modules with one being the sd card so i searched and found this article which helped alot but the code still didnt work. i dived deep into HSPI and VSPI and found out you need to setup the the hspi as follows
//declared above void setup()
SPIClass * hspi = NULL;
void setup()
hspi = new SPIClass(HSPI);
hspi->begin(14, 2, 15, 13);
if (!SD.begin(SD_CS, *hspi)) {
Serial.println(“Card Mount Failed”);
return;
}
// rest of the code and void loop()
rest of the code was same and everything worked at last
Hope this helps someone
Thanks for sharing.
Regards,
Sara
I spent a full day trying to get the SD card reader to work. Checked and rechecked all connections. Reformatted a 32 GB Micro SanDisk Ultra A1 FAT32 several times and put many files on it in Windows. Used two Espduinos and one 38 pin DevKit. Used three different card reader modules. Without exception SD_Test.cpp would give me a “card Mount Failed” message for all setups.
Finally I replaced the card with another SanDisk 32GB standard low-end SDHC card. And voila, it started singing!
Same problem with another SD Ultra A1. But no issues with a SanDisk Ultra.
Do not assume that if the card works on Windows that it will work with an ESP32 running FS.h/SD.h.
Can FAT32 handle SD cards only up to 128 GB over SDIO interface with ESP32S3 ?
Fantastic tutorials, thanks so much!
Is there an easy way to use this information (along with a few of the others on this amazing site) to create a very simple web page that will show a directory listing of the files on the SD card, allowing the user to browse and download them? This can be one-way (read only), like the old school ftp site listings.
I’m helping my niece with a school project, and this would be just about perfect for what she’s trying to do, if we can just figure out a way to get the files accessible via a browser.
Hi.
Yes.
You can use this tutorial as a reference: https://randomnerdtutorials.com/esp32-datalogger-download-data-file/
Regards,
Sara
Amazing! What is not on this site? 😀
As all your tutorials, this is just great material and easy to listen.
While playing a bit with it and trying to record GPS position on the SD car, i faced an issue which appears to be a conflict between the Serial flow from NEO8M and the SPI of SD card. If no activation of GPS, no problem with SD card, but if activation of GPS, the AppendFile method will work one or 2 cycles and then says that can not find the file.
Would it be any reason for it ?
Excellente tutorial,
Can I do the same for TTGO?
Thanks,
Antonio Cesar
A quick note for people who are having the “Card Mount Failed” error – I was getting this and looked into the problem in detail. First, as Sara pointed out, some SD readers need 5V, some 3v3. I had bought a batch of ten 5V readers and was experimenting with these, attempting to get them to mount on various ESP32 and ESP8266 models, without any success. Then I read on the Espressif site that ALL the pins needed 10K pull-up resistors on them, even if they were not connected. I tried this and, glory be, it worked! I then bought some card readers that looked the same as in the example above, and these worked first time, without pull-ups. On examining the new readers, I noticed that they had four resistors built in to the card, all marked up (in tiny writing) as 10K. So, I suggest that you make sure the power supply is correct for the reader you purchase and if that does not work, try adding pull-up resistors from a 3v3 source to the data pins (CS, MISO, CLK and MOSI).
Hi.
Thank you so much for your tips.
I wasn’t aware there were modules that required the resistors.
Thank you.
Regards,
Sara
Hello, I have a problem with SD.h and FS.h
When I read a file I get all the information from the file.
But I don’t get a stop when the file has been read,
blank characters are sent. A blank line is added to my memo field every 1 second.
Until I send another command (query time) then it stops and I get a line with the end;01.01.2025
And then it goes quiet, everything else works. Only when I read a file. What could that be?
mfg
I now know my problem.
I create 2 text files. The first text file has 10 lines with a blank line.
The second text file has 10 lines without a blank line,
so without LF or rather without #13#10
I can read the first file without any problems, but with the second I get a blank line. Until I send another command to the ESP32, now the last line of the file comes.
Hello Sara, Have you tried this code with ESP32-S3? I think there is some issue with it. It works with other boards but not for S3. Have you come across any solution?
Hi.
What pins are you using for the ESP32-S3?
Do you get any errors?
Regards,
Sara
Hola Sara, muchas gracias por dedicar su tiempo a compartir sus conocimientos.
Tengo un problema, adapté el programa para grabar datos de un sensor cada 5 minutos, pero la memoria solo graba 39 datos y se sobre escriben, yo quiero grabar datos hasta que se llene la memoria de 32 Gb.
¿Algún comentario sobre los pocos datos que se graban?
Saludos,
Miller CM
Hi.
Do you get any information in the Serial Monitor?
Regards,
Sara
Hola Sara, gracias por responder tan pronto.
Debo tener algún problema con los cálculos que hago para que los datos se guarden cada 5 minutos, le quité la restricción y permití que los datos se guarden en cada vuelta del programa y la memoria grabó 525 registros.
Voy a revisar, quizás no estoy gestionando bien la función millis(), como lo dice Dave Evans.
Gracias de nuevo.
Miller CM
Can you show how you calculate and decide when is the next time to take a sample. I have seen a lot of examples where people do not properly handle the unsigned long integer return value of the Arduino millis() function.
Best regards,
Dave
Hola Sara, yo de nuevo.
Ya corregí el error de cálculo y logré que los datos en la memoria se guarden cada 5 minutos. Ahora tengo un problema: cada vez que se reinicia el ESP32 (o hay un corte de energía), el archivo en la memoria SD comienza a grabarse desde el inicio, es decir, se borran los registros ya grabados.
Qué debo hacer para que el archivo continúe grabando desde el último registro antes que se corte la energía?
Saludos,
Miller CM
Hola Sara,
Logré resolver el problema, tenía un error casi imperceptible en una instrucción, casi me saco un ojo.
Muchas gracias.
Saludos,
Miller CM
Great!
Regards,
Sara
When will the function to read files from the USB drive be added?
Hi Sara. Congrats for your wonderful work.
Do you think it is possible to program update from a SDcard to an ESP32 . I am working presently with arduino IDE.
Thanks
Hi.
Yes.
I think that is possible, but unfortunately, I don’t have any resources about it.
Regards,
Sara
Hi,
Maybe a stupid question, but I can not find a good working library FS.h that is required for this tutorial. The only one I have found is at https://github.com/espressif/arduino-esp32 with file arduino-esp32-master.zip. When I click within the Arduino IDE 1 at Sketch-Include library-Add .zip-library and open the arduino-esp32-master.zip in the map Downloads then after opening I get the next error in the IDE 1:
“Specified folder/zip file does not contain a valid library”
When I unzip this file myself then I get after unzipping a map called:
“arduino-esp32-master” and in that map at /arduino-esp32-master/libraries/FS/src/ I find FS.h
On my disk at usr/users/usr/Documents/Arduino/ there is the subdir libraries and sketches. So I am wondering why the IDE 1 cannot place it there in /libraries.
If I try to install this zip file with the Arduino IDE 2 then the error is:
“Error: 13 INTERNAL: Library install failed: moving extracted archive to destination dir: library not valid”
I have tried it on a Windows10 Pc and A windows11 laptop. Both same result.
Maybe you may help me a bit further. Thank you.
Hi.
The library FS.h that we use in this tutorial is included by default when you install the ESP32 boards in your ARduino IDE.
You don’t need to install any library.
Just make sure you have the ESP32 boards installed in your Arduino IDE: https://randomnerdtutorials.com/installing-esp32-arduino-ide-2-0/
And when compiling or uploading your code, make sure you select an ESP32 board in Tools > Board.
Let me know if you can solve the issue.
Regards,
Sara
Hi Sara,
Thank you for your very quick reply.
I must honestly admit that this problem could have easily been avoided afterwards
if I had first selected the ESP32 board in the Board Manager.
At that moment it was still set to Arduino Nano.
I found out this issue after going through the installation procedure you mentioned
(https://randomnerdtutorials.com/installing-esp32-arduino-ide-2-0/).
It also turned out that I had already performed that installation in the past.
Solved this (experiential) issue.
Great.
I’m glad the issue is solved.
Regards,
Sara