This guide provides a beginner-friendly introduction to using Web Bluetooth with the ESP32. We’ll explain what Web Bluetooth is and walk you through creating a web application for interacting with an ESP32 Bluetooth Low Energy (BLE) device. Within the web app, you’ll be able to control the ESP32 GPIOs and retrieve values sent by the ESP32 through writing to and reading from its BLE characteristics.

Table of Contents
Throughout this tutorial, we’ll cover the following:
- Web Bluetooth Introduction
- Bluetooth Low Energy Introduction – Basic Concepts
- Project Overview
- Part 1: ESP32 BLE Device – Arduino Code
- Part 2: Creating the Web BLE App
- Part 3: Hosting your Web BLE App
Introducing Web Bluetooth
Web Bluetooth (also sometimes referred to as Web BLE) is a technology that allows you to connect and control BLE-enabled devices, like the ESP32, directly from your web browser using JavaScript.
With Web BLE, you can create web applications that interact with your ESP32 devices via Bluetooth, enabling you to control GPIO pins, exchange data, and manage your devices remotely through a web interface (this means any device that supports a web browser like your computer or smartphone).

One of the key advantages of Web BLE is its cross-platform compatibility. Unlike traditional mobile apps developed for Android or iOS, Web BLE applications are web-based and can run on any device with a modern web browser that supports Web BLE.
This cross-platform compatibility removes the need for users to download and install dedicated mobile apps, simplifying the user experience and reducing development efforts.
This means you can use a smartphone, tablet, or desktop computer to connect and control ESP32 devices using a Web BLE application.
The Web Bluetooth API is still under development, but it is generally considered to be stable and usable. It has been implemented in Chrome, Edge, Opera (Android), and it is supported on Android and Windows. However, it is not yet supported on iOS.
You can check the web browser/device compatibility on the Web Bluetooth API documentation.
Note: At the time of writing this tutorial, Web BLE is not supported on iOS.
Bluetooth Low Energy Introduction – Basic Concepts
Before proceeding, it’s important to get familiar with some basic BLE concepts. We also recommend that you take a quick look at our BLE getting started guides and tutorials:
- Getting Started with ESP32 Bluetooth Low Energy (BLE) on Arduino IDE
- ESP32 BLE Server and Client (Bluetooth Low Energy)
BLE Peripheral and Controller (Central Device)
When using Bluetooth Low Energy (BLE), it’s important to understand the roles of BLE Peripheral and BLE Controller (also referred to as the Central Device).

In our particular example, the ESP32 takes the role of the BLE Peripheral, serving as the device that provides data or services. Your smartphone or computer acts as the BLE Controller, managing the connection and communication with the ESP32.
BLE Server and Client
With Bluetooth Low Energy, there are two types of devices: the server and the client. The ESP32 can act either as a client or as a server. But, in our particular example, it will act as a server, exposing its GATT structure containing data. The BLE Server acts as a provider of data or services, while the BLE Client consumes or uses these services.

The server advertises its existence, so it can be found by other devices and contains data that the client can read or interact with. The client scans the nearby devices, and when it finds the server it is looking for, it establishes a connection and can interact with that device by reading or writing on its characteristics.
GATT
GATT, which stands for Generic Attribute Profile, is a fundamental concept in Bluetooth Low Energy (BLE) technology. Essentially, it serves as a blueprint for how BLE devices communicate with each other. Think of it as a structured language that two BLE devices use to exchange information seamlessly.

- Profile: standard collection of services for a specific use case;
- Service: collection of related information, like sensor readings, battery level, heart rate, etc. ;
- Characteristic: it is where the actual data is saved on the hierarchy (value);
- Descriptor: metadata about the data;
- Properties: describe how the characteristic value can be interacted with. For example: read, write, notify, broadcast, indicate, etc.
For a more detailed introduction to these BLE concepts, read: Getting Started with ESP32 Bluetooth Low Energy (BLE) on Arduino IDE.
UUID
A UUID is a unique digital identifier used in BLE and GATT to distinguish and locate services, characteristics, and descriptors. It’s like a distinct label that ensures every component in a Bluetooth device has a unique name.
Each service, characteristic, and descriptor has a UUID (Universally Unique Identifier). A UUID is a unique 128-bit (16 bytes) number. For example:
55072829-bc9e-4c53-938a-74a6d4c78776
There are shortened and default UUIDs for services, and characteristics specified in the SIG (Bluetooth Special Interest Group). This means, that if you have a BLE device that uses the default UUIDs for its services and characteristics, you’ll know exactly how to interact with that device to get or interact with the information you’re looking for.
Most of the time, with the ESP32, you’ll use your custom UUIDs. You can generate them using this UUID generator website.
Project Overview
Now that you’re more familiar with BLE concepts, let’s go through a quick overview of the project we’ll build.
The ESP32 will act as a BLE Peripheral/BLE Server that advertises its existence. Your computer, smartphone, or tablet will act as a BLE Controller/Client that interacts with the ESP32 device.

The ESP32 GATT structure will have one service with two characteristics. One characteristic (let’s call it sensor characteristic) will be the place to save a value that changes over time (like sensor readings). The other characteristic (let’s call it LED characteristic) will be the place to save the state of a GPIO. By changing the value of that characteristic, we’ll be able to control an LED connected to that GPIO.
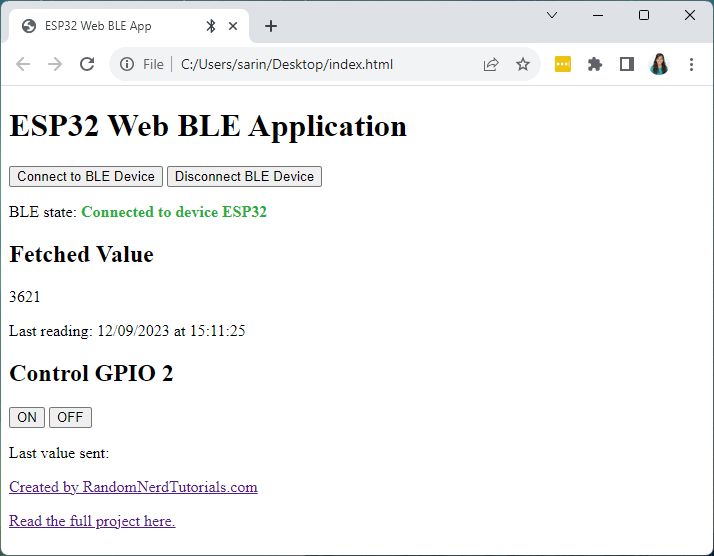
The ESP32 will write a new value to the sensor characteristic periodically. Your browser will connect to the ESP32 Bluetooth device and will receive notifications whenever the value changes and will display the new value on the web page (see Fetched Value in the picture below).

Additionally, your browser will also connect to the LED characteristic and will change its value (see the ON and OFF buttons above). The ESP32 checks that the value of that characteristic changed, and it will change the state of the GPIO accordingly, turning the LED either on or off.
ESP32 BLE Device – Arduino Code
The following code turns the ESP32 into a BLE device with one service and two characteristics as we’ve mentioned previously.
Upload the following code to your board, and it will work straight away.
/*
  Rui Santos & Sara Santos - Random Nerd Tutorials
  Complete project details at https://RandomNerdTutorials.com/esp32-web-bluetooth/
  Permission is hereby granted, free of charge, to any person obtaining a copy of this software and associated documentation files.
  The above copyright notice and this permission notice shall be included in all copies or substantial portions of the Software.
*/
#include <BLEDevice.h>
#include <BLEServer.h>
#include <BLEUtils.h>
#include <BLE2902.h>

BLEServer* pServer = NULL;
BLECharacteristic* pSensorCharacteristic = NULL;
BLECharacteristic* pLedCharacteristic = NULL;
bool deviceConnected = false;
bool oldDeviceConnected = false;
uint32_t value = 0;

const int ledPin = 2; // Use the appropriate GPIO pin for your setup

// See the following for generating UUIDs:
// https://www.uuidgenerator.net/
#define SERVICE_UUID        "19b10000-e8f2-537e-4f6c-d104768a1214"
#define SENSOR_CHARACTERISTIC_UUID "19b10001-e8f2-537e-4f6c-d104768a1214"
#define LED_CHARACTERISTIC_UUID "19b10002-e8f2-537e-4f6c-d104768a1214"

class MyServerCallbacks: public BLEServerCallbacks {
  void onConnect(BLEServer* pServer) {
    deviceConnected = true;
  };

  void onDisconnect(BLEServer* pServer) {
    deviceConnected = false;
  }
};

class MyCharacteristicCallbacks : public BLECharacteristicCallbacks {
  void onWrite(BLECharacteristic* pLedCharacteristic) {
    String value = pLedCharacteristic->getValue();
    if (value.length() > 0) {
      Serial.print("Characteristic event, written: ");
      Serial.println(static_cast<int>(value[0])); // Print the integer value

      int receivedValue = static_cast<int>(value[0]);
      if (receivedValue == 1) {
        digitalWrite(ledPin, HIGH);
      } else {
        digitalWrite(ledPin, LOW);
      }
    }
  }
};

void setup() {
  Serial.begin(115200);
  pinMode(ledPin, OUTPUT);

  // Create the BLE Device
  BLEDevice::init("ESP32");

  // Create the BLE Server
  pServer = BLEDevice::createServer();
  pServer->setCallbacks(new MyServerCallbacks());

  // Create the BLE Service
  BLEService *pService = pServer->createService(SERVICE_UUID);

  // Create a BLE Characteristic
  pSensorCharacteristic = pService->createCharacteristic(
                      SENSOR_CHARACTERISTIC_UUID,
                      BLECharacteristic::PROPERTY_READ   |
                      BLECharacteristic::PROPERTY_WRITE  |
                      BLECharacteristic::PROPERTY_NOTIFY |
                      BLECharacteristic::PROPERTY_INDICATE
                    );

  // Create the ON button Characteristic
  pLedCharacteristic = pService->createCharacteristic(
                      LED_CHARACTERISTIC_UUID,
                      BLECharacteristic::PROPERTY_WRITE
                    );

  // Register the callback for the ON button characteristic
  pLedCharacteristic->setCallbacks(new MyCharacteristicCallbacks());

  // https://www.bluetooth.com/specifications/gatt/viewer?attributeXmlFile=org.bluetooth.descriptor.gatt.client_characteristic_configuration.xml
  // Create a BLE Descriptor
  pSensorCharacteristic->addDescriptor(new BLE2902());
  pLedCharacteristic->addDescriptor(new BLE2902());

  // Start the service
  pService->start();

  // Start advertising
  BLEAdvertising *pAdvertising = BLEDevice::getAdvertising();
  pAdvertising->addServiceUUID(SERVICE_UUID);
  pAdvertising->setScanResponse(false);
  pAdvertising->setMinPreferred(0x0);  // set value to 0x00 to not advertise this parameter
  BLEDevice::startAdvertising();
  Serial.println("Waiting a client connection to notify...");
}

void loop() {
  // notify changed value
  if (deviceConnected) {
    pSensorCharacteristic->setValue(String(value).c_str());
    pSensorCharacteristic->notify();
    value++;
    Serial.print("New value notified: ");
    Serial.println(value);
    delay(3000); // bluetooth stack will go into congestion, if too many packets are sent, in 6 hours test i was able to go as low as 3ms
  }
  // disconnecting
  if (!deviceConnected && oldDeviceConnected) {
    Serial.println("Device disconnected.");
    delay(500); // give the bluetooth stack the chance to get things ready
    pServer->startAdvertising(); // restart advertising
    Serial.println("Start advertising");
    oldDeviceConnected = deviceConnected;
  }
  // connecting
  if (deviceConnected && !oldDeviceConnected) {
    // do stuff here on connecting
    oldDeviceConnected = deviceConnected;
    Serial.println("Device Connected");
  }
}
This is one of the simplest BLE code examples that turn the ESP32 into a BLE device that writes and listens to changes on characteristics. If you understand how this code works, you can easily modify it to serve more complex projects with more characteristics and services.
We recommend continuing reading to learn how the code works.
How the Code Works
In summary, this code sets up a BLE server with two characteristics—one for reading sensor data and another for controlling an LED. When a BLE client connects, it can read sensor data and send commands (write on the characteristic) to turn the LED on or off. The code also handles device connection and disconnection events.
Including Libraries
First, you need to import the following libraries to deal with Bluetooth.
#include <BLEDevice.h>
#include <BLEServer.h>
#include <BLEUtils.h>
#include <BLE2902.h>
Creating Global Variables
Then you create some global variables to use later in your code.
BLEServer* pServer = NULL;
BLECharacteristic* pSensorCharacteristic = NULL;
BLECharacteristic* pLedCharacteristic = NULL;
bool deviceConnected = false;
bool oldDeviceConnected = false;
uint32_t value = 0;

const int ledPin = 2; // Use the appropriate GPIO pin for your setup- pServer: Pointer to the BLEServer object.
- pSensorCharacteristic: Pointer to the BLECharacteristic for reading the sensor value.
- pLedCharacteristic: Pointer to the BLECharacteristic for controlling an LED.
- deviceConnected: A boolean variable to track whether a BLE device is connected.
- oldDeviceConnected: A boolean variable to track the previous connection status.
- value: An integer variable used to store and send sensor values.
- ledPin: The GPIO pin number to which an LED is connected.
UUID Definitions
Then, you set the UUIDs for the Service and Characteristics. Those UUIDs were created using the uuidgenerator website. You can generate your own UUIDs for your application, but for this example, we recommend using the same UUIDs we’re using.
#define SERVICE_UUID        "19b10000-e8f2-537e-4f6c-d104768a1214"
#define SENSOR_CHARACTERISTIC_UUID "19b10001-e8f2-537e-4f6c-d104768a1214"
#define LED_CHARACTERISTIC_UUID "19b10002-e8f2-537e-4f6c-d104768a1214"
BLE Server and Callbacks
Then, you create several callback functions. The MyServerCallbacks defines a callback function for device connection and disconnection events. In this case, we change the value of the deviceConnected variable to true or false depending on the connection state.
class MyServerCallbacks: public BLEServerCallbacks {
    void onConnect(BLEServer* pServer) {
      deviceConnected = true;
    };

    void onDisconnect(BLEServer* pServer) {
      deviceConnected = false;
    }
};
The MyCharacteristicCallbacks defines a callback function to read the value of a characteristic when it changes. In our code, we’ll set this callback function for the LED_CHARACTERISTIC to detect when the value of the characteristic has changed. We’ll turn the LED on and off accordingly to the value of that characteristic.
class MyCharacteristicCallbacks : public BLECharacteristicCallbacks {
    void onWrite(BLECharacteristic* onCharacteristic) {
        String value = onCharacteristic->getValue();
        if (value.length() > 0) {
            Serial.print("Characteristic event, written: ");
            Serial.println(static_cast<int>(value[0])); // Print the integer value

            int receivedValue = static_cast<int>(value[0]);
            if (receivedValue == 1) {
                digitalWrite(ledPin, HIGH);
            } else {
                digitalWrite(ledPin, LOW);
            }
        }
    }
};
setup()
In the setup(), initialize serial communication for debugging.
Serial.begin(115200);Set the ledPin as an output.
pinMode(ledPin, OUTPUT);Initialize the ESP32 as BLE device called ESP32. You can call it any other name, but for this project we recommend using this name to be compatible with the app we’ll build later on.
Then, create a BLE server and set its callbacks for connection and disconnection.
// Create the BLE Server
pServer = BLEDevice::createServer();
pServer->setCallbacks(new MyServerCallbacks());
Create a BLE service with the UUID we’ve defined earlier.
// Create the BLE Service
BLEService *pService = pServer->createService(SERVICE_UUID);
Create a BLE characteristic (inside the service we just created) for sensor values and set its properties (read, write, notify, indicate).
// Create a BLE Characteristic
pSensorCharacteristic = pService->createCharacteristic(
                    SENSOR_CHARACTERISTIC_UUID,
                    BLECharacteristic::PROPERTY_READ   |
                    BLECharacteristic::PROPERTY_WRITE  |
                    BLECharacteristic::PROPERTY_NOTIFY |
                    BLECharacteristic::PROPERTY_INDICATE
                  );
Create a BLE characteristic for the LED characteristic and set its property (write).
// Create the ON button Characteristic
pLedCharacteristic = pService->createCharacteristic(
                    LED_CHARACTERISTIC_UUID,
                    BLECharacteristic::PROPERTY_WRITE
                  );
Register the callback for the LED characteristic, so that we detect when a new value was written on that characteristic.
pLedCharacteristic->setCallbacks(new MyCharacteristicCallbacks());Add BLE descriptors (BLE2902) to both characteristics.
Note: BLE2902 is a specific descriptor that is often used for Client Characteristic Configuration (CCC). CCC descriptors are used to configure how a client (the device connecting to the server) wants to be notified or indicated of changes in a characteristic’s value. In simpler terms, they control whether the client should receive notifications or indications when the value of the associated characteristic changes.
By adding BLE2902 descriptors to both characteristics, you make it possible for clients to configure how they want to be notified or updated when the values of these characteristics change. Clients can use these descriptors to enable or disable notifications or indications, depending on their preferences or requirements for real-time updates from the ESP32 server.
Start the BLE service.
// Start the service
pService->start();
And finally, configure advertising settings and start advertising.
// Start advertising
BLEAdvertising *pAdvertising = BLEDevice::getAdvertising();
pAdvertising->addServiceUUID(SERVICE_UUID);
pAdvertising->setScanResponse(false);
pAdvertising->setMinPreferred(0x0);  // set value to 0x00 to not advertise this parameter
BLEDevice::startAdvertising();
Serial.println("Waiting a client connection to notify...");
loop()
In the loop(), if a BLE device is connected (deviceConnected is true), it updates the sensor value, notifies the client, and increments the value.
if (deviceConnected) {
    pSensorCharacteristic->setValue(String(value).c_str());
    pSensorCharacteristic->notify();
    value++;
    Serial.print("New value notified: ");
    Serial.println(value);
    delay(3000); // bluetooth stack will go into congestion, if too many packets are sent, in 6 hours test i was able to go as low as 3ms
}
If a device disconnects and oldDeviceConnected is true, it restarts advertising and logs a message.
If a device connects and oldDeviceConnected is false, it logs a message (you can add your own logic here for actions to be taken on connection).
// disconnecting
if (!deviceConnected && oldDeviceConnected) {
    Serial.println("Device disconnected.");
    delay(500); // give the bluetooth stack the chance to get things ready
    pServer->startAdvertising(); // restart advertising
    Serial.println("Start advertising");
    oldDeviceConnected = deviceConnected;
}
// connecting
if (deviceConnected && !oldDeviceConnected) {
    // do stuff here on connecting
    oldDeviceConnected = deviceConnected;
    Serial.println("Device Connected");
}
Uploading the Code
Upload the code to your ESP32 board. After uploading, open the Serial Monitor and restart your board.
You’ll see that it initialized the BLE service and is waiting for a connection from a client.

Now that you’ve set the ESP32 as a BLE Client, we’ll create the web app so that we can interact with the ESP32 via Bluetooth using our web browser.
Alternatively, you can use our web app by going to this URL:
Connect to your ESP32 BLE device and see the values sent by the ESP32 being displayed on the interface and control the ESP32 on-board LED with the ON and OFF buttons. If you want to learn how to build the web app, continue reading.
Creating the Web BLE App
Create an HTML file called index.html with the following code (it contains both the HTML to build the web page and Javascript to handle Web Bluetooth).
<!--
  Rui Santos
  Complete project details at https://RandomNerdTutorials.com/esp32-web-bluetooth/

  Permission is hereby granted, free of charge, to any person obtaining a copy of this software and associated documentation files.
  The above copyright notice and this permission notice shall be included in all copies or substantial portions of the Software.
-->

<!DOCTYPE html>
<html>
<head>
    <title>ESP32 Web BLE App</title>
    <meta name="viewport" content="width=device-width, initial-scale=1">
    <link rel="icon" type="image/png" href="">
</head>
<body>
  <h1>ESP32 Web BLE Application</h1>
  <button id="connectBleButton">Connect to BLE Device</button>
  <button id="disconnectBleButton">Disconnect BLE Device</button>
  <p>BLE state: <strong><span id="bleState" style="color:#d13a30;">Disconnected</span></strong></p>
  <h2>Fetched Value</h2>
  <p><span id="valueContainer">NaN</span></p>
  <p>Last reading: <span id="timestamp"></span></p>
  <h2>Control GPIO 2</h2>
  <button id="onButton">ON</button>
  <button id="offButton">OFF</button>
  <p>Last value sent: <span id="valueSent"></span></p>
  <p><a href="https://randomnerdtutorials.com/">Created by RandomNerdTutorials.com</a></p>
  <p><a href="https://RandomNerdTutorials.com/esp32-web-bluetooth/">Read the full project here.</a></p>
</body>
<script>
    // DOM Elements
    const connectButton = document.getElementById('connectBleButton');
    const disconnectButton = document.getElementById('disconnectBleButton');
    const onButton = document.getElementById('onButton');
    const offButton = document.getElementById('offButton');
    const retrievedValue = document.getElementById('valueContainer');
    const latestValueSent = document.getElementById('valueSent');
    const bleStateContainer = document.getElementById('bleState');
    const timestampContainer = document.getElementById('timestamp');

    //Define BLE Device Specs
    var deviceName ='ESP32';
    var bleService = '19b10000-e8f2-537e-4f6c-d104768a1214';
    var ledCharacteristic = '19b10002-e8f2-537e-4f6c-d104768a1214';
    var sensorCharacteristic= '19b10001-e8f2-537e-4f6c-d104768a1214';

    //Global Variables to Handle Bluetooth
    var bleServer;
    var bleServiceFound;
    var sensorCharacteristicFound;

    // Connect Button (search for BLE Devices only if BLE is available)
    connectButton.addEventListener('click', (event) => {
        if (isWebBluetoothEnabled()){
            connectToDevice();
        }
    });

    // Disconnect Button
    disconnectButton.addEventListener('click', disconnectDevice);

    // Write to the ESP32 LED Characteristic
    onButton.addEventListener('click', () => writeOnCharacteristic(1));
    offButton.addEventListener('click', () => writeOnCharacteristic(0));

    // Check if BLE is available in your Browser
    function isWebBluetoothEnabled() {
        if (!navigator.bluetooth) {
            console.log("Web Bluetooth API is not available in this browser!");
            bleStateContainer.innerHTML = "Web Bluetooth API is not available in this browser!";
            return false
        }
        console.log('Web Bluetooth API supported in this browser.');
        return true
    }

    // Connect to BLE Device and Enable Notifications
    function connectToDevice(){
        console.log('Initializing Bluetooth...');
        navigator.bluetooth.requestDevice({
            filters: [{name: deviceName}],
            optionalServices: [bleService]
        })
        .then(device => {
            console.log('Device Selected:', device.name);
            bleStateContainer.innerHTML = 'Connected to device ' + device.name;
            bleStateContainer.style.color = "#24af37";
            device.addEventListener('gattserverdisconnected', onDisconnected);
            return device.gatt.connect();
        })
        .then(gattServer =>{
            bleServer = gattServer;
            console.log("Connected to GATT Server");
            return bleServer.getPrimaryService(bleService);
        })
        .then(service => {
            bleServiceFound = service;
            console.log("Service discovered:", service.uuid);
            return service.getCharacteristic(sensorCharacteristic);
        })
        .then(characteristic => {
            console.log("Characteristic discovered:", characteristic.uuid);
            sensorCharacteristicFound = characteristic;
            characteristic.addEventListener('characteristicvaluechanged', handleCharacteristicChange);
            characteristic.startNotifications();
            console.log("Notifications Started.");
            return characteristic.readValue();
        })
        .then(value => {
            console.log("Read value: ", value);
            const decodedValue = new TextDecoder().decode(value);
            console.log("Decoded value: ", decodedValue);
            retrievedValue.innerHTML = decodedValue;
        })
        .catch(error => {
            console.log('Error: ', error);
        })
    }

    function onDisconnected(event){
        console.log('Device Disconnected:', event.target.device.name);
        bleStateContainer.innerHTML = "Device disconnected";
        bleStateContainer.style.color = "#d13a30";

        connectToDevice();
    }

    function handleCharacteristicChange(event){
        const newValueReceived = new TextDecoder().decode(event.target.value);
        console.log("Characteristic value changed: ", newValueReceived);
        retrievedValue.innerHTML = newValueReceived;
        timestampContainer.innerHTML = getDateTime();
    }

    function writeOnCharacteristic(value){
        if (bleServer && bleServer.connected) {
            bleServiceFound.getCharacteristic(ledCharacteristic)
            .then(characteristic => {
                console.log("Found the LED characteristic: ", characteristic.uuid);
                const data = new Uint8Array([value]);
                return characteristic.writeValue(data);
            })
            .then(() => {
                latestValueSent.innerHTML = value;
                console.log("Value written to LEDcharacteristic:", value);
            })
            .catch(error => {
                console.error("Error writing to the LED characteristic: ", error);
            });
        } else {
            console.error ("Bluetooth is not connected. Cannot write to characteristic.")
            window.alert("Bluetooth is not connected. Cannot write to characteristic. \n Connect to BLE first!")
        }
    }

    function disconnectDevice() {
        console.log("Disconnect Device.");
        if (bleServer && bleServer.connected) {
            if (sensorCharacteristicFound) {
                sensorCharacteristicFound.stopNotifications()
                    .then(() => {
                        console.log("Notifications Stopped");
                        return bleServer.disconnect();
                    })
                    .then(() => {
                        console.log("Device Disconnected");
                        bleStateContainer.innerHTML = "Device Disconnected";
                        bleStateContainer.style.color = "#d13a30";

                    })
                    .catch(error => {
                        console.log("An error occurred:", error);
                    });
            } else {
                console.log("No characteristic found to disconnect.");
            }
        } else {
            // Throw an error if Bluetooth is not connected
            console.error("Bluetooth is not connected.");
            window.alert("Bluetooth is not connected.")
        }
    }

    function getDateTime() {
        var currentdate = new Date();
        var day = ("00" + currentdate.getDate()).slice(-2); // Convert day to string and slice
        var month = ("00" + (currentdate.getMonth() + 1)).slice(-2);
        var year = currentdate.getFullYear();
        var hours = ("00" + currentdate.getHours()).slice(-2);
        var minutes = ("00" + currentdate.getMinutes()).slice(-2);
        var seconds = ("00" + currentdate.getSeconds()).slice(-2);

        var datetime = day + "/" + month + "/" + year + " at " + hours + ":" + minutes + ":" + seconds;
        return datetime;
    }


</script>

</html>
How does it Work?
This HTML and JavaScript code represents a web application that allows you to connect to an ESP32 device over Bluetooth Low Energy (BLE). The application provides a user interface to interact with the ESP32, including reading values and controlling an LED. Let’s break down the code and understand how it works.
Below you can see the application we’ll build (on the right with CSS, and on the left without CSS).

HTML Page
First, we create a simple HTML page. We first create two buttons: one to connect the browser to BLE devices and another to disconnect.
<button id="connectBleButton"> Connect to BLE Device</button>
<button id="disconnectBleButton"> Disconnect BLE Device</button>
Then, we have a paragraph that will then display the BLE connection state.
<p>BLE state: <strong><span id="bleState" style="color:#d13a30;">Disconnected</span></strong></p>Then, we have a section to display the value written by the ESP32 on the sensor value characteristic.
<h2>Fetched Value</h2>
<p><span id="valueContainer">NaN</span></p>
We’ll also display the timestamp of when the value was received in the following paragraph.
<p>Last reading: <span id="timestamp"></span></p>Finally, we have a section with two buttons. One to write 1 on the LED characteristic (to turn it on) and another to write 0 on the LED characteristic (to turn it off).
<button id="onButton">ON</button>
<button id="offButton">OFF</button>
We also have a paragraph to display the last value that was sent to control the LED.
<p>Last value sent: <span id="valueSent"></span></p>JavaScript – Web BLE
Next, inside the <script></script> tags, we have the Javascript code responsible for handling the buttons and connecting to the ESP32 via Bluetooth and interacting with its characteristics.
DOM Elements
First, we select the HTML elements and assign them to a variable name for easier manipulation along the code.
const connectButton = document.getElementById('connectBleButton');
const disconnectButton = document.getElementById('disconnectBleButton');
const onButton = document.getElementById('onButton');
const offButton = document.getElementById('offButton');
const retrievedValue = document.getElementById('valueContainer');
const latestValueSent = document.getElementById('valueSent');
const bleStateContainer = document.getElementById('bleState');
const timestampContainer = document.getElementById('timestamp');
BLE Device Specifications
Then, we add the BLE Device specifications we want to connect to. We already set up the ESP32 as a BLE server. So, we can set its specs here, the name, the UUID of the service, and the UUIDs of the characteristics we want to interact with—these should be the same you’ve set on your Arduino code.
//Define BLE Device Specs
var deviceName ='ESP32';
var bleService = '19b10000-e8f2-537e-4f6c-d104768a1214';
var ledCharacteristic = '19b10002-e8f2-537e-4f6c-d104768a1214';
var sensorCharacteristic= '19b10001-e8f2-537e-4f6c-d104768a1214';
Defining Global Variables
Then, we create some global variables to handle Bluetooth communication and device discovery later on in our code.
var bleServer;
var bleServiceFound;
var sensorCharacteristicFound;
Assigning Events to Buttons
Then, we add event listeners to the buttons to trigger actions when they are clicked.
Connect To BLE Device Button
The Connect To BLE Device button will trigger the connectToDevice() function. But first, we check if the Web BLE Javascript API is available in your browser before proceeding and we display a message on the bleStateContainer in case Web BLE is not supported.
// Connect Button (search for BLE Devices only if BLE is available)
connectButton.addEventListener('click', (event) => {
    if (isWebBluetoothEnabled()){
        connectToDevice();
    }
});
To check if the Web Bluetooth is enabled in your browser, we created a function called isWebBluetoothEnabled(). The method that checks if Web BLE is enabled is nagivator.bluetooth.
// Check if BLE is available in your Browser
function isWebBluetoothEnabled() {
    if (!navigator.bluetooth) {
        console.log("Web Bluetooth API is not available in this browser!");
         bleStateContainer.innerHTML = "Web Bluetooth API is not available in this browser/device!";
         return false
    }
    console.log('Web Bluetooth API supported in this browser.');
    return true
}
Disconnect BLE Device Button
The Disconnect BLE Device Button will call the disconnectDevice function.
// Disconnect Button
disconnectButton.addEventListener('click', disconnectDevice);
ON and OFF Buttons
The on and off buttons will trigger the writeOnCharacteristic function. In case of the ON button, we’ll pass a 1 as a parameter, and in case of the OFF button, we’ll pass 0 as a parameter.
// Write to the ESP32 LED Characteristic
onButton.addEventListener('click', () => writeOnCharacteristic(1));
offButton.addEventListener('click', () => writeOnCharacteristic(0));
Connecting to BLE Device and search Services and Characteristics
The connectToDevice() function is triggered when you click on the Connect to BLE Device button. This function searches for our specific BLE Device, its Service and Characteristics.
function connectToDevice(){The following lines of code search for BLE Devices with the name and Service that we’ve defined. There are other filters you can define to search for BLE devices, or you can opt to not add any filters and return all the BLE devices found.
navigator.bluetooth.requestDevice({
    filters: [{name: deviceName}],
    optionalServices: [bleService]
})
Once we’ve connected to your device, we display on the HTML interface that we are now connected to our device. We also add an event listener to our device, in case it disconnects (it will call the onDisconnected function).
.then(device => {
    console.log('Device Selected:', device.name);
    bleStateContainer.innerHTML = 'Connected to device ' + device.name;
    bleStateContainer.style.color = "#24af37";
    device.addEventListener('gattserverdisconnected', onDisconnected);
    return device.gatt.connect();
})
From the device, we can get our GATT server (the hierarchical structure that stores data in BLE protocol). We save our GATT server on our bleServer global variable. From the GATTT server, we can get the service with the UUID we’ve defined at the beginning of the code, bleService.
.then(gattServer =>{
    bleServer = gattServer;
    console.log("Connected to GATT Server");
    return bleServer.getPrimaryService(bleService);
 })
Once we’ve found our service, we save it on the global variable bleServiceFound, and get the sensor characteristic from the service.
.then(service => {
    bleServiceFound = service;
    console.log("Service discovered:", service.uuid);
    return service.getCharacteristic(sensorCharacteristic);
})
Now that we’ve found our sensor characteristic, we assigned it to the global sensorCharacteristicFound variable. We add an event listener to our characteristic to handle what happens when the characteristic value changes—we call the handleCharacteristicChange function. We also start notifications on that characteristic. Finally, we return the current value written on the characteristic.
.then(characteristic => {
    console.log("Characteristic discovered:", characteristic.uuid);
    sensorCharacteristicFound = characteristic;
    characteristic.addEventListener('characteristicvaluechanged', handleCharacteristicChange);
    characteristic.startNotifications();
    console.log("Notifications Started.");
    return characteristic.readValue();
})
Next, we display the value read from the characteristic on the corresponding HTML element.
.then(value => {
    console.log("Read value: ", value);
    const decodedValue = new TextDecoder().decode(value);
    console.log("Decoded value: ", decodedValue);
    retrievedValue.innerHTML = decodedValue;
})
Handle Characteristic Change
The handleCharacteristicChange() function will be called when the sensor characteristic value changes. That function gets the new value written on the characteristic and places it on the corresponding HTML element. Additionally, we also get the date and time to display when was the last time that the characteristic value has changed.
function handleCharacteristicChange(event){
    const newValueReceived = new TextDecoder().decode(event.target.value);
    console.log("Characteristic value changed: ", newValueReceived);
    retrievedValue.innerHTML = newValueReceived;
    timestampContainer.innerHTML = getDateTime();
}
Write on Characteristics
When you click on the ON or OFF buttons, the writeOnCharacteristicfunction will be called. That function first checks if we are connected to the BLE server. If we are, it gets the LED characteristic from the BLE Service we’ve found previously, and it writes the value we’ve passed as an argument on the characteristic.
if (bleServer && bleServer.connected) {
    bleServiceFound.getCharacteristic(ledCharacteristic)
     .then(characteristic => {
        console.log("Found the LED characteristic: ", characteristic.uuid);
        const data = new Uint8Array([value]);
        return characteristic.writeValue(data);
})
If we’re successful in writing to the characteristic, we update the last value written on the HTML interface.
.then(() => {
    latestValueSent.innerHTML = value;
    console.log("Value written to LEDcharacteristic:", value);
})
In case we try to write to the characteristic without being connected to BLE first, we’ll create a pop-up window informing that we need to connect to BLE first.
} else {
    console.error ("Bluetooth is not connected. Cannot write to characteristic.")
    window.alert("Bluetooth is not connected. Cannot write to characteristic. \n Connect to BLE first!")
}
Disconnect BLE Device
When you click on the Disconnect BLE Device button, the disconnectDevice() function is called. This function first checks if we’re connected to the server. Then, we stop the notifications on the sensorCharacteristic and we disconnect from the GATT server. Additionally, we also display some messages on the HTML interface and a pop-up window in case Bluetooth is not connected.
function disconnectDevice() {
    console.log("Disconnect Device.");
    if (bleServer && bleServer.connected) {
        if (sensorCharacteristicFound) {
            sensorCharacteristicFound.stopNotifications()
                .then(() => {
                    console.log("Notifications Stopped");
                    return bleServer.disconnect();
                })
                .then(() => {
                    console.log("Device Disconnected");
                    bleStateContainer.innerHTML = "Device Disconnected";
                    bleStateContainer.style.color = "#d13a30";

                })
                .catch(error => {
                    console.log("An error occurred:", error);
                });
        } else {
            console.log("No characteristic found to disconnect.");
        }
    } else {
        // Throw an error if Bluetooth is not connected
        console.error("Bluetooth is not connected.");
        window.alert("Bluetooth is not connected.")
    }
}
Testing the Web BLE App
Save your index.html file and drag it to your browser. The following page will open.

With the ESP32 running the code we’ve provided previously, let’s test the web app.
Start by clicking on the Connect to BLE Device button. A window will pop up and you should see the ESP32 BLE Device. Connect to that device.

You’ll see that the BLE Status will change to connected and you’ll start receiving the values written by the ESP32 on the sensor characteristic.

Simultaneously, you should get the following messages on the Arduino Serial Monitor showing that the connection was successful and the values being written on the sensor characteristic.

Getting back to the app, if you click the ON and OFF buttons you’ll be able to control the ESP32 LED on and off.

On the Serial Monitor, you’ll see that it detects the changes in the LED characteristic value.

Consequently, it will control the ESP32 onboard LED according to the value written on that characteristic.


Styling the Web BLE App
To make your web interface look better, we’ll add some CSS.
index.html
Copy the following to your index.html file. This is the same HTML we provided previously, but we added some CSS classes to style the web page.
<!--
  Rui Santos
  Complete project details at https://RandomNerdTutorials.com/esp32-web-bluetooth/

  Permission is hereby granted, free of charge, to any person obtaining a copy of this software and associated documentation files.
  The above copyright notice and this permission notice shall be included in all copies or substantial portions of the Software.
-->

<!DOCTYPE html>
<html>
<head>
    <title>ESP32 Web BLE App</title>
    <meta name="viewport" content="width=device-width, initial-scale=1">
    <link rel="icon" type="image/png" href="favicon.ico">
    <link rel="stylesheet" type="text/css" href="style.css">
    <meta charset="UTF-8">
</head>
<body>
    <div class="topnav">
        <h1>ESP32 Web BLE Application</h1>
    </div>
    <div class="content">
        <div class="card-grid">
            <div class="card">
                <p>
                    <button id="connectBleButton" class="connectButton"> Connect to BLE Device</button>
                    <button id="disconnectBleButton" class="disconnectButton"> Disconnect BLE Device</button>
                </p>
                <p class="gray-label">BLE state: <strong><span id="bleState" style="color:#d13a30;">Disconnected</span></strong></p>
            </div>
        </div>
        <div class="card-grid">
            <div class="card">
                <h2>Fetched Value</h2>
                <p class="reading"><span id="valueContainer">NaN</span></p>
                <p class="gray-label">Last reading: <span id="timestamp"></span></p>
            </div>

            <div class="card">
                <h2>Control GPIO 2</h2>
                <button id="onButton" class="onButton">ON</button>
                <button id="offButton" class="offButton">OFF</button>
                <p class="gray-label">Last value sent: <span id="valueSent"></span></p>
            </div>
        </div>
    </div>
    <div class="footer">
        <p><a href="https://randomnerdtutorials.com/">Created by RandomNerdTutorials.com</a></p>
        <p><a href="https://RandomNerdTutorials.com/esp32-web-bluetooth/">Read the full project here.</a></p>
    </div>
</body>
<script>
    // DOM Elements
    const connectButton = document.getElementById('connectBleButton');
    const disconnectButton = document.getElementById('disconnectBleButton');
    const onButton = document.getElementById('onButton');
    const offButton = document.getElementById('offButton');
    const retrievedValue = document.getElementById('valueContainer');
    const latestValueSent = document.getElementById('valueSent');
    const bleStateContainer = document.getElementById('bleState');
    const timestampContainer = document.getElementById('timestamp');

    //Define BLE Device Specs
    var deviceName ='ESP32';
    var bleService = '19b10000-e8f2-537e-4f6c-d104768a1214';
    var ledCharacteristic = '19b10002-e8f2-537e-4f6c-d104768a1214';
    var sensorCharacteristic= '19b10001-e8f2-537e-4f6c-d104768a1214';

    //Global Variables to Handle Bluetooth
    var bleServer;
    var bleServiceFound;
    var sensorCharacteristicFound;

    // Connect Button (search for BLE Devices only if BLE is available)
    connectButton.addEventListener('click', (event) => {
        if (isWebBluetoothEnabled()){
            connectToDevice();
        }
    });

    // Disconnect Button
    disconnectButton.addEventListener('click', disconnectDevice);

    // Write to the ESP32 LED Characteristic
    onButton.addEventListener('click', () => writeOnCharacteristic(1));
    offButton.addEventListener('click', () => writeOnCharacteristic(0));

    // Check if BLE is available in your Browser
    function isWebBluetoothEnabled() {
        if (!navigator.bluetooth) {
            console.log('Web Bluetooth API is not available in this browser!');
            bleStateContainer.innerHTML = "Web Bluetooth API is not available in this browser/device!";
            return false
        }
        console.log('Web Bluetooth API supported in this browser.');
        return true
    }

    // Connect to BLE Device and Enable Notifications
    function connectToDevice(){
        console.log('Initializing Bluetooth...');
        navigator.bluetooth.requestDevice({
            filters: [{name: deviceName}],
            optionalServices: [bleService]
        })
        .then(device => {
            console.log('Device Selected:', device.name);
            bleStateContainer.innerHTML = 'Connected to device ' + device.name;
            bleStateContainer.style.color = "#24af37";
            device.addEventListener('gattserverdisconnected', onDisconnected);
            return device.gatt.connect();
        })
        .then(gattServer =>{
            bleServer = gattServer;
            console.log("Connected to GATT Server");
            return bleServer.getPrimaryService(bleService);
        })
        .then(service => {
            bleServiceFound = service;
            console.log("Service discovered:", service.uuid);
            return service.getCharacteristic(sensorCharacteristic);
        })
        .then(characteristic => {
            console.log("Characteristic discovered:", characteristic.uuid);
            sensorCharacteristicFound = characteristic;
            characteristic.addEventListener('characteristicvaluechanged', handleCharacteristicChange);
            characteristic.startNotifications();
            console.log("Notifications Started.");
            return characteristic.readValue();
        })
        .then(value => {
            console.log("Read value: ", value);
            const decodedValue = new TextDecoder().decode(value);
            console.log("Decoded value: ", decodedValue);
            retrievedValue.innerHTML = decodedValue;
        })
        .catch(error => {
            console.log('Error: ', error);
        })
    }

    function onDisconnected(event){
        console.log('Device Disconnected:', event.target.device.name);
        bleStateContainer.innerHTML = "Device disconnected";
        bleStateContainer.style.color = "#d13a30";

        connectToDevice();
    }

    function handleCharacteristicChange(event){
        const newValueReceived = new TextDecoder().decode(event.target.value);
        console.log("Characteristic value changed: ", newValueReceived);
        retrievedValue.innerHTML = newValueReceived;
        timestampContainer.innerHTML = getDateTime();
    }

    function writeOnCharacteristic(value){
        if (bleServer && bleServer.connected) {
            bleServiceFound.getCharacteristic(ledCharacteristic)
            .then(characteristic => {
                console.log("Found the LED characteristic: ", characteristic.uuid);
                const data = new Uint8Array([value]);
                return characteristic.writeValue(data);
            })
            .then(() => {
                latestValueSent.innerHTML = value;
                console.log("Value written to LEDcharacteristic:", value);
            })
            .catch(error => {
                console.error("Error writing to the LED characteristic: ", error);
            });
        } else {
            console.error ("Bluetooth is not connected. Cannot write to characteristic.")
            window.alert("Bluetooth is not connected. Cannot write to characteristic. \n Connect to BLE first!")
        }
    }

    function disconnectDevice() {
        console.log("Disconnect Device.");
        if (bleServer && bleServer.connected) {
            if (sensorCharacteristicFound) {
                sensorCharacteristicFound.stopNotifications()
                    .then(() => {
                        console.log("Notifications Stopped");
                        return bleServer.disconnect();
                    })
                    .then(() => {
                        console.log("Device Disconnected");
                        bleStateContainer.innerHTML = "Device Disconnected";
                        bleStateContainer.style.color = "#d13a30";

                    })
                    .catch(error => {
                        console.log("An error occurred:", error);
                    });
            } else {
                console.log("No characteristic found to disconnect.");
            }
        } else {
            // Throw an error if Bluetooth is not connected
            console.error("Bluetooth is not connected.");
            window.alert("Bluetooth is not connected.")
        }
    }

    function getDateTime() {
        var currentdate = new Date();
        var day = ("00" + currentdate.getDate()).slice(-2); // Convert day to string and slice
        var month = ("00" + (currentdate.getMonth() + 1)).slice(-2);
        var year = currentdate.getFullYear();
        var hours = ("00" + currentdate.getHours()).slice(-2);
        var minutes = ("00" + currentdate.getMinutes()).slice(-2);
        var seconds = ("00" + currentdate.getSeconds()).slice(-2);

        var datetime = day + "/" + month + "/" + year + " at " + hours + ":" + minutes + ":" + seconds;
        return datetime;
    }


</script>

</html>
style.css
On the same folder of your index.html file, create a file called style.css with the following.
html {
    font-family: Arial, Helvetica, sans-serif;
    display: inline-block;
    text-align: center;
}
h1 {
    font-size: 1.8rem;
    color: white;
}
.topnav {
    overflow: hidden;
    background-color: #0A1128;
}
body {
    margin: 0;
}
.content {
    padding: 50px;
}
.card-grid {
    max-width: 800px;
    margin: 0 auto;
    margin-bottom: 30px;
    display: grid;
    grid-gap: 2rem;
    grid-template-columns: repeat(auto-fit, minmax(300px, 1fr));
}
.card {
    background-color: white;
    box-shadow: 2px 2px 12px 1px rgba(140,140,140,.5);
}
button {
    color: white;
    padding: 14px 20px;
    margin: 8px 0;
    border: none;
    cursor: pointer;
    border-radius: 4px;
}

.onButton{
    background-color: #1b8a94;
}

.offButton{
    background-color: #5f6c6d;
}

.connectButton{
    background-color: #24af37;
}

.disconnectButton{
    background-color: #d13a30;
}

.gray-label {
    color: #bebebe;
    font-size: 1rem;
}

.reading {
    font-size: 1.8rem;
}
favicon
Additionally, add the following favicon to your folder.
Demonstration
After creating all the required files in the same folder, open the index.html file on your web browser.
This is what the application will look like. It works exactly the same way as we’ve seen previously, but it looks much better.

Taking it Further – Hosting your Web BLE App
At the moment, you can only connect to the ESP32 via BLE by opening the index.html file on the web browser of your computer. If you want to open it on your smartphone or any other device you would need to copy that file to the device and then, open it on the web browser. This is not very convenient.
The best way to have access to your web app on any device is to host your files on a server. To work with BLE, the files need to be served via HTTPS.
To host our web app, we’ll use GitHub pages. If you don’t have a GitHub account, create one before proceeding.
1. On your account dashboard, click on the + icon and create a New repository.

2. The following page will load. Give a name to your repository, and make sure it is set to Public. Then, click on Create repository.

3. Then, click on Add file > Upload files to repository.

4. Then, drag your index.html, style.css, and favicon.ico files to the repository. Then, click on Commit changes.

5. Then, go to Settings > Pages and make sure you have the options highlighted in red below. Then, click the Save button.

After submitting, wait a few minutes for the web page to be available. Your web app will be in the following domain:
YOUR_GITHUB_USERNAME.github.io/YOUR_REPOSITORY_NAME
In our case, it is available on the following web page: https://ruisantosdotme.github.io/esp32-web-ble/
https://ruisantosdotme.github.io/esp32-web-ble/
Demonstration
Now, you can access your Web BLE App on any device (that supports Web BLE) with a web browser by going to that URL. Then, you can connect to the ESP32 via BLE using that device and read and write on its characteristics.

Now you can access the Web App on your smartphone or tablet and control your ESP32 BLE Device from there.
Wrapping Up
In this tutorial, you learned about the Web BLE technology. In simple terms, it is a JavaScript API that allows us to create web apps to interact with BLE devices from any web browser that supports Web BLE.
You learned how to set the ESP32 as a BLE device with a Service and Characteristics and you create a web application to interact with the ESP32 characteristics. This way, we are now able to control the ESP32 via BLE using our browser.
We hope you’ve found this tutorial useful and that it helped you start into this relatively new technology.
We have other ESP32 tutorials related to Bluetooth that you may like:
- Getting Started with ESP32 Bluetooth Low Energy (BLE) on Arduino IDE
- ESP32 BLE Server and Client (Bluetooth Low Energy)
- ESP32 Bluetooth Classic with Arduino IDE – Getting Started
- ESP32 BLE Peripheral (Server): Environmental Sensing Service
Do you want to learn more about the ESP32? Check out all our Resources:
- Learn ESP32 with Arduino IDE (eBook)
- Build Web Servers with ESP32 and ESP8266 (eBook)
- Firebase Web App with ESP32 and ESP8266 (eBook)
- SMART HOME with Raspberry Pi, ESP32, and ESP8266
- Free ESP32 Projects and Tutorials…
Thanks for reading.


Hi Sarah
How can I print the article to my printer or to pdf, without losing lines at the top and bottom of every page?
As an example:
the first page ends with “Part 1: ESP 32….
the second page starts with the bottom third of the line “Part 3: Hosting….
I’m sure I’m not alone with this issue!
Kind Regards J
Hi.
If you press CTRL+P on google chrome, it should print or save as pdf the whole article.
Regards,
Sara
Thanks Sara
It worked!
I had always assumed that Ctrl P would give the same result as hitting Print from the Dropdown menu..clearly I wuz rong
Great.
I’m glad it solved the issue.
Regards,
Sara
That is quite a tutorial. My compliments. Just want to ask one small clarification. When you describe testing the HTML on your computer by dragging it in to the browser, I presume this only works if that computer also has Bluetooth, otherwise it will not connect to anything. or did i totally misunderstand?
Hi.
Thank you.
Yes. The computer must have bluetooth enabled.
Regards,
Sara
As usual, a very well-written tutorial. I hadn’t heard of Web BLE before, so now I’m starting to think about how I might use this compared to the other ways I interact with my IoT devices. Thanks for providing the info.
You’re welcome.
Thanks 😀
OK after a couple of paragraphs I’m confused about Client and Server.
Under ‘BLE Peripheral and Controller (Central Device)’ you say :
‘In our particular example, the ESP32 takes the role of the BLE Peripheral,’
But in the next paragraph under ‘BLE Server and Client’ you say :
‘… in our particular example, it will act as a server, …’
Perhaps the first should say: ‘In a general example ( as shown in the above diagram)…’ , and the second would be correct.
Hi.
In BLE, peripheral and server are the same device. It is a BLE peripheral, but it has all the information, so it’s also the server.
With your computer or smartphone, you control the BLE peripheral, so this is the controller. It is also the client because it doesn’t contain any information.
I hope this is clear.
Regards,
Sara
A great tutorial as always. Please help us understand that the web page on gihub will only work in our esp32 bluetooth range. We cannot use it to connect from another city or remote location.
Hi.
Yes. That’s right.
The web application can control the ESP32 via bluetooth, so it must be within the device’s bluetooth range.
REgards,
Sara
Hi, thanks – as always very well described projects – you are by far the best on the net in creating & explaining makerprojects, in particular in the IoT area, which is my main interest.
Just one question – still no progress in BLE support in micropython? I know it has been limited and somewhat unstable for a long time. There is a lot for Arduino (such as this one), but almost nothing for micropython. Any suggestions, tips or updates on the progress on BLE/micropython is appreciated.
regards,
Hi.
We have some followers who use BLE successfully with micropython.
However, we didn’t explore that yet in our blog.
Regards,
Sara
Hello Sara and Ruis,
many thanks for your web-ble tutorial. I tried it and it works
if – and only if the web browser supports web ble functionality.
I had to enable the browser flag #enable-experimental-web-platform-features,
e.g. on chrome or opera.
For me only chrome on my mobil phone and my tablet works
fine. On raspberry pi 5 there are problems to connect to the esp
via ble. On other systems like windows 10 and other browsers
like firefox and opera it seems not to work correctly. I installed
therefore the last beta versions of chrome and opera.
Maybe the browsers will implement the web-ble feature in future
releases …
Thanks again an best greetings,
Peter
Hi Sara,
today I tried the chrome browser on raspberry pi 5 again
and it worked!!!!
So I can use web ble on chrome browsers on android
and linux (raspberry pi os bookworm 64 bit). great!
I will use it in my lectures on esp32 and iot in the summer.
On the server side (esp32) it should be no problem to use
micropython. The last versions support ble and work fine.
Thanks again to you and Ruis for the super tutorial,
Peter
Hi.
That’s great.
I’m glad this tutorial is was helpful.
Regards,
Sara
Hi Sara,
thanks to both of you for this deep tutorial – realy cool!. One question left on my side for Bluetooth Low Energy (BLE).
There is another standard – quite the most popular standard this time – using BLE: Zigbee! Worldwide there are hundrets of smarthome components using zigbee and that is quite comfortable.
How cool could it be to use a ESP32 to create a own BLE-Device in example to read temperature, air-quality, switchin power-applications and other stuff. There are so much extremly cool tutorials on RNT that show and explain this with e.g. ESP8266 and ESP32.
The questions is now: How far is it to combine BLE and ESP32 in that way to create own devices that communicate over Zigbee using BLE? Maybe this would be a relatively smal step. Is it real to hope for such a tutorial?
Best regards and thanks,
Manfred
Excellent tutorial, even though I’m not sure I fully understand, but, I do get the basics.
I tried to modify the code to add additional buttons to Control Relays. This did not work. Got an onWrite overload error trying to compile. I did a bunch of copy/paste and changed the corresponding “LED/led” characteristics to “R1” for example.
Can you direct me to additional code example that might use two or four buttons instead of the single LED buttons
Thanks
Hello Ste7
You requested for a little bit code expanding the example.
In my first experiments I added a third button to toggle the led.
I created a new toggle button, defined a constant for it and
added an event listener to write out ‘#’ to toggle the led.
Here are the code snippets:
add the toggle button
OFF
TOGGLE // added
Last value sent:
define a DOM constant for the toggle button
const offButton = document.getElementById(‘offButton’);
const toggleButton = document.getElementById(‘toggleButton’); // added
const retrievedValue = document.getElementById(‘valueContainer’);
add an event listener for the toggle button to write out ‘#’
offButton.addEventListener(‘click’, () => writeOnCharacteristic(45));
toggleButton.addEventListener(‘click’, () => writeOnCharacteristic(35)); // added
I hope this helps,
Peter
I found your new article very interesting.
Can you compare the pros and cons to using this method against Web Sockets?
I see the 3 second delay and wonder if that is too much for an IOT device running something like my Monorail project where I need status updates and remote motor control.
Again, thank you both for your most excellent gifts of your time and creativity.
Hello Sara,
thanks for this great tutorial,
could you give me/us a hint how to connect to 2 or more ESP32 BLE at the same time?
Just can’t find a solution, yet… .
would be great,
Regards,
Tobias
Hello Sara.
Do you have an example with more value displayed and also with a textBox. I would like to display information from more sensors and also sending values to ESP32.
Thanks
Martin
Hi,
At the moment, we only have this example for Web BLE.
Regards,
Sara
I tried changing the UUIDs in your example, but I always get the error that no Characteristics matching UUID were found in my browser.
I changed the UUID under #define X_UUID in the Arduino code and in the var of the javascript code. Curiously if I just change the UUID in the javascript back to your examples (and not in the Arduino Code) it doesn’t throw an error which makes no sense.
When I check the UUID with the nRF Connect App the services have the UUIDs I defined in the Arduino Code.
Any idea what might be happening here?
Hi Daniel,
do you solved the problem?
I have the same problem. My JS works fine on laptop Windows 10 and chrome.
The exact same webside on Android with Chrome works only with exact UUID from tutorial.
Custom defined UUID not found in Device.
@Sara:
Do you have any idea?
Or do you have a slution for us?
best regards,
Michael
Hi Daniel,
I have a solution 🙂
There is more then one issue.
Number one, to see the correct UUIDs, is the following:
The Arduino IDE has a buildin BLE library. But you can install it also from library bibliothek in version 1.x
After this it works for me 🙂
The second one was not that easy for me. Maybe because my little experience with javascript.
Its all in the HTTP part.
The main error was to call
return characteristic.readValue();
and then the
.then(value => {
part after that.
return.characteristic.startNotifications(); was the key for calling multiple Notifications.
    .then(characteristic => {

        console.log("Characteristic discovered:", characteristic.uuid);

        sensorCharacteristicFound = characteristic;

        characteristic.addEventListener('characteristicvaluechanged', handleCharacteristicChange);

        return.characteristic.startNotifications();

    })
was the last part of calling characteristics.
After that you can call
.then(service =>{})
and
.the({myCharacteristics1… =>})
Notifications for each custom characteristics you need.
It the part
function handleCharacteristicChange(event){
I’ve used switch case to differ between myCharacteristics. This is my code for this part:
//Characteristic Change funktion mit Abfrage uuidfunction handleCharacteristicChange(event){
let elem = event.target;
let value = elem.value;
let elemUuid = elem.uuid;
const newValueReceived = new TextDecoder().decode(value);
//console.log("Characteristic value changed: ", newValueReceived, " ", elemUuid);
//if (elemUuid == )
switch (elemUuid){
case sensorCharacteristic:
retrievedValue.innerHTML = newValueReceived;
timestampContainer.innerHTML = getDateTime();
console.log("sensorCharacteristic: ", newValueReceived, " ", elemUuid, " ", sensorCharacteristic);
break;
case sensorCharT1:
retrievedValueT1.innerHTML = newValueReceived;
timestampT1Container.innerHTML = getDateTime();
console.log("sensorCharT1: ", newValueReceived, " ", elemUuid, " ", sensorCharT1);
break;
case sensorCharT2:
retrievedValueT2.innerHTML = newValueReceived;
timestampT2Container.innerHTML = getDateTime();
console.log("sensorCharT2: ", newValueReceived, " ", elemUuid, " ", sensorCharT2);
break;
case sensorCharT3:
retrievedValueT3.innerHTML = newValueReceived;
timestampT3Container.innerHTML = getDateTime();
console.log("sensorCharT3: ", newValueReceived, " ", elemUuid, " ", sensorCharT3);
break;
default:
console.log("Unknown Characteristic: ", newValueReceived, " ", elemUuid);
}
}
The curiosity is, that Chrome for Windows has either a problem with arduino implemented BLE nor with reading value after notification. But Chrome for Android has.
I hope it helps you. For me it was a long process to understand the errors 🙂
best regards,
Michael
Maybe I am tired, where does the file, “index.html ” go in my laptop?
Does it get inserted into my Arduino/esp32 file location on laptop?
Hi.
Create the HTML file on any place on your computer.
It will not be uploaded to your board.
You just need to create the file on your computer and then open that file to see the webpage.
Regards,
Sara
Hello,
After uploading the code without modifying anything i got a problem that the watchdog was triggered these are the logs i have on the serial monitor:
rst:0xc (SW_CPU_RESET),boot:0x13 (SPI_FAST_FLASH_BOOT)
configsip: 0, SPIWP:0xee
clk_drv:0x00,q_drv:0x00,d_drv:0x00,cs0_drv:0x00,hd_drv:0x00,wp_drv:0x00
mode:DIO, clock div:1
load:0x3fff0030,len:1344
load:0x40078000,len:13924
ho 0 tail 12 room 4
load:0x40080400,len:3600
entry 0x400805f0
E (21720) task_wdt: Task watchdog got triggered. The following tasks did not reset the watchdog in time:
E (21720) task_wdt: – IDLE (CPU 0)
E (21720) task_wdt: Tasks currently running:
E (21720) task_wdt: CPU 0: btController
E (21720) task_wdt: CPU 1: IDLE
E (21720) task_wdt: Aborting.
abort() was called at PC 0x400e04e5 on core 0
Hi.
I just tested the project and it is working as expected.
Make sure you’re using a proper USB cable that can provide enough power.
Which ESP32 board are you using? And which ESP32 version do you have installed in your Arduino IDE?(Go to Tools > Board > Boards Manager>ESP32 and check the version you have installed)
Regards,
Sara
Hey
Thank you so much for this tutorial I am getting this error which is super weird because my code was previously working…
Compilation error: ‘class BLECharacteristic’ has no member named ‘getValue’; did you mean ‘setValue’?
The code is identical to the tutorial, so I am not sure where it went wrong. I did update my Arduino IDE could that be why? Also can I set the mtu value to 500? if I do where would I do that. Any help would be amazing I have a project deadline coming up and I am super stressed now because what was previously working is not anymore 🙁
Hi.
Make sure you have an ESP32 board selected before compiling the code.
Also, check the ESP32 boards version you’re using in Tools > Boards > Boards Manager > ESP32.
Regards,
Sara
Yes, I have it is on COM12 (where the board is plugged in) and using board is esp32 Dev Module. I just double checked it and still gives the same error.
What’s the ESP32 boards version you have installed?
Hey Sara, I figured out what the Issue was, I had downloaded an ArduinoBLE library which was interfering with the EspBLE functions when I deleted the library it stopped giving me the errors. Thank you for your help though 🙂
Great.
Thanks for sharing the solution.
Regards,
Sara
Hi,
I have a XIAO seeed esp32s3 board. Unfortunately for me the code doesn’t work on this board.
When i check for a bluetooth device with the nRF connect app it shows the name of the bluetooth device and the corresponding characteristics. However, when i try to connect from web BLE from the javascript webpage provided, the device doesn’t show up.
Any ideas or directions for a solution?
regards,
Malik
Hi.
Did you use the exact code provided?
The device should have the same name and same UUIDS to work with the web app provided.
Regards,
Sara
This code isn’t compiling any more because of:
BREAKING CHANGE! Changed API return and parameter type from std::string to Arduino style String.
I changed this to make it compile again:
//std::string value = pLedCharacteristic->getValue();
String value = pLedCharacteristic->getValue();
Hi.
Can you check your ESP32 boards installation version?
Go to Tools > Boards > Boards Manager, search for ESP32 and check the version. Which version do you have installed?
Regards,
Sara
There is an error in this line from a breaking change
std::string value = pLedCharacteristic->getValue();
it should be
String value = pLedCharacteristic->getValue();
Hi.
Use the following line for ESP32 version 2.
std::string value = pLedCharacteristic->getValue();
And this one for version 3.
String value = pLedCharacteristic->getValue();
We’ll try to update all our examples to version 3 soon.
Regards,
Sara
Hi Sara
I tried this tutorial with platformIO and VS Code and version 3 of the above example and it doesn’t work. (VS code and PlatformIO updated to the last version).
( Error message: conversion from ‘std::__cxx11::string’ {aka ‘std::__cxx11::basic_string’} to non-scalar type ‘String’ requested )
When trying version 2 it works lika a dream…
Best regards
Anders Oleander
Sweden
Hallo Sara,
I have the same problem that Daniel has:
My Website JavaScript works fine on laptop Windows 10 and chrome.
The exact same webside on Android with Chrome works only with exact UUID from tutorial.
Custom defined UUID not found in Device.
If I have the custom UUIDs in arduino code but tutorial UUIDs in javascript, the js founds the tutorial UUIDs (logg of USB debugging). Thats strange.
Then I’ve flashed ESP32 to factory settings (erased flash memory).
After this, js don’t found tutorial UUIDs anymore. But the custom UUIDs doesn’t works anyway. So I’ve set the UUIDs back to tutorial version. And js found them again.
What is the error?
I like to define more characteristics, but Its not possible. Chrome on android don’t found something other from tutorial. Even if I use similar ones.
Chrome on windows works just fine with several different UUIDs.
I hope you can help me.
best regards,
Michael
Hi Sara,
I have a solution 🙂
There is more then one issue.
Number one, to see the correct UUIDs, is the following:
The Arduino IDE has a buildin BLE library. But you can install it also from library bibliothek in version 1.x
After this it works for me 🙂
The second one was not that easy for me. Maybe because my little experience with javascript.
Its all in the HTTP part.
The main error was to call
return characteristic.readValue();
and then the
.then(value => {
part after that.
return.characteristic.startNotifications(); was the key for calling multiple Notifications.
    .then(characteristic => {

        console.log("Characteristic discovered:", characteristic.uuid);

        sensorCharacteristicFound = characteristic;

        characteristic.addEventListener('characteristicvaluechanged', handleCharacteristicChange);

        return.characteristic.startNotifications();

    })
was the last part of calling characteristics.
After that you can call
.then(service =>{})
and
.the({myCharacteristics1… =>})
Notifications for each custom characteristics you need.
It the part
function handleCharacteristicChange(event){
I’ve used switch case to differ between myCharacteristics. This is my code for this part:
//Characteristic Change funktion mit Abfrage uuidfunction handleCharacteristicChange(event){
let elem = event.target;
let value = elem.value;
let elemUuid = elem.uuid;
const newValueReceived = new TextDecoder().decode(value);
//console.log("Characteristic value changed: ", newValueReceived, " ", elemUuid);
//if (elemUuid == )
switch (elemUuid){
case sensorCharacteristic:
retrievedValue.innerHTML = newValueReceived;
timestampContainer.innerHTML = getDateTime();
console.log("sensorCharacteristic: ", newValueReceived, " ", elemUuid, " ", sensorCharacteristic);
break;
case sensorCharT1:
retrievedValueT1.innerHTML = newValueReceived;
timestampT1Container.innerHTML = getDateTime();
console.log("sensorCharT1: ", newValueReceived, " ", elemUuid, " ", sensorCharT1);
break;
case sensorCharT2:
retrievedValueT2.innerHTML = newValueReceived;
timestampT2Container.innerHTML = getDateTime();
console.log("sensorCharT2: ", newValueReceived, " ", elemUuid, " ", sensorCharT2);
break;
case sensorCharT3:
retrievedValueT3.innerHTML = newValueReceived;
timestampT3Container.innerHTML = getDateTime();
console.log("sensorCharT3: ", newValueReceived, " ", elemUuid, " ", sensorCharT3);
break;
default:
console.log("Unknown Characteristic: ", newValueReceived, " ", elemUuid);
}
}
The curiosity is, that Chrome for Windows has either a problem with arduino implemented BLE nor with reading value after notification. But Chrome for Android has.
I hope it helps the other user. For me it was a long process to understand the errors 🙂
best regards,
Michael
Hello! Excelent tutorial. I have a question, how do you do to send a string/json from the web app to the board. Ican doit it from the esp32 to the web app but not in the other way, it only accepts int. Thanks!!
Good morning, excellent tutorial, my question is:
In the html file, in the function writeOnCharacteristic(value) can a string be sent instead of a number?
How would the change be in the function writeOnCharacteristic(value)?
Thank you very much
Fixed.
Add function: buffer_str
function buffer_str(tex) {
var ArrBuf = new ArrayBuffer(tex.length);
var VerBuffer = new Uint8Array(ArrBuf);
for (var i=0, texLen=tex.length; i<texLen; i++) {
VerBuffer[i] = tex.charCodeAt(i);
}
return ArrBuf;
}
Change function writeOnCharacteristic: return characteristic.writeValue(buffer_str(value+”\n”))
function writeOnCharacteristic(value){
if (bleServer && bleServer.connected) {
bleServiceFound.getCharacteristic(ledCharacteristic)
.then(characteristic => {
console.log(“Found the LED characteristic: “, characteristic.uuid);
return characteristic.writeValue(buffer_str(value+”\n”))
})
.then(() => {
latestValueSent.innerHTML = value;
console.log(“Value written to LEDcharacteristic:”, value);
})
.catch(error => {
console.error(“Error writing to the LED characteristic: “, error);
});
} else {
console.error (“Bluetooth is not connected. Cannot write to characteristic.”)
window.alert(“Bluetooth is not connected. Cannot write to characteristic. \n Connect to BLE first!”)
}
}
I am getting this error when I try to compile the esp32s3 code:
/private/var/folders/8h/by6_jkqs2yx2fw89mdxrkcvh0000gn/T/.arduinoIDE-unsaved2024924-70222-1oax92m.allt/sketch_oct24b/sketch_oct24b.ino: In member function ‘virtual void MyCharacteristicCallbacks::onWrite(BLECharacteristic*)’:
/private/var/folders/8h/by6_jkqs2yx2fw89mdxrkcvh0000gn/T/.arduinoIDE-unsaved2024924-70222-1oax92m.allt/sketch_oct24b/sketch_oct24b.ino:39:46: error: conversion from ‘std::__cxx11::string’ {aka ‘std::__cxx11::basic_string’} to non-scalar type ‘String’ requested
String value = pLedCharacteristic->getValue();
~~~~~~~~~~~~~~~~~~~~~~~~~~~~^~
exit status 1
Compilation error: conversion from ‘std::__cxx11::string’ {aka ‘std::__cxx11::basic_string’} to non-scalar type ‘String’ requested
Any clues about it?
Thanks a lot for the tutorial. and the code.
I believe the led value is binary value not a string so you can’t do String value = … it’s not a string, hope that helps!
String value = pLedCharacteristic->getValue();
change to
std::string value = pLedCharacteristic->getValue();
Bonjour comment lire plusieurs valeurs de l’ESP32 sur la page html, par exemple les valeur d’un capteur de température DHT11
Good morning
I’m starting, how to read several values from the ESP32 on the html page, for example the values of a DHT11 temperature sensor
thanks in advance
Hello, Thank you for your response on the subject that you sent me in link, “https://randomnerdtutorials.com/esp32-web-bluetooth/”
I tested it, it’s great, but I would like to add the reading of a potentiometer and a voltage, which is displayed on my PC, despite all my attempts I am stuck on this subject, bluetooth is simpler for me, but I don’t see how to send the data to an HTML page,
Thank you, your site is great
André
Hello, very cool tutorial, but:
I simply can’t understand it. There are many tutorials on ESP32 and BLE, but none of them really cover security.
For devices that are reachable via the air, this is the first thing I think about!
It would be really nice if you could expand on the example and at least add the possibility of a static PIN.
Thank you!
Thank you for the excellent sample! There’s a typo in the example for the event:
device.addEventListener(‘gattservicedisconnected’, onDisconnected);
It should actually read:
device.addEventListener(‘gattserverdisconnected’, onDisconnected);
Hi.
Thanks for your comment.
Why should it be gattserverdisconnected instead of gattservicedisconnected?
Regards,
Sara
Howdy Sara!
The Web Bluetooth doc in section 6.6.2. Event types https://webbluetoothcg.github.io/web-bluetooth/#event-types only lists gattserverdisconnected as a valid event. The gattservicedisconnected doesn’t fire in my testing and does not trigger the connectToDevice(); because that event doesn’t exist. There’s more documentation for reconnecting with an expanding timeout: https://googlechrome.github.io/samples/web-bluetooth/automatic-reconnect-async-await.html That also confirms the correct gattserverdisconnected event.
Hi again.
Thank you so much for the clarification and taking your time to explain this to me.
I’ll update the tutorial.
Regards,
Sara