In our ESP32 projects and tutorials, we recommend using the Arduino IDE to program the ESP32 development board. However, in some Windows computers it’s a bit tricky to install the ESP32 add-on using Git GUI due to permission errors, Arduino IDE version, or multiple Arduino IDE installations.

There’s also another popular method to program ESP32 development boards using the Atom text editor combined with PlatformIO IDE. With this method you can still use the same programming language you use on Arduino IDE.
This next tutorial was tested on a Windows 10 PC and on a Mac OS X computer.
1. Installing Atom Text Editor
The first step is to go to Atom.io website and download the free text editor.

After that, open the downloaded installation file and run it. The installation is pretty straightforward. Complete the on-screen instructions to finish the Atom installation.
2a. Installing Python 2.7.X on a Windows PC
In order to use PlatformIO IDE and program your ESP32 boards, you must have Python 2.7.X installed on your computer. Go to the Python downloads page and download the latest version of Python 2.7.X for your OS (Operating System).

Note: for this Unit, we’ve used Python 2.7.15. Any other Python 2.7.X version should also work.
Open the downloaded file to start the Python installation wizard. During step 2, follow these next instructions:
- Scroll down through the “Customize Python 2.7.15” window;
- Open the “Add python.exe to Path“;
- And select the option “Will be installed on local hard drive“.

After that, press “Next” button to complete the installation. After installing Python 2.7.X, you need to open the “Command Prompt“:

Run the next sequence of commands to check the Python and pip version installed:
python --version
Python 2.7.15
pip --version
pip 9.0.3
Both commands should return a similar output (the version might be slighter different in your case). After that, check if you have virtualenv installed:
virtualenv --version
If it’s already installed, you can go to the next section. Otherwise, you need to install it with this command:
pip install virtualenv
After that, run this command again to check if virtualenv was installed properly:
virtualenv --version
16.0.0

2b. Installing Python 2.7.X on Mac OS X
In order to use PlatformIO IDE and program your ESP32 boards, you must have Python 2.7.X installed in your computer. Run the next sequence of commands to install Python 2.7.X. Then, check if Python, pip, and virtualenv are installed:
$ brew install python2

$ python --version
Python 2.7.15

$ pip --version
pip 9.0.3

$ virtualenv --version

$ pip install virtualenv

3. Installing Clang for Code Completion
PlatformIO IDE uses Clang for the Intelligent Code Completion. To check if Clang is available in your system, open Terminal/Command Prompt and run:
clang --version
If clang is not installed, then install it by following the instructions for your Operating System:
- Windows: download Clang 3.9.1 for Windows. Select “Add LLVM to the system PATH” option during the installation step shown in the image below.

Warning: DO NOT INSTALL CLANG 4.0, ONLY CLANG 3.9 IS SUPPORTED AT THE MOMENT.
- Mac OS X: install the latest Xcode along with the latest Command Line Tools. They are installed automatically when you run clang in Terminal for the first time, or manually by running:
xcode-select --install
- Linux: using package managers: apt-get install clang or yum install clang.
- Other systems: download the latest Clang for the other systems.
4. Installing PlatformIO IDE on Atom
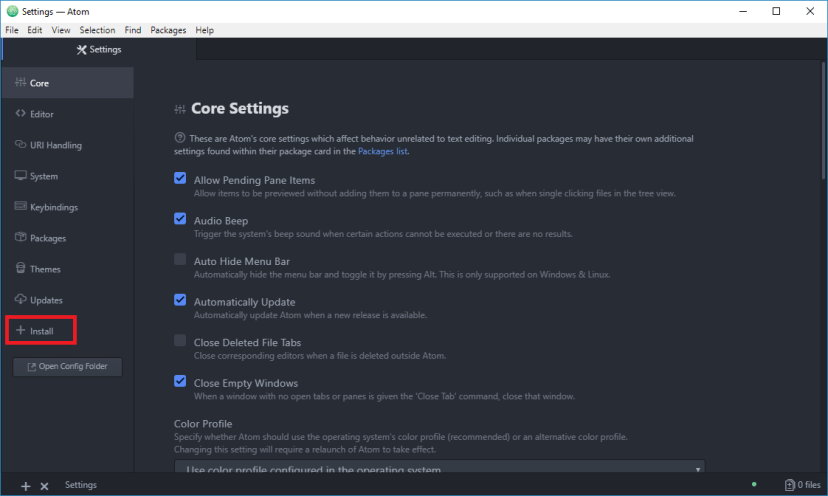
After installing all the PlatformIO IDE dependencies, open Atom text editor and go to File > Settings:

On the left menu, open the “Install” tab:
Search for “platformio” and press the Enter/Return key:

Install the “platformio-ide” option highlighted in the preceding image. After the installation is completed, restart the Atom text editor for the changes to take effect.
5. PlatformIO IDE Overview
Now, when you open Atom text editor a new window should load with the “Welcome to PlatformIO” screen:

Press the “New Project” button in the quick access menu:

A new window loads that allows you to create a new project for your board, follow these next steps:
- Name your project (example: Blink);
- Search for “ESP32” and select your ESP32 board (example: DOIT ESP32 DEVKIT V1);
- Select Arduino framework;
- Press the “Finish” button.

After the new project is created, you’ll see the project folder on the left menu that you can use to navigate through files and folders.

Open the src folder and double-click the main.cpp file to open it. A new window opens in Atom with that file, so you can edit it:

The main.cpp file is like your Blink.ino file used in the Arduino IDE. You can write your Arduino code, but you need to start with the file by including the Arduino framework. So, basically all the Arduino sketches work with PlatformIO IDE, if you start the sketch with this line following line:
#include <Arduino.h>
6. Testing PlataformIO IDE
Let’s try an example to test PlataformIO IDE. We’ll blink an LED connected to GPIO23. Here’s the list of parts you need to follow this example:
- ESP32 development board – read ESP32 Development Boards Review and Comparison
- 5mm LED
- 330 Ohm resistor
- Breadboard
- Jumper wires
You can use the preceding links or go directly to MakerAdvisor.com/tools to find all the parts for your projects at the best price!

Follow the next schematic to assemble your circuit.

Here’s a sketch for testing purposes that blinks the LED:
#include <Arduino.h>

// ledPin refers to ESP32 GPIO 23
const int ledPin = 23;

// the setup function runs once when you press reset or power the board
void setup() {
    // initialize digital pin ledPin as an output.
    pinMode(ledPin, OUTPUT);
}

// the loop function runs over and over again forever
void loop() {
    digitalWrite(ledPin, HIGH);   // turn the LED on (HIGH is the voltage level)
    delay(1000);                  // wait for a second
    digitalWrite(ledPin, LOW);    // turn the LED off by making the voltage LOW
    delay(1000);                  // wait for a second
}
Copy the code to the Atom text editor and follow these next steps to upload code to your ESP32 board:
- Connect your ESP32 board to your computer;
- Save thew newly created sketch (File > Save);
- Press the “Upload” button (highlighted in the next image).

Wait a few seconds while the sketch uploads to your board:

After uploading the sketch, your ESP32 should be blinking the LED attached to GPIO 23 every 1 second.
That’s it! The PlatformIO was successfully installed and you can use it to program your ESP32 board.
7. PlatformIO IDE Additional Tips
We’ve just scratched the surface on what PlatformIO IDE can do. Here’s what each button in the PlatformIO IDE does/means:

- PlatformIO Home
- PlatformIO Build
- PlatformIO Upload
- Upload to remote device
- PlatformIO Clean
- PlatformIO Test
- PlatformIO Debug
- Run other target
- Toggle Build Panel
- Find in Project
- Terminal
- Serial Monitor (it’s like the Arduino IDE Serial Monitor)
- Atom Settings
We’ve modified the Blink code used previously to include some Serial.println() commands to demonstrate how the Serial Monitor looks like. You can open the Serial Monitor by clicking that icon:

The PlatformIO software should automatically complete your settings. Otherwise, select your ESP32 COM port and its baudrate. Then, press the “Start” button:

Just like the Arduino IDE Serial Monitor, you have a window that outputs all the Serial.println() commands used in your code:

As you can see, it’s printing the messages: “LED on” and “LED off”.
Wrapping Up
We recommend using the following links as a resource to explore the additional functionalities and features that PlaformIO offers:
- PlatformIO IDE official website
- PlatformIO IDE user guide
- PlatformIO IDE documentation
- PlatformIO IDE Espressif 32 (ESP32) boards
We have other tutorials with ESP32 that you might like:
- ESP32 Web Server – Arduino IDE
- Build an All-in-One ESP32 Weather Station
- Alexa (Echo) with ESP32 – Voice Controlled Relay
We hope you’ve found this tutorial useful. If you like ESP32 and you want to learn more, we recommend enrolling in Learn ESP32 with Arduino IDE course.
Thanks for reading.


Nice write up Thank You!!
of course an even easier way is to use the Arduino Web Editor
https://create.arduino.cc/
Ralph
woops disregard, I don’t “think” the Arduino web editor supports the ESP32!! sorry
Ralph
This is very helpful. Managed to download Blink sketch and it works fine.
The serial monitor is not reporting sensible output and I cant find the option to control the baud rate. Any suggestions?
Brian
vraiment merci cet article m’a beaucoup aidé